
Planetary Roller Screw Assemblies (PRSAs) represent a critical class of power transmission components, converting rotary motion into precise linear actuation. Their superiority over traditional ball screws in applications demanding high thrust, stiffness, reliability, and dynamic response—such as aerospace, defense, and advanced industrial machinery—is well-established. At the heart of this performance lies the roller, a complex load-bearing element whose design dictates the assembly’s functionality and longevity. This article presents a detailed, first-person perspective on a systematic methodology for designing the roller’s integrated features and for executing its virtual modeling and assembly, which forms the foundation for subsequent analysis and manufacturing.
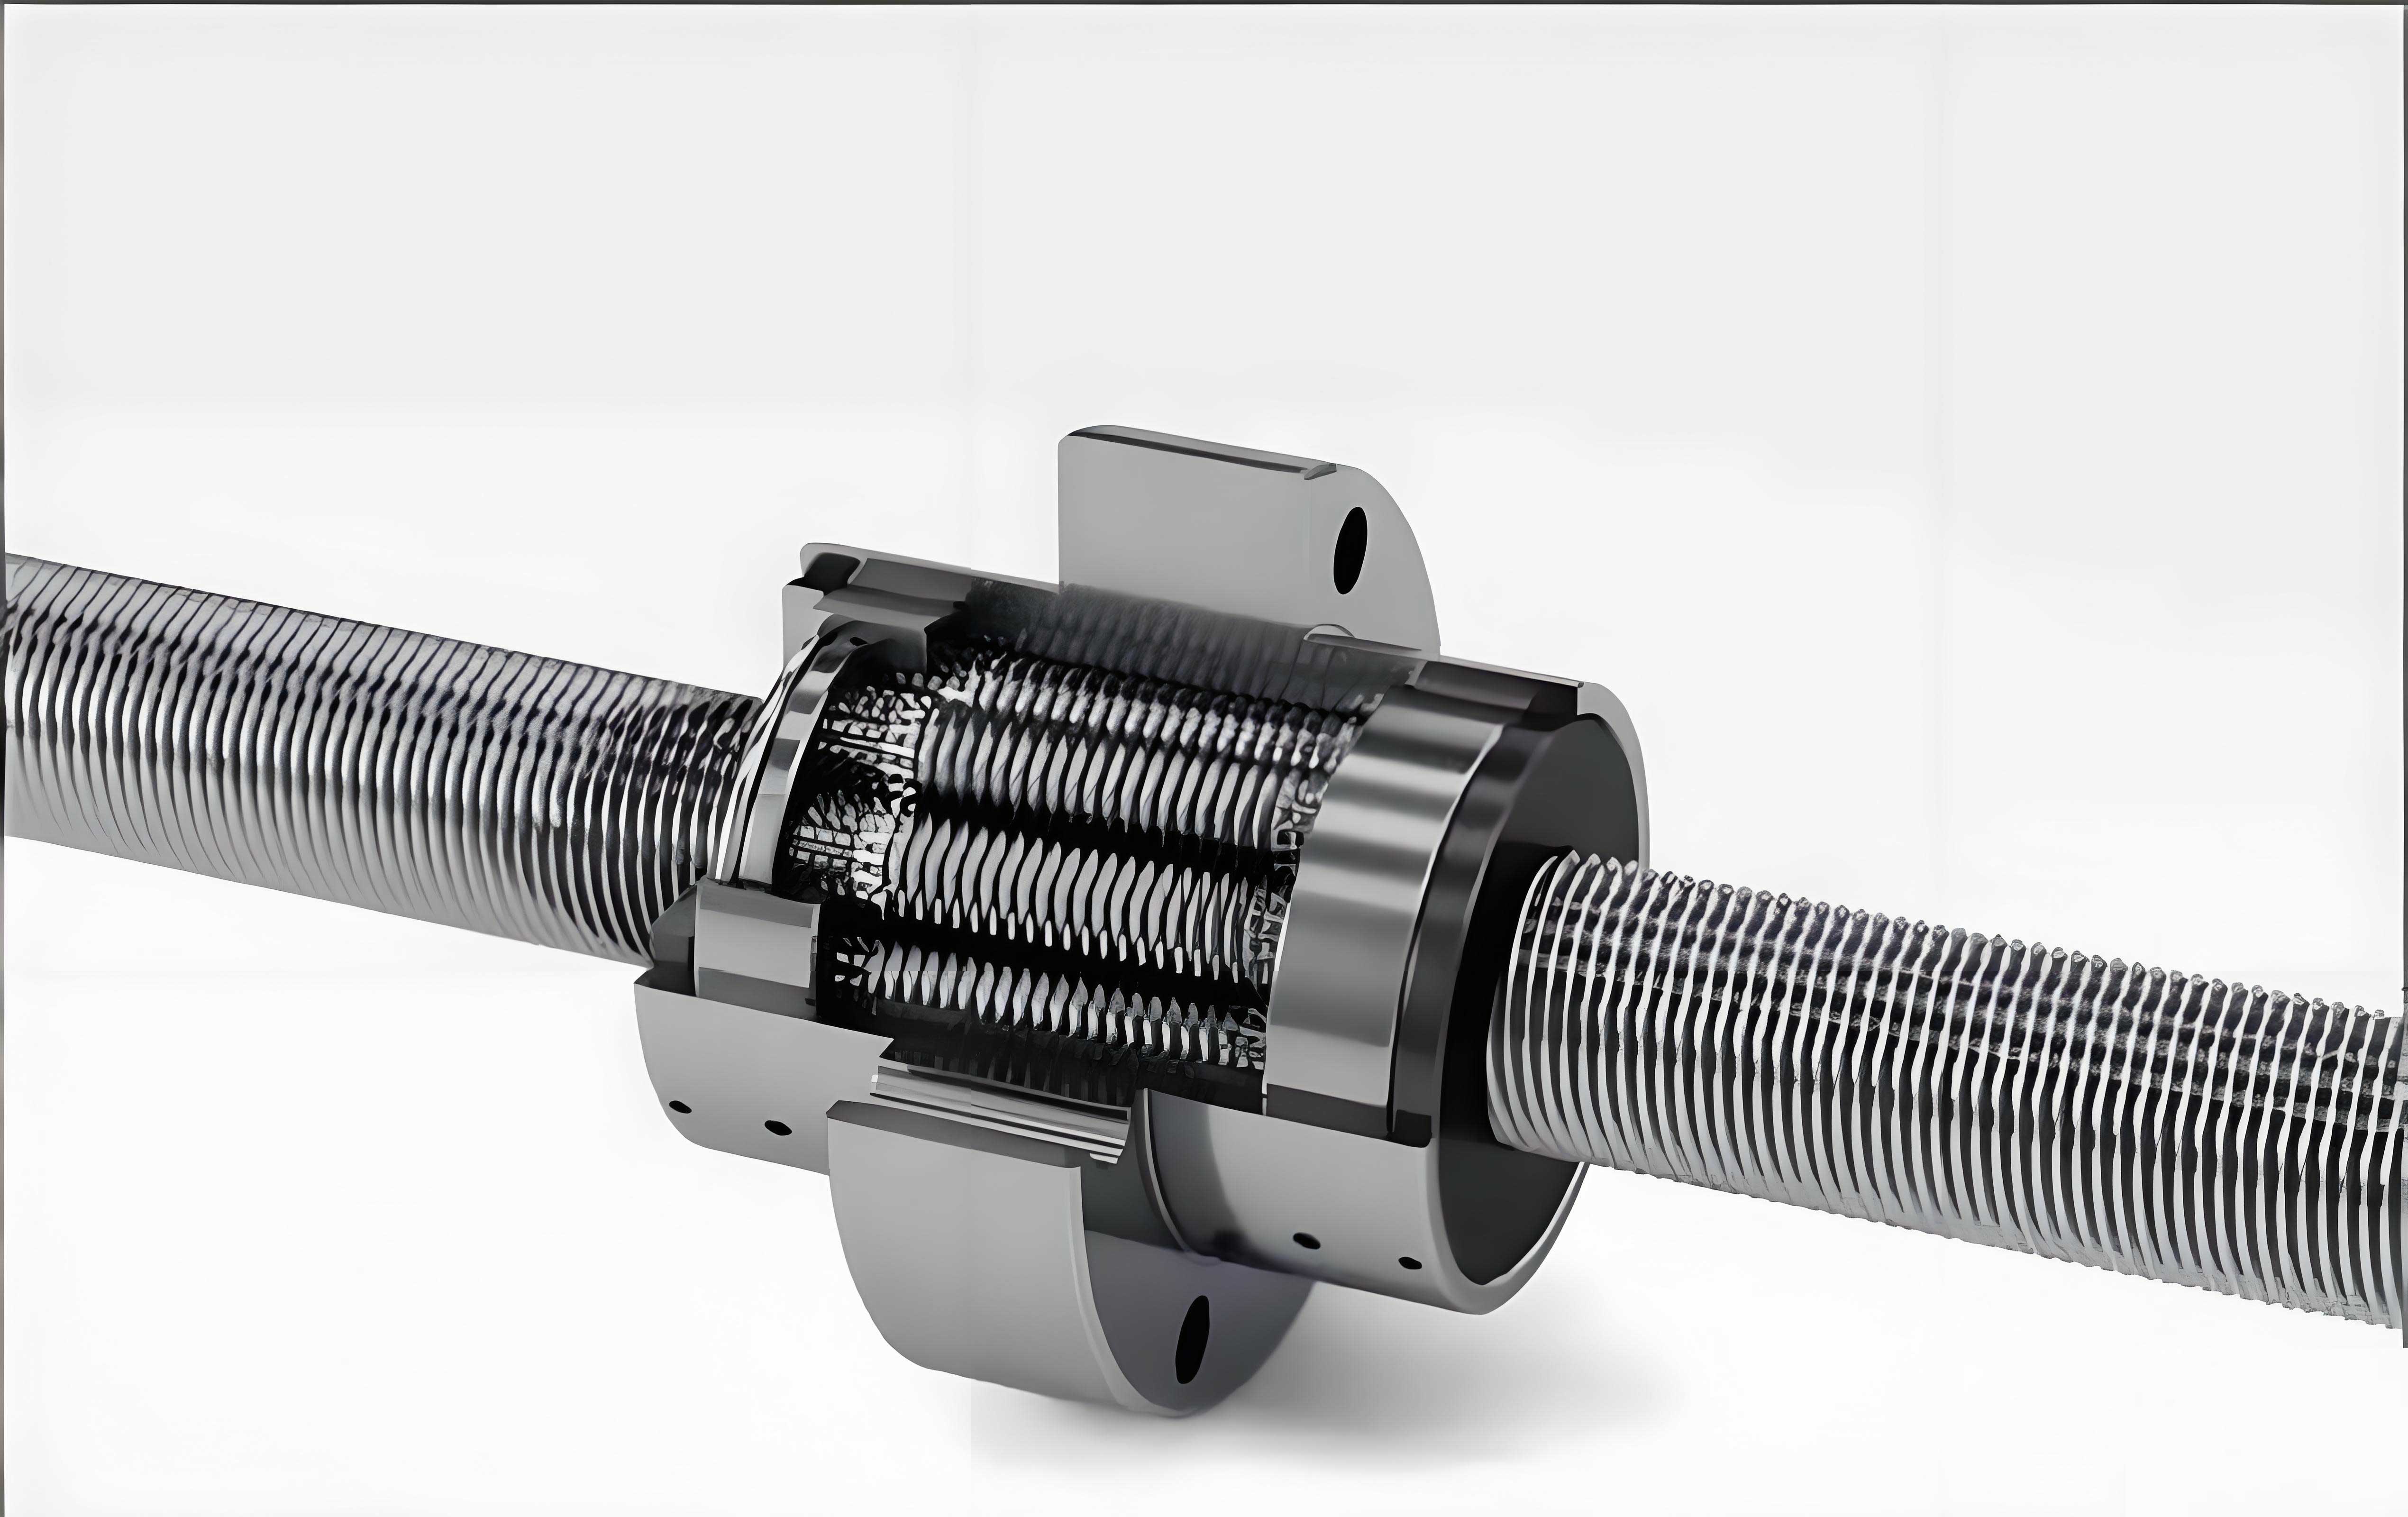
The fundamental structure of a planetary roller screw assembly comprises several key components: a central threaded screw, multiple threaded rollers arranged planetarily around it, an internally threaded nut, an internal gear ring (or ring gear) typically housed within the nut, and a retainer or planet carrier. The kinematic principle involves the screw’s rotation driving the rollers. These rollers not only spin on their own axes but also revolve around the screw’s axis (planetary motion), meshing simultaneously with the screw threads, the nut threads, and the gear teeth at their ends. This synchronized motion translates the rotary input into linear output at the nut. The design challenge of the roller stems from its dual-function nature: it must feature a precision thread form for load transmission and a gear profile at its ends for kinematic synchronization. Failure to properly match these two feature sets leads to binding, incorrect motion, premature wear, or catastrophic failure of the entire planetary roller screw assembly.
Systematic Roller Design Methodology
The proposed design flow for the roller in a planetary roller screw assembly is sequential and iterative, ensuring geometric compatibility between the thread and the gear. It is broken down into three primary stages, as outlined in the flowchart below and detailed in the subsequent sections.
Stage 1: Matching Design Based on Pitch Diameter and Thread Starts
The initial step establishes the core kinematic and geometric relationship between the screw and the rollers. Starting from performance specifications (load, speed, stroke), the screw’s primary parameters are determined: its pitch diameter $d_s$, the number of thread starts $n_s$, and the lead $L$ (where lead $L = n_s \cdot p$, and $p$ is the pitch). The fundamental design equations governing a standard planetary roller screw assembly are:
$$ \frac{d_s}{d_r} = k $$
$$ n_s = k + 2 $$
$$ Z_n = (k + 2) Z_r = n_s Z_r $$
Here, $d_r$ is the roller pitch diameter, $k$ is a design constant (often an integer), $Z_n$ is the number of teeth on the internal ring gear, and $Z_r$ is the number of teeth on the roller’s end gear. The first equation links the screw and roller sizes. The second equation determines the number of screw thread starts based on the chosen $k$. The third equation ensures the proper gear ratio for synchronous planetary motion. From the first two equations, the roller’s pitch diameter is derived as $d_r = d_s / k$.
Stage 2: Design of the End Gear Pair
This stage focuses on designing the spur gear at each end of the roller. For correct kinematic constraint and to prevent axial migration, the roller’s gear must mesh perfectly with the internal ring gear. A critical constraint is that the pitch circle diameter of this end gear must equal the previously determined thread pitch diameter of the roller:
$$ d_r = m Z_r $$
where $m$ is the gear module. Selecting the pair $(Z_r, m)$ is constrained by this equation and by gear design rules to avoid interference and undercutting. The process involves checking the initially chosen number of roller teeth $Z_r$ against the minimum number of teeth $Z_{min}$ to avoid undercutting for a standard gear:
$$ Z_{min} = \frac{2 h_a^*}{\sin^2 \alpha} $$
where $h_a^*$ is the addendum coefficient (usually 1 for full-depth teeth) and $\alpha$ is the pressure angle (typically 20°). The design logic is as follows:
- If $Z_r > Z_{min}$, the selection is valid without undercutting. Proceed to calculate the gear addendum diameter $d_a$, dedendum diameter $d_f$, and center distance $a$.
- If $Z_r < Z_{min}$, undercutting will occur. Two corrective paths are available:
- Re-select the pair $(Z_r, m)$ and re-evaluate.
- Apply profile shifting (positive correction). The minimum shift coefficient $x_{min}$ to avoid undercutting is: $x_{min} = h_a^* \frac{Z_{min} – Z_r}{Z_{min}}$. A shifted gear design is then performed.
Following this process finalizes the gear parameters: $Z_r$, $m$, $Z_n$, $h_a^*$, clearance coefficient $c^*$, $\alpha$, and shift coefficient $x$ (if any). The corresponding gear diameters ($d_a$, $d_f$) are then calculated.
Stage 3: Design of the Roller Thread Profile
The final stage integrates the thread design with the gear design. To ensure full engagement and prevent the gear teeth from interfering with the nut threads, two key conditions are imposed:
- The major diameter of the roller thread $d_{r,maj}$ should be equal to the addendum diameter of its end gear $d_{a,gear}$: $d_{r,maj} = d_{a,gear}$.
- The thread height $h_t$ should be greater than or equal to the total gear tooth height $h_{gear}$ to prevent axial snagging.
To optimize contact stress and fatigue life, the thread flanks of the roller are typically designed with a circular arc profile, creating point contact with the screw and nut threads (which usually have a trapezoidal profile). A common design uses a 90° included angle for the nut and screw. The radius $R$ of the circular arc on the roller thread flank is often chosen relative to its pitch diameter. One recommended relation is:
$$ R = \frac{d_r}{2 \sin 45^\circ} $$
With the major/minor diameters determined by the gear, the pitch diameter from Stage 1, and the flank radius defined, the complete thread profile for the roller is fully defined. The thread start for the roller in a standard PRS design is always 1.
| Design Stage | Key Parameter | Governing Equation / Relation | Purpose/Constraint |
|---|---|---|---|
| 1. Kinematic Matching | Screw-Roller Diameter Ratio | $d_s / d_r = k$ | Sets relative size and load distribution. |
| Screw Thread Starts | $n_s = k + 2$ | Determines lead and kinematic condition. | |
| Gear Teeth Relation | $Z_n = n_s Z_r$ | Ensures synchronous planetary motion. | |
| 2. End Gear Design | Roller Pitch Diameter | $d_r = m Z_r$ | Links thread and gear geometry. |
| Undercutting Check | $Z_{min} = 2h_a^* / \sin^2 \alpha$ | Ensures manufacturable, strong gear teeth. | |
| Profile Shift (if needed) | $x_{min} = h_a^* (Z_{min}-Z_r)/Z_{min}$ | Corrects for undercutting when $Z_r$ is small. | |
| Key Outputs | $d_{a,gear}, d_{f,gear}$ | Defines gear outer dimensions. | |
| 3. Thread Integration | Thread Major Diameter | $d_{r,maj} = d_{a,gear}$ | Prevents interference, ensures full engagement. |
| Thread Height | $h_t \geq h_{gear}$ | Prevents axial snagging of gear teeth. | |
| Flank Radius | $R = d_r / (2 \sin 45^\circ)$ | Optimizes contact stress (point contact). |
Virtual Modeling and Assembly Strategy for Planetary Roller Screw Assemblies
With the roller’s parameters fully defined, the next phase is creating a digital twin through virtual modeling and assembly. This process validates the design, checks for interferences, and simulates kinematics before physical prototyping. Using a parametric CAD platform (e.g., SolidWorks, CATIA), the strategy involves meticulous part creation followed by a constrained assembly that respects the planetary roller screw assembly’s motion principles.
Parametric Part Modeling with Integrated Features
Modeling the roller is the most complex task due to its integrated helix and gear. The process begins by creating the roller blank with the end gears. The gear’s pitch diameter must precisely match the calculated $d_r$. The thread is then created using a cut-sweep feature. The sweep path is a helix defined by the roller’s pitch diameter, the lead ($L_{roller} = 1 \cdot p$, as roller has one start), and length. The critical element is the sweep profile—a 2D sketch on a plane normal to the helix start point.
For the screw and nut, which have multi-start threads ($n_s$ starts), a single-start thread is modeled first and then patterned circularly $n_s$ times. Their thread profiles are typically trapezoidal. To prevent interference during assembly and ensure proper clearance, the root width of the screw, nut, and roller threads should be kept consistent. The flank angles of the screw and nut are set (e.g., 90° included angle), while the roller’s profile uses the circular arc defined earlier. The modeling principle for ensuring later correct assembly is to carefully control the starting phase of the helix relative to the gear’s tooth space.
Let’s define a reference plane on the nut’s internal ring gear that passes through the center of a tooth space (tooth space center plane). Similarly, a reference plane on the roller passes through the center of one of its gear teeth (tooth center plane). During modeling, the helical path for the thread cut on both the nut and the roller should be defined such that its start point lies precisely on these respective reference planes. This alignment is crucial for synchronizing the gear mesh with the thread mesh during assembly.
Systematic Virtual Assembly Procedure
Assembling a planetary roller screw assembly virtually requires replicating its planetary motion constraints. The assembly of rollers into the nut is the most critical step and can be decomposed into their revolution (around the screw) and rotation (about their own axis).
Assume a planetary roller screw assembly with $N$ rollers evenly spaced. The angular position for the $i$-th roller due to revolution is:
$$ \theta_{rev,i} = (i-1) \cdot \phi_c \quad \text{where} \quad \phi_c = \frac{360^\circ}{N}, \quad i = 1, 2, …, N $$
However, simply placing the rollers at these angular positions only aligns their gears with the nut’s ring gear. To also align the threads, each roller must be rotated about its own axis by a specific angle $\beta_i$. This rotation is derived from the kinematic condition that for each revolution of the roller around the screw ($\theta_{rev}$), it must undergo $n_s$ rotations about its own axis relative to the nut. Therefore, the required assembly rotation is:
$$ \beta_i = n_s \cdot \theta_{rev,i} = n_s \cdot (i-1) \cdot \phi_c $$
This angle should be taken modulo $360^\circ$. A significant simplification occurs when the number of rollers equals the number of screw starts ($N = n_s$). In this common configuration, $\beta_i$ becomes $(i-1) \cdot 360^\circ$, which modulo $360^\circ$ is $0^\circ$ for all rollers. This means all rollers have the same rotational orientation relative to their own axis when placed at their revolved positions, allowing them to be assembled using a simple circular pattern after the first one is correctly mated.
The step-by-step assembly process is:
- Mate the First Roller: Insert the first roller ($i=1$) into the nut. Apply mates to: a) align its axis parallel to the nut’s axis at the required center distance, b) make its end face flush with the nut’s gear face, and c) crucially, mate its tooth center plane to coincide with the nut’s tooth space center plane. This ensures both gear and thread of the first roller are in correct mesh with the nut.
- Position Subsequent Rollers (Revolution): Introduce the remaining $N-1$ rollers. Position them by applying revolute mates that place their axes at the correct center distance from the nut’s axis, with angular offsets $\theta_{rev,i}$.
- Orient Threads (Rotation): For each roller $i$, apply an angular mate between its tooth center plane and the corresponding reference in the nut, setting the angle to $\beta_i \mod 360^\circ$. When $N = n_s$, this angle is $0^\circ$ for all, meaning all tooth center planes align with the nut’s tooth space centers after the revolute positioning in step 2.
- Complete the Assembly: Install the planet carrier/retainer at both ends to constrain the rollers axially. Finally, insert the central screw. Since the screw threads mesh only with the roller threads, and the rollers are already correctly oriented, mating the screw’s axis and ensuring its first thread start aligns with the thread of the first roller typically ensures correct engagement with all rollers.
This virtual assembly process rigorously validates the design of the planetary roller screw assembly. Any interference, typically occurring at the thread roots or crests, can be detected and corrected by iteratively adjusting the thread profile dimensions (like crest width or root radius) in the part models before any physical manufacturing begins.
Conclusion
The design and successful integration of the roller component are paramount to the performance of a planetary roller screw assembly. This article has detailed a structured, three-stage methodology for roller design, which systematically reconciles the interdependent parameters of the thread and the end gear. The process begins with kinematic matching based on pitch diameters, proceeds through a rigorous gear design stage with undercutting checks, and culminates in the integration of a specially profiled thread form. Furthermore, a robust strategy for the virtual modeling and constrained assembly of the planetary roller screw assembly has been presented. This strategy emphasizes the precise phasing between helical thread starts and gear tooth geometry during modeling, and it employs a two-step (revolution + rotation) mating logic during assembly to accurately simulate the component’s planetary kinematics. The integrated application of this design and virtual prototyping methodology significantly de-risks the development process, ensures geometric compatibility, and provides a solid digital foundation for subsequent finite element analysis, dynamic simulation, and manufacturing of high-performance planetary roller screw assemblies.