
In the realm of mechanical engineering, the fabrication of large miter gears—specifically straight bevel gears with intersecting axes at 90 degrees—presents significant challenges, especially when standard机床 equipment is unavailable. Throughout my career, I have encountered numerous instances where custom solutions were necessary to produce这些 high-precision components. Miter gears are critical in power transmission systems, and their accurate manufacture is paramount for optimal performance. This article delves into a detailed account of how I, drawing from practical experience, successfully machined a large-diameter miter gear by creatively combining existing workshop equipment and designing minimal专用 tooling. The focus is on replicating the essence of such projects while emphasizing the technical intricacies involved in machining miter gears under constrained conditions.
The core challenge lay in machining a single, large-diameter miter gear where conventional gear-cutting machines were absent. Miter gears of substantial size—often exceeding specific dimensions—require meticulous setup to ensure proper tooth geometry and surface finish. The process I adopted involved an improvised setup comprising a universal tool铣床, a mechanical slide table, and a precision indexing head. This combination allowed for the模拟 of dedicated gear-generating movements. The fundamental principle revolved around using a form-cutting method, where the cutter profile matches the tooth space of the miter gear, and the workpiece is indexed after each cut. Throughout this endeavor, the term “miter gears” was constantly at the forefront, guiding every decision from tool selection to alignment checks.
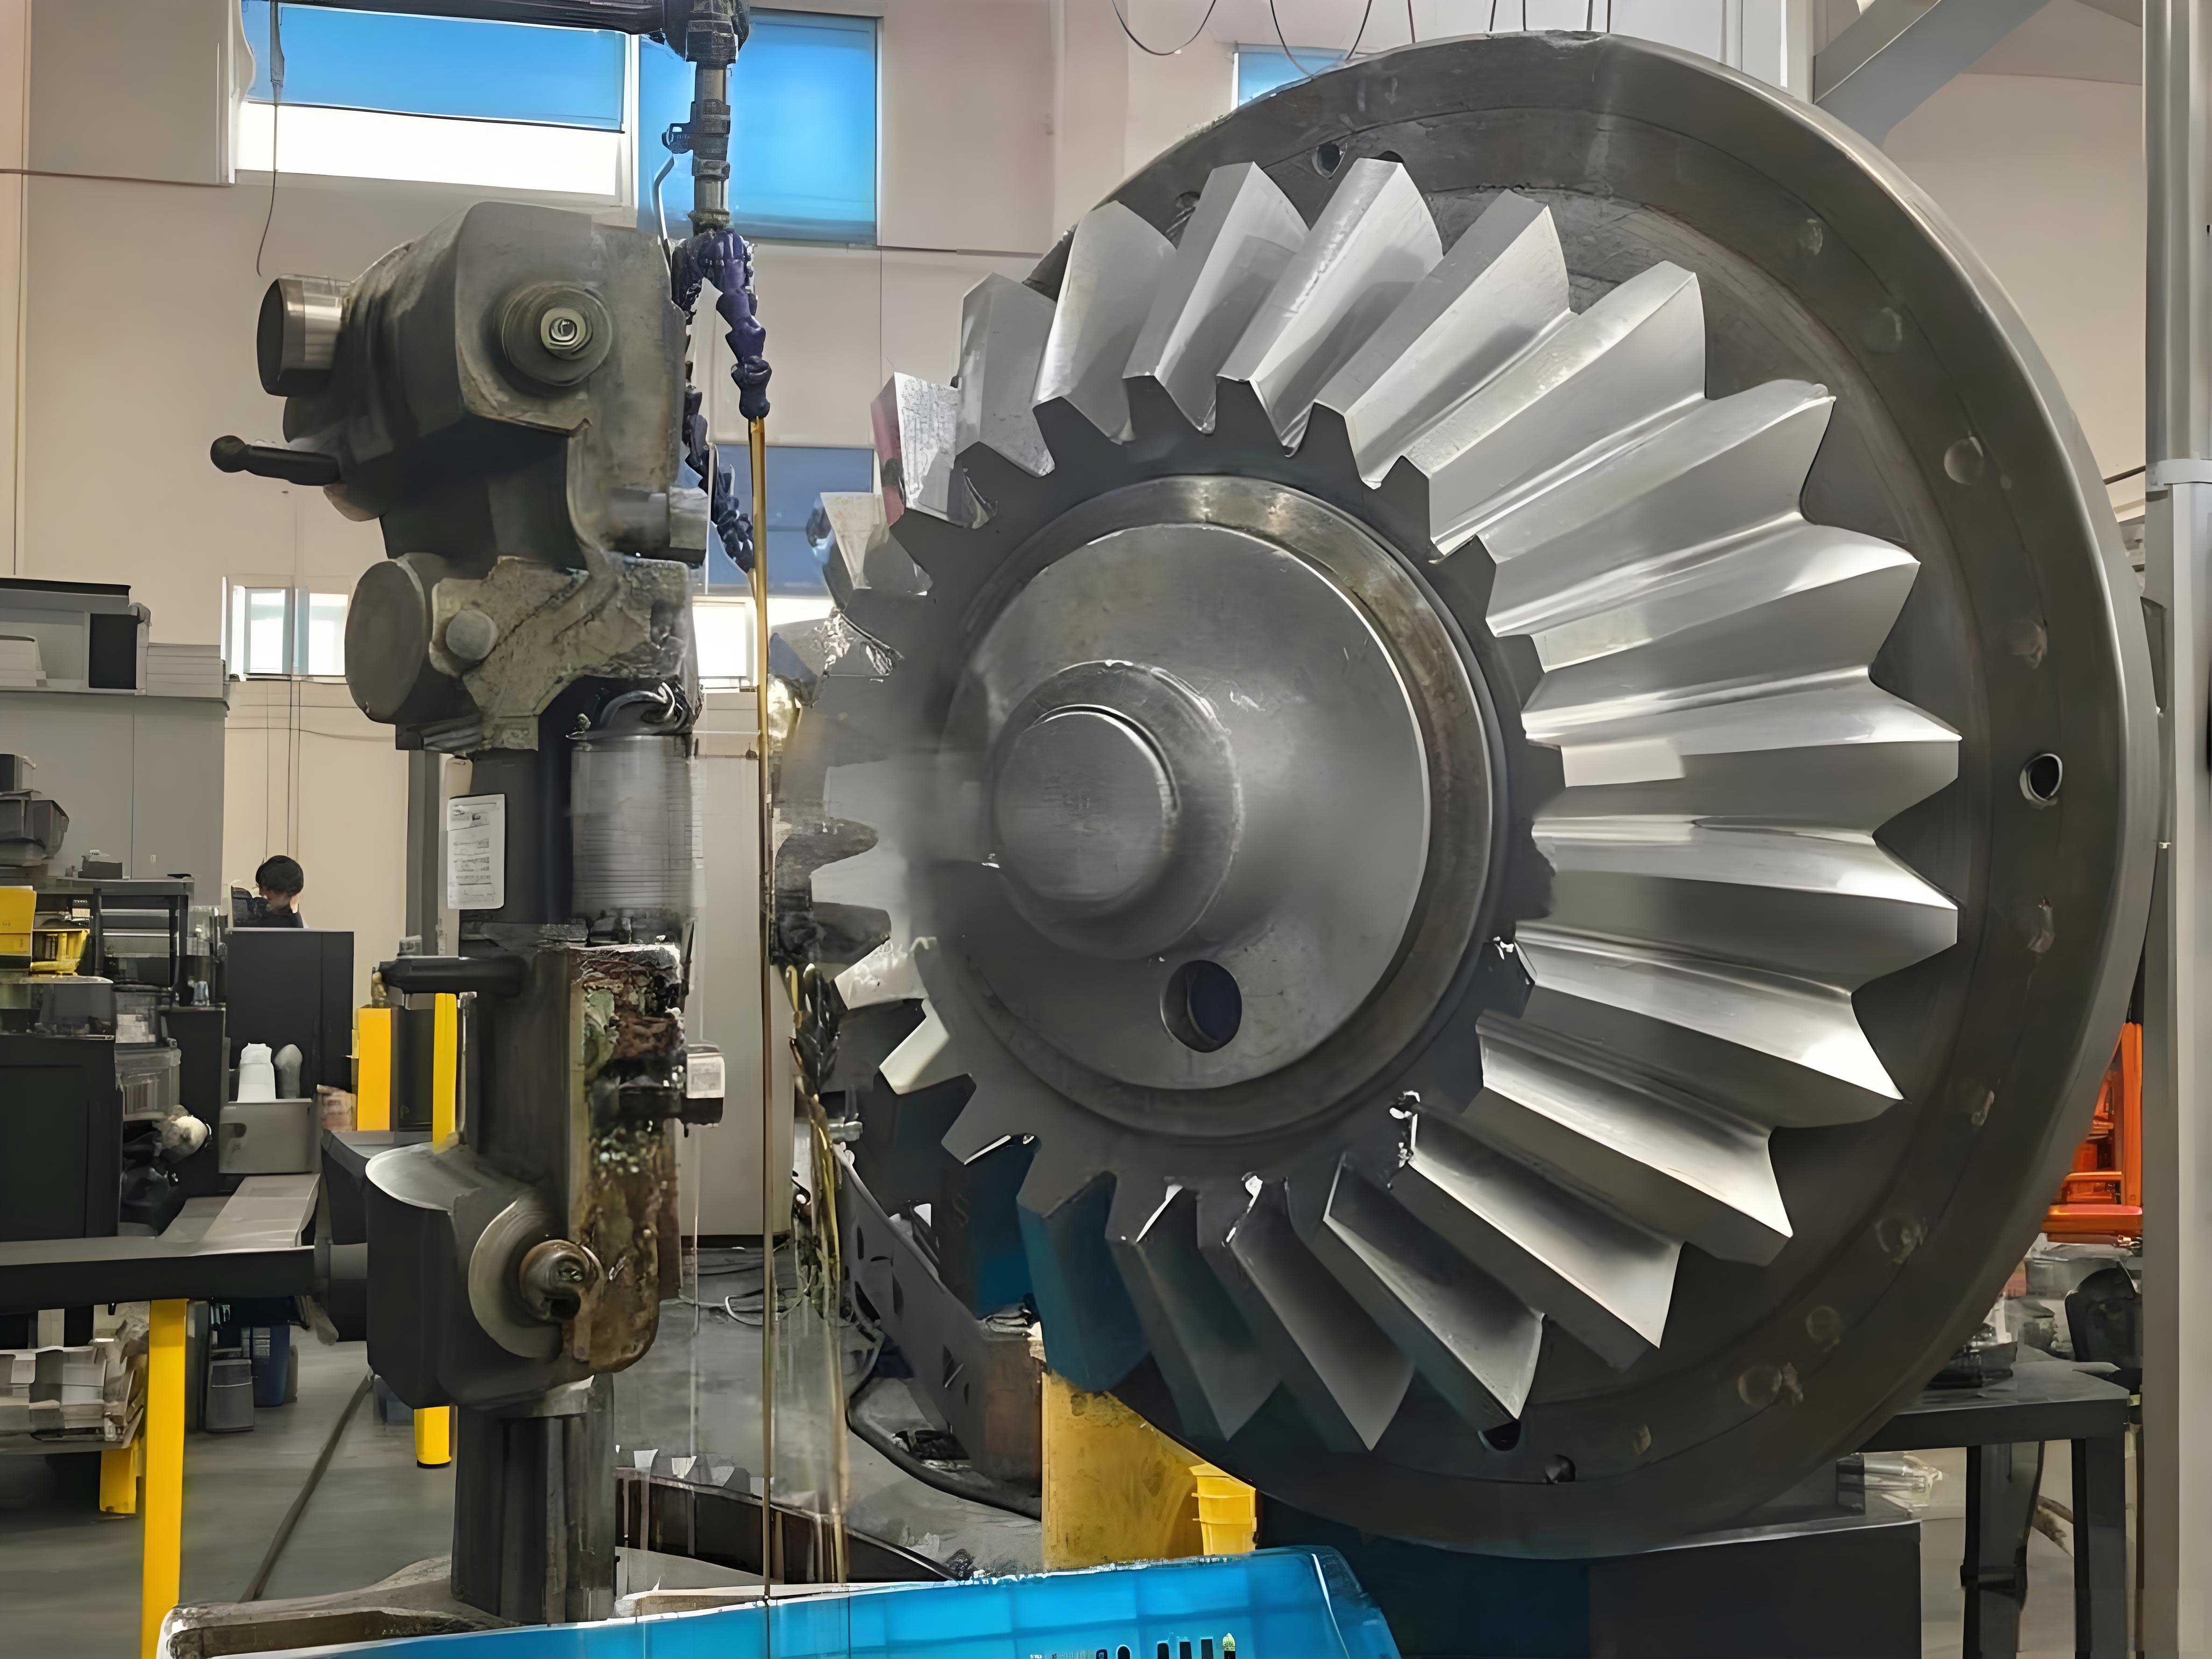
To begin, the setup assembly was crucial. The universal tool铣床 provided the primary cutting motion, while the mechanical slide table enabled precise横向 movements essential for generating the taper of the miter gear teeth. The indexing head, mounted securely, handled the division of the gear blank into the required number of teeth. A connecting plate was fabricated to rigidly couple the铣床 to the slide table, ensuring stability during cutting forces. Additionally, inclined垫铁 blocks were employed to tilt the entire assembly relative to the indexing head. The angle of these blocks was set equal to the root angle of the miter gear, which is derived from its pitch cone geometry. For a standard miter gear with a 1:1 ratio, the pitch cone angle is 45 degrees, but the root angle may differ slightly based on design parameters. This tilt ensured that the cutter approached the workpiece at the correct orientation, mimicking the根锥角 of the miter gear. Accurate depth control was achieved using a height gauge, referenced from a datum surface.
The indexing process for dividing the gear blank into teeth is governed by a fundamental formula. For an indexing head with a specific “定数” (often denoted as K, typically 40 for many standard heads), the number of turns or holes on the index plate required per tooth is calculated as:
$$n = \frac{K}{Z}$$
where \(n\) is the number of turns (or fraction thereof) of the index crank, \(K\) is the indexing head constant (e.g., 40), and \(Z\) is the number of teeth on the miter gear. In practical terms, \(n\) often results in a fractional turn, necessitating the use of an index plate with a suitable hole circle. For instance, if machining a miter gear with \(Z = 37\) teeth and using an indexing head with \(K = 40\), then:
$$n = \frac{40}{37} \approx 1.08108$$
This means approximately 1 full turn plus an additional fraction. To achieve this precisely, an index plate with a 37-hole circle could be used directly, but since such a plate might not be available, one selects a plate with a hole circle that is a multiple or divisor allowing accurate fractioning. Alternatively, for a gear with \(Z = 60\), common in many applications, the calculation simplifies:
$$n = \frac{40}{60} = \frac{2}{3}$$
Thus, using a plate with a hole circle divisible by 3, such as a 39-hole circle, one would advance the crank by \(\frac{2}{3}\) of 39 holes, i.e., 26 holes. This precise control is vital for the uniform spacing of teeth on miter gears, which directly affects meshing smoothness and noise levels. I often tabulate these calculations for different gear sizes to streamline the process.
| Gear Tooth Count (Z) | Indexing Head Constant (K) | Required Crank Turns (n) | Recommended Index Plate Hole Circle | Holes to Advance per Tooth |
|---|---|---|---|---|
| 30 | 40 | 4/3 ≈ 1.3333 | 33 | 44 |
| 45 | 40 | 8/9 ≈ 0.8889 | 45 | 40 |
| 50 | 40 | 0.8 | 50 | 40 |
| 75 | 40 | 16/15 ≈ 1.0667 | 75 | 80 |
Beyond indexing, the横向 offset of the workpiece during cutting is critical for generating the tapered tooth profile of miter gears. This offset, often denoted as \( \Delta X \), is calculated based on the gear geometry: the pitch cone distance, tooth depth, and cutter geometry. For a straight bevel gear, the tooth thickness varies linearly from the large end to the small end. In form cutting, the cutter is initially positioned to cut the small end of the tooth space, and then shifted laterally to progressively machine the large end. The offset can be derived from the关系 between the cone distance and the tooth depth. If \( R \) is the pitch cone radius at the large end, \( r \) at the small end, and \( h \) is the total tooth depth, then the taper angle \( \gamma \) satisfies:
$$\tan \gamma = \frac{R – r}{L}$$
where \( L \) is the face width of the miter gear. However, in practice, the offset per cut is often determined empirically through试切, but a theoretical starting point is given by:
$$\Delta X = h \cdot \tan \alpha$$
where \( \alpha \) is the pressure angle of the miter gear (commonly 20°). This ensures that the cutter clears the material properly. During my operations, I used the slide table’s built-in micrometer or a dial indicator to measure and set this offset accurately. The process involved multiple passes: roughing cuts to remove bulk material, followed by finishing cuts to achieve the final dimensions and surface quality. Each pass required careful adjustment of both depth and横向 offset, with constant verification against the gear design specifications. Miter gears demand such precision because any deviation in tooth profile can lead to uneven loading and premature failure.
The actual cutting sequence was methodical. First, the gear blank was mounted on the indexing head, aligned using a test indicator to ensure concentricity. The铣床 cutter—a form cutter ground to the exact profile of the tooth space—was installed. The initial cut was made at the small end of the tooth space, with the depth set to the full tooth depth minus a finishing allowance. After each tooth was roughed out, the indexing head was advanced to the next position. Once all teeth received the initial roughing cut, the横向 offset was applied via the slide table. The amount of offset for each subsequent cut was calculated based on the desired taper, but as mentioned,试切 was used to fine-tune it. Typically, for large miter gears, I performed two roughing cuts: one to establish the小端 profile and another to begin forming the大端. Then, finishing cuts were made with reduced feed rates to achieve the required surface finish and dimensional accuracy. Throughout,冷却 fluid was applied to manage heat and extend tool life.
To encapsulate the key parameters and steps, I find tables invaluable. Below is a summary table for a hypothetical large miter gear machining project, which I often refer to when planning such tasks.
| Parameter | Symbol | Value/Description | Remarks |
|---|---|---|---|
| Gear Type | — | Straight Bevel Miter Gear | 轴交角 90° |
| Number of Teeth | Z | 60 | Determines indexing sequence |
| Pitch Diameter (Large End) | D | 500 mm | Defines gear size |
| Face Width | L | 80 mm | Affects taper calculation |
| Pressure Angle | α | 20° | Standard for miter gears |
| Module (Large End) | m | 8 mm | Tooth size parameter |
| Root Angle | δ_f | 44.5° | Sets assembly tilt angle |
| Indexing Head Constant | K | 40 | Used in division formula |
| Index Plate Selection | — | 39-hole circle | For n=2/3 turn |
| Calculated Offset (ΔX) | ΔX | 2.9 mm per side | From empirical testing |
| Number of Cutting Passes | — | 4 (2 rough, 2 finish) | Ensures accuracy |
| Cutter Type | — | Form Relieved Milling Cutter | Profile matched to tooth space |
Accuracy verification was a continuous process. After machining, the miter gear underwent rigorous inspection. Key dimensions such as the chordal tooth thickness at the large end, pitch diameter, and runout were measured using gear tooth calipers, micrometers, and dial indicators. The tooth profile was checked against a master template or using a coordinate measuring machine if available. For the large miter gear in question, the target accuracy等级 was equivalent to AGMA 9 or similar, which requires tight tolerances on tooth-to-tooth composite error and total cumulative pitch deviation. I employed statistical process control techniques, recording measurements in a log to identify any trends or deviations. This data was then used to adjust the machining parameters for future runs. The success in achieving the desired精度 underscores the viability of this improvised method for producing high-quality miter gears in small batches or as one-offs.
Beyond the mechanical setup, the mathematical modeling of miter gear geometry is essential for precise fabrication. The relationship between various angles and dimensions can be expressed through a series of formulas. For a standard straight bevel miter gear with轴交角 Σ = 90° and equal numbers of teeth on both gears (i.e., a 1:1 ratio), the pitch cone angle γ is 45°. However, the root cone angle γ_f and face cone angle γ_a differ based on the addendum and dedendum. These are given by:
$$\gamma_f = \gamma – \theta_f$$
$$\gamma_a = \gamma + \theta_a$$
where \( \theta_f \) is the dedendum angle and \( \theta_a \) is the addendum angle, calculated as:
$$\theta_f = \arctan\left(\frac{h_f}{R}\right)$$
$$\theta_a = \arctan\left(\frac{h_a}{R}\right)$$
with \( h_f \) being the dedendum, \( h_a \) the addendum, and \( R \) the pitch cone radius. In practice, for module-based designs, \( h_a = m \) and \( h_f = 1.25m \) typically, where \( m \) is the module. Thus, for a miter gear with module \( m = 8 \) mm and pitch diameter \( D = 500 \) mm, the pitch cone radius \( R = D / (2 \sin \gamma) = 500 / (2 \sin 45°) ≈ 353.55 \) mm. Then:
$$\theta_a = \arctan\left(\frac{8}{353.55}\right) ≈ 1.296°$$
$$\theta_f = \arctan\left(\frac{10}{353.55}\right) ≈ 1.620°$$
Hence, \( \gamma_f ≈ 45° – 1.620° = 43.38° \) and \( \gamma_a ≈ 45° + 1.296° = 46.296° \). These angles directly inform the setup angles for machining and inspection. When cutting the teeth, the workpiece tilt (via the垫铁) should match \( \gamma_f \) to ensure the cutter is aligned with the root line. This alignment is critical for maintaining uniform tooth strength and proper clearance in the final miter gear assembly.
The cutting forces and tool wear also play a significant role in machining large miter gears. Given the substantial material removal involved, optimizing cutting parameters is essential. I often use the following formulas to estimate cutting speed \( V_c \), feed per tooth \( f_z \), and metal removal rate \( Q \):
$$V_c = \frac{\pi \cdot D_c \cdot N}{1000}$$
where \( D_c \) is the cutter diameter in mm, and \( N \) is the spindle speed in rpm. For a form cutter with diameter 100 mm and using high-speed steel, a typical \( V_c \) might be 30 m/min for steel workpieces, yielding:
$$N = \frac{1000 \cdot V_c}{\pi \cdot D_c} = \frac{1000 \cdot 30}{\pi \cdot 100} ≈ 95.5 \text{ rpm}$$
The feed per tooth \( f_z \) depends on the cutter material and workpiece hardness; for roughing, \( f_z = 0.1 \) mm/tooth might be suitable, while finishing might use \( f_z = 0.05 \) mm/tooth. The table feed \( V_f \) is then:
$$V_f = f_z \cdot Z_c \cdot N$$
with \( Z_c \) being the number of teeth on the cutter (e.g., 10 for a standard form cutter). Thus, for roughing:
$$V_f = 0.1 \cdot 10 \cdot 95.5 ≈ 95.5 \text{ mm/min}$$
These parameters require adjustment based on actual machine rigidity and tool condition. During the machining of miter gears, I monitor tool wear regularly, as worn cutters can cause profile errors and poor surface finish. Re-sharpening or replacing the cutter at appropriate intervals ensures consistent quality across all teeth.
Another aspect is the thermal deformation of both workpiece and tool. Large miter gears, often made from alloy steels, can expand during cutting due to heat generation. To mitigate this, I employ generous冷却 and allow for intermediate cooling periods. Additionally, the final dimensions are measured after the gear has cooled to room temperature, ensuring that thermal expansion does not skew the results. This is particularly important for achieving the tight tolerances required for precision miter gears in aerospace or heavy machinery applications.
The economics of this approach cannot be overlooked. By utilizing existing equipment—a universal tool铣床, a slide table, and an indexing head—the capital investment is minimized. The only additional costs are for the form cutter and custom工装 like the connecting plate and垫铁. This makes the method highly attractive for prototyping or small-batch production of large miter gears. Compared to purchasing a dedicated gear hobbling or shaping machine, which can be prohibitively expensive for infrequent use, this组合 solution offers a cost-effective alternative without compromising significantly on accuracy. Moreover, the skills developed in setting up and running such improvisations are invaluable, fostering a deeper understanding of gear geometry and machining dynamics.
In terms of repeatability and scaling, I have documented the process for various sizes of miter gears. Below is a comparative table summarizing the setup parameters for different gear modules and tooth counts, all aimed at producing miter gears with a 90°轴交角.
| Module (m) mm | Number of Teeth (Z) | Pitch Diameter (D) mm | Face Width (L) mm | Calculated Root Angle (γ_f) degrees | Recommended Cutter Diameter (D_c) mm | Approx. Machining Time per Gear (hours) |
|---|---|---|---|---|---|---|
| 6 | 40 | 240 | 60 | 43.5 | 80 | 8 |
| 8 | 50 | 400 | 70 | 43.4 | 100 | 12 |
| 10 | 60 | 600 | 80 | 43.3 | 120 | 18 |
| 12 | 70 | 840 | 90 | 43.2 | 150 | 24 |
As evident, larger miter gears require more time and careful planning. The machining time increases due to the greater volume of material and the need for more passes to maintain accuracy. However, the fundamental process remains consistent: align, index, offset, and cut, with constant verification. This methodology has proven robust across multiple projects involving miter gears of varying sizes.
Looking forward, advancements in CNC technology could enhance this approach further. By retrofitting the铣床 and slide table with CNC controls, the indexing and offset movements could be automated, improving precision and reducing manual intervention. However, the core principles of form cutting for miter gears would remain unchanged. The knowledge gained from manual setups provides a solid foundation for programming such automated systems, as one must thoroughly understand the gear geometry to generate the correct tool paths.
In conclusion, machining large miter gears without dedicated equipment is a challenging yet feasible endeavor. Through strategic combination of standard machine tools, careful calculation of indexing and offset parameters, and meticulous attention to setup and inspection, high-quality miter gears can be produced. This hands-on experience has taught me the importance of adaptability and deep technical knowledge in mechanical fabrication. Whether for prototyping, repair, or small-scale production, this method offers a practical solution for manufacturing large straight bevel miter gears. The repeated focus on miter gears throughout this process—from initial design to final inspection—ensures that every aspect is optimized for these critical components. As industries continue to demand custom gearing solutions, such improvised techniques will remain valuable in the engineer’s toolkit.