
In my extensive experience within automotive parts manufacturing, particularly for imported vehicles, I frequently encounter the necessity to produce miter gears. These components are essentially straight bevel gears with a 1:1 transmission ratio, commonly employed in differential systems and right-angle drives. The primary challenge has always been machining them accurately without access to expensive, specialized bevel gear generators. Through years of practical experimentation and refinement, I have developed and perfected a method to successfully cut miter gears on a standard universal hobbing machine. This is achieved by incorporating a simple, removable attachment that synchronizes the hob’s axial and radial feed motions, effectively simulating the generation of a conical gear surface. This article comprehensively shares my accumulated knowledge regarding the fundamental characteristics, underlying cutting principles, detailed design of the attachment apparatus, precise calculation methodologies, and step-by-step operational procedures for this highly effective technique.
The miter gear, as a specific type of straight bevel gear, exhibits a set of unique geometric characteristics directly resulting from its conical form. Unlike spur gears, its parameters are not constant along the axis of the gear. Understanding these features is crucial for accurate design, setup, and inspection. The key defining features are as follows:
| Feature | Description | Mathematical Expression / Implication |
|---|---|---|
| Conical Tooth Flank | The tooth surface is generated on a conical frustum. The teeth taper from a larger cross-section at one end (the heel or large end) to a smaller cross-section at the opposite end (the toe or small end). The tooth flank is not perpendicular to any end face. | Defined by the pitch cone angle $$\delta$$. For a standard miter gear, $$\delta = 90^\circ$$. |
| Constant Whole Tooth Depth | The total height of the tooth (from addendum to dedendum) remains equal in all transverse sections taken perpendicular to the gear axis. | $$h = h_a + h_f = \text{constant}$$. This is a fundamental constraint for simplified generation. |
| Constant Module & Pressure Angle | The module (m), the theoretical pitch diameter (d), and the standard pressure angle (α) are invariant across all perpendicular cross-sections along the axis. | $$m = d/z$$ is constant. $$\alpha$$ (typically 20°) is constant. This allows the use of a standard involute hob. |
| Variable Profile Shift & Dimensions | To maintain a constant whole depth on a tapering blank, the profile shift coefficient (x) must vary linearly from the large end to the small end. Consequently, the addendum diameter, dedendum diameter, addendum, dedendum, and pitch circle tooth thickness all change continuously. | At a distance ‘y’ from the large end: $$x_y = x_L – (y/R) \cdot (x_L – x_S)$$. Other dimensions like $$d_{ay}$$, $$d_{fy}$$, $$s_y$$ are functions of $$x_y$$. |
To visualize the conical form and tooth geometry of a typical miter gear, consider the following reference image:
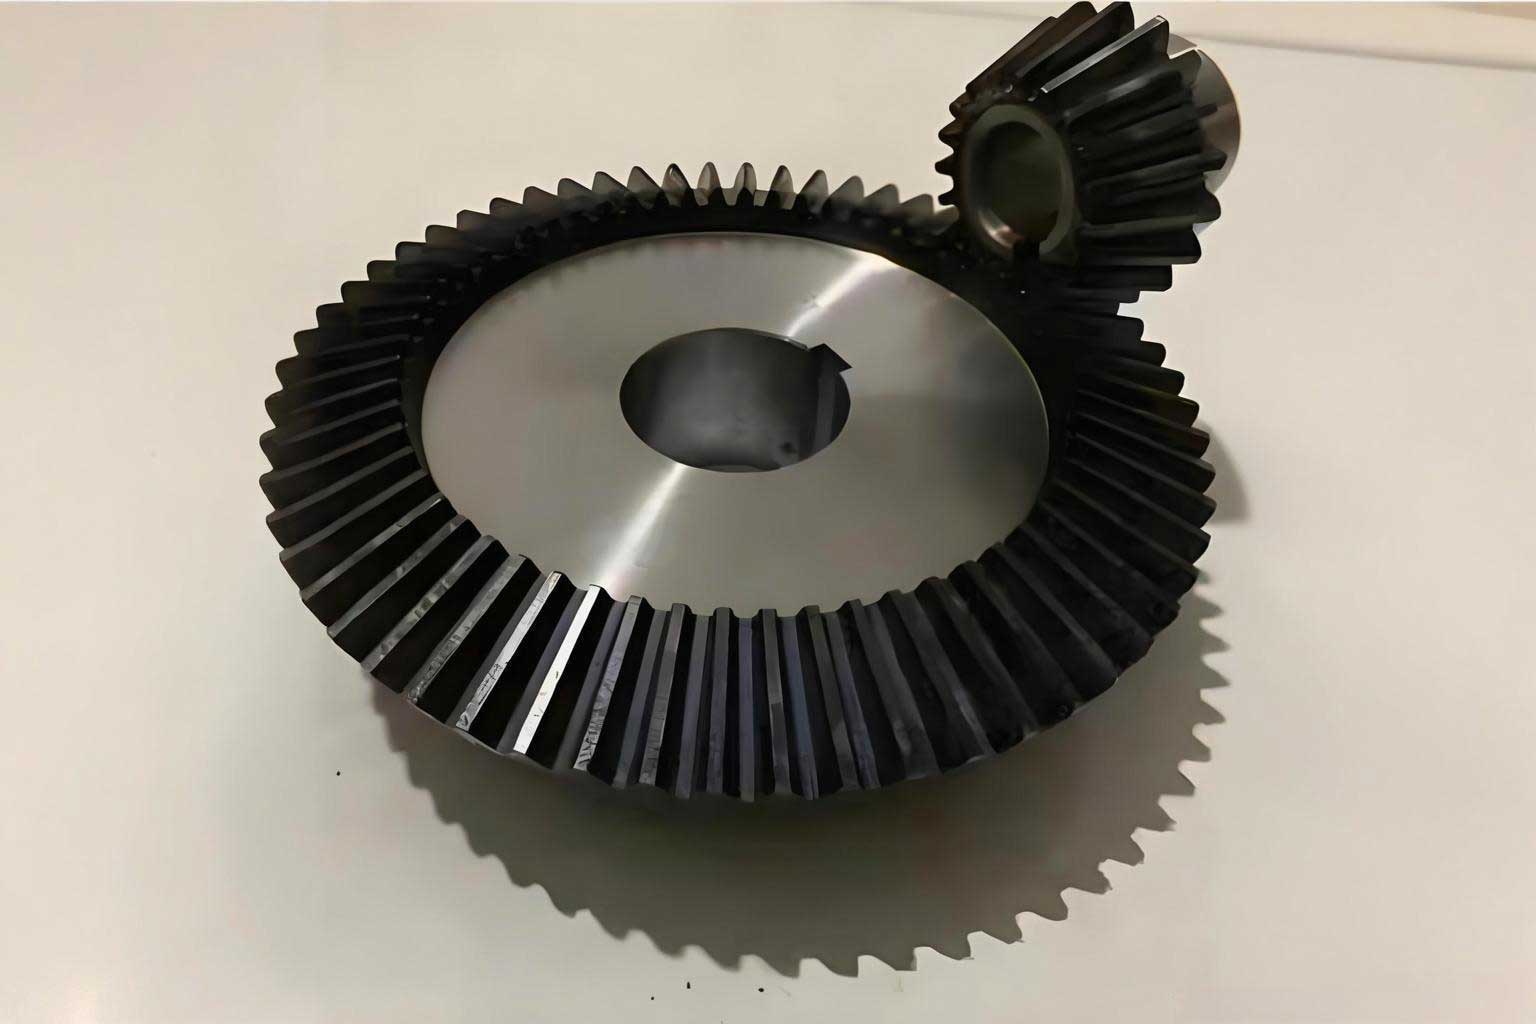
The successful generation of a miter gear tooth profile on a hobbing machine hinges on accurately replicating the relative motion between a virtual generating gear (the hob) and the conical workpiece. The hob, which is essentially a worm with gashes to form cutting edges, must move in such a way that its thread envelope produces the desired tapered involute tooth space. This requires three fundamental motions to be precisely coordinated:
- Workpiece Rotation (Indexing): This is the primary cutting motion, provided by the machine’s indexing gear train. It ensures the workpiece rotates at a specific speed relative to the hob’s rotation to generate the correct number of teeth.
- Hob Rotation (Cutting Speed): This is provided by the machine’s speed change gear train. It determines the surface speed at the hob’s teeth for efficient cutting.
- Synchronized Hob Feed Motion: This is the critical motion for conical gear generation. The hob must simultaneously advance axially (vertical feed, $$f_a$$) and radially (infeed, $$f_r$$) relative to the workpiece. The ratio of these two feeds must be constant and equal to the tangent of the gear’s cone half-angle.
The kinematic relationship is geometrically derived from the cone geometry. If the hob’s movement is to follow a line on the pitch cone surface, the ratio of radial displacement ($$\Delta R$$) to axial displacement ($$\Delta V$$) must satisfy:
$$ \tan\left(\frac{\delta}{2}\right) = \frac{\Delta R}{\Delta V} $$
Where $$\delta$$ is the pitch cone angle of the miter gear. For a standard 90-degree miter gear, $$\delta/2 = 45^\circ$$ and $$\tan(45^\circ) = 1$$, meaning the radial and axial increments must be equal in magnitude. On a standard hobbing machine, these two feeds are normally independent. Therefore, the core of my method is to mechanically link them through an auxiliary gear train—the cone angle attachment—which forces them to occur in the fixed ratio dictated by the above equation.
The heart of this adaptation is a mechanical attachment I designed to interconnect the vertical feed mechanism and the radial (horizontal) feed mechanism of the hobbing machine. This attachment, which I term the Cone Angle Synchronizing Attachment, uses a train of change gears to establish the precise ratio between the two feeds. Its design philosophy emphasizes simplicity, cost-effectiveness, and non-permanent modification to the host machine, making it ideal for job shops or repair departments.
The attachment primarily consists of three custom-fabricated shafts designed to fit specific machine models, such as the common Y3150 series:
| Component Name | Function | Design Note |
|---|---|---|
| Shaft 1 (Vertical Drive Shaft) | Connects directly to the vertical feed handwheel or drive shaft. It transmits rotational motion from the vertical feed system into the change gear train. | Machined to match the spline, keyway, or thread of the specific machine’s vertical feed output. |
| Shaft 2 (Radial Drive Shaft) | Connects to the radial infeed handwheel or lead screw. It receives motion from the change gear train and transfers it to the radial feed mechanism. | Similarly customized to interface with the machine’s radial feed input point. |
| Shaft 3 (Bracket Support Sleeve) | A stationary sleeve or shaft fixed at the location of the vertical feed handwheel bracket. It serves as the stable mounting point for the change gear bracket or banjo. | Ensures the gear train bracket remains aligned and rigid during operation. |
The gear train itself utilizes standard change gears, often from a milling machine set. A simple banjo or adjustable bracket holds the intermediate gears. The entire assembly can be mounted externally, for instance, on the machine column, and is easily installed or removed as needed. For high-volume production, a more permanent and enclosed design is advisable, but for prototyping and small batches, this modular approach is perfectly sufficient.
The accuracy of the entire process depends critically on the correct calculation of the change gear ratio ($$i$$) for the synchronizing attachment. This ratio is not merely $$\tan(\delta/2)$$ but must incorporate the specific lead parameters of the machine’s feed screws. Let’s derive the general formula.
Let:
- $$P_v$$ = Pitch of the vertical feed screw (mm/revolution of the screw).
- $$P_r$$ = Pitch of the radial feed screw (mm/revolution of the screw).
- $$\Delta V$$ = Vertical movement per revolution of the vertical feed handwheel (mm).
- $$\Delta R$$ = Radial movement per revolution of the radial feed handwheel (mm).
- $$N_v$$ = Number of revolutions of the vertical feed handwheel.
- $$N_r$$ = Number of revolutions of the radial feed handwheel.
Typically, $$\Delta V$$ and $$\Delta R$$ are directly related to $$P_v$$ and $$P_r$$ via the gear reduction between the handwheel and the screw. For many machines, the handwheel is directly on the screw, so $$\Delta V = P_v$$ and $$\Delta R = P_r$$.
The attachment creates a geared connection such that $$N_r = i \cdot N_v$$, where $$i$$ is the change gear ratio (Driver Gears / Driven Gears). Therefore, the resulting feeds are:
Axial feed distance: $$F_a = N_v \cdot \Delta V$$
Radial feed distance: $$F_r = N_r \cdot \Delta R = i \cdot N_v \cdot \Delta R$$
The ratio of these feeds must equal $$\tan(\delta/2)$$:
$$ \frac{F_r}{F_a} = \frac{i \cdot N_v \cdot \Delta R}{N_v \cdot \Delta V} = i \cdot \frac{\Delta R}{\Delta V} = \tan\left(\frac{\delta}{2}\right) $$
Solving for the required change gear ratio:
$$ i = \tan\left(\frac{\delta}{2}\right) \cdot \frac{\Delta V}{\Delta R} $$
If the handwheels are directly coupled to the screws ($$\Delta V = P_v, \Delta R = P_r$$), the formula simplifies to:
$$ i = \tan\left(\frac{\delta}{2}\right) \cdot \frac{P_v}{P_r} $$
For example, on a Y3150 hobbing machine, common values are $$P_v = 6 \text{ mm}$$ and $$P_r = 4 \text{ mm}$$. For a standard miter gear ($$\delta/2 = 45^\circ$$), the ratio is:
$$ i = 1 \cdot \frac{6}{4} = 1.5 $$
This means the change gear train must provide a ratio of 1.5:1. We must then select available change gears (e.g., from a set with teeth numbers 20, 25, 30, 35, 40, 50, 60, 70, 80) to approximate this ratio as closely as possible. The gear ratio is calculated as:
$$ i = \frac{z_1 \cdot z_3}{z_2 \cdot z_4} $$
Where $$z_1$$ and $$z_3$$ are driving gears, and $$z_2$$ and $$z_4$$ are driven gears. To achieve $$i=1.5$$, one could select $$z_1=60, z_2=40, z_3=50, z_4=50$$:
$$ i = \frac{60 \cdot 50}{40 \cdot 50} = \frac{3000}{2000} = 1.5 $$
The following table provides example gear combinations for different cone half-angles on a machine with $$P_v/P_r = 1.5$$:
| Cone Half-Angle ($$\delta/2$$) | $$\tan(\delta/2)$$ | Required Ratio $$i = 1.5 \cdot \tan(\delta/2)$$ | Possible Gear Combination (z1/z2 * z3/z4) | Actual Ratio |
|---|---|---|---|---|
| 30° | 0.5774 | 0.8661 | 40/50 * 50/60 ≈ 0.8667 | 0.8667 |
| 45° | 1.0000 | 1.5000 | 60/40 * 50/50 = 1.5000 | 1.5000 |
| 60° | 1.7321 | 2.5982 | 60/30 * 50/40 = 2.5000 (Approx.) | 2.5000 |
With the attachment built and the gear ratio calculated, the actual setup and machining process on the hobbing machine follows a systematic procedure. Careful execution of each step is vital for achieving a quality miter gear.
- Attachment Installation: Mount the bracket support sleeve (Shaft 3) securely to the machine column near the vertical feed handwheel. Attach the vertical drive shaft (Shaft 1) to the handwheel mechanism. Connect the radial drive shaft (Shaft 2) to the radial infeed mechanism. Install the banjo and the selected change gears according to the calculated ratio, but leave them disengaged initially by loosening the locking screws on the banjo.
- Workpiece and Hob Setup: Mount the gear blank securely on the machine arbor. The blank must be pre-machined to the correct cone angle approximately. Set the hob on its arbor and align it centrally with the workpiece. Adjust the hob speed and feed rate gears according to the material and desired finish.
- Initial Positioning and Gear Engagement: Manually turn the radial feed handwheel to bring the hob into light contact with the workpiece at the large end diameter. This sets the starting radial position. Now, carefully mesh the change gears on the attachment by adjusting the banjo, ensuring proper tooth engagement without backlash. Tighten all locking screws on the banjo and gear hubs. From this point onward, the vertical and radial feeds are mechanically linked.
- Setting Cutting Depth: Use the vertical feed handwheel to raise the hob to the start position for the first cut. Because the feeds are linked, turning the vertical handwheel will also cause a proportional radial movement. The depth of cut for each pass is controlled by the incremental movement of this combined feed system.
- Performing the Cut: Start the machine. The workpiece rotates, the hob rotates, and you manually or automatically engage the synchronized vertical/radial feed. The hob will now generate a tooth slot that follows the conical surface of the blank. Multiple passes are usually required to reach the full tooth depth. After each complete pass around the gear (indexing through all teeth), a new depth is set for the next pass.
- Inspection and Verification: After the final pass, measure the critical dimensions of the miter gear. The most practical check for a miter gear is the chordal tooth thickness or span measurement ($$W_k$$) at the large end. The theoretical value can be calculated using the standard formula for a spur gear with the same number of teeth and module at that section, often with a zero profile shift for the large end in this simplified method:
$$ W_k = m_n \cos \alpha [ \pi (k – 0.5) + z \cdot \text{inv}(\alpha) ] $$
where $$k$$ is the number of teeth spanned, and $$\text{inv}(\alpha) = \tan \alpha – \alpha$$ (in radians). Measure this with a gear tooth caliper. Also, verify the cone angle using a protractor or by checking the fit with a master gear or in the assembly.
Throughout my application of this method, I have identified several key advantages and considerations. The primary benefit is the dramatic cost saving, as it enables the production of miter gears on existing, general-purpose hobbing machines without multi-million dollar investments in dedicated bevel gear equipment. It offers excellent flexibility; by simply changing a set of gears, the same attachment can produce bevel gears with various cone angles, not just miter gears. The accuracy attainable is sufficient for a wide range of applications, including automotive repairs, prototype development, and low-to-medium volume production. However, there are inherent limitations. The process is generally slower than using a dedicated bevel gear generator like a Gleason machine. The tooth profile generated is an approximation, and true conjugate action is not guaranteed as it would be with a proper generating method; nonetheless, for many practical purposes, the performance is entirely acceptable. Surface finish and precision at the very small end of the tooth can be challenging due to reduced cutting speed and potential for deflection. I recommend using sharp hobs, taking lighter finishing cuts, and employing coolants to mitigate these issues.
To illustrate the entire process with concrete numbers, let’s consider a detailed example. Suppose we need to cut a replacement miter gear for a truck differential with the following specifications: Module $$m = 5 \text{ mm}$$, Number of teeth $$z = 18$$, Pressure angle $$\alpha = 20^\circ$$, Pitch cone angle $$\delta = 90^\circ$$, Face width $$b = 25 \text{ mm}$$. Our machine is a Y3150 with $$P_v = 6 \text{ mm}$$, $$P_r = 4 \text{ mm}$$.
Step 1: Calculate Gear Ratio. Cone half-angle $$\delta/2 = 45^\circ$$, $$\tan(45^\circ)=1$$.
$$ i = \tan(45^\circ) \cdot \frac{P_v}{P_r} = 1 \cdot \frac{6}{4} = 1.5 $$
We need change gears such that $$(z_1 \cdot z_3)/(z_2 \cdot z_4) = 1.5$$. Selecting from a standard set: $$z_1=60, z_2=40, z_3=50, z_4=50$$ gives $$i = (60 \cdot 50)/(40 \cdot 50) = 3000/2000 = 1.5$$.
Step 2: Determine Blank Dimensions.
Pitch diameter at large end: $$d = m \cdot z = 5 \cdot 18 = 90 \text{ mm}$$.
Pitch cone distance: $$R = \frac{d}{2 \sin \delta} = \frac{90}{2 \sin 90^\circ} = 45 \text{ mm}$$.
Addendum at large end (assuming standard addendum for constant depth): $$h_a = m = 5 \text{ mm}$$.
Dedendum at large end: $$h_f = 1.25m = 6.25 \text{ mm}$$ (clearance included).
Outside diameter at large end: $$d_a = d + 2h_a \cos(\delta/2) = 90 + 2 \cdot 5 \cdot \cos 45^\circ = 90 + 10 \cdot 0.7071 = 97.071 \text{ mm}$$.
The blank should be turned to this conical shape prior to hobbing.
Step 3: Machining Parameters.
Hob diameter (example): $$D_h = 100 \text{ mm}$$.
Cutting speed for steel: $$V_c = 30 \text{ m/min}$$.
Hob RPM: $$N_h = \frac{1000 \cdot V_c}{\pi \cdot D_h} = \frac{1000 \cdot 30}{\pi \cdot 100} \approx 95.5 \text{ RPM}$$.
Set the machine’s speed gears accordingly.
Step 4: Inspection Calculation.
For the large end (considered as an 18-tooth spur gear with module 5):
Number of teeth for span measurement: $$k = \lceil z/9 \rceil = \lceil 18/9 \rceil = 2$$.
Involute function: $$\text{inv}(20^\circ) = \tan(20^\circ \cdot \pi/180) – (20 \cdot \pi/180) \approx 0.014904$$.
Span measurement: $$W_2 = 5 \cdot \cos 20^\circ [ \pi (2 – 0.5) + 18 \cdot 0.014904 ] = 5 \cdot 0.9397 [ 1.5\pi + 0.26827 ] = 4.6985 [ 4.7124 + 0.2683 ] = 4.6985 \cdot 4.9807 \approx 23.40 \text{ mm}$$.
After cutting, measure $$W_2$$ at the large end; it should be close to 23.40 mm. Any significant deviation indicates a need to adjust the depth of cut or check the gear ratio setting.
In conclusion, the method of cutting miter gears on a standard hobbing machine via a synchronized feed attachment is a powerful and accessible technique. It democratizes the production of these specialized gears, making them feasible for small workshops, repair facilities, and R&D departments. While it has its limitations in terms of ultimate precision and production rate compared to dedicated machinery, its advantages in cost, flexibility, and simplicity are overwhelmingly positive for a vast array of applications. My firsthand experience has consistently shown that with careful setup, accurate calculations, and patient operation, high-quality, functional miter gears can be reliably produced, extending the capabilities of the humble hobbing machine far beyond its traditional purview.