
The worm gear reducer is an essential power transmission device between a prime mover and a working machine, playing an irreplaceable role in mechanized manufacturing. In the field of reducer design, the adoption of CAD and related technologies for product design can accelerate the design process, shorten the development cycle, and improve design quality and reliability, thereby generating significant economic and social benefits. Based on the actual situation of the reducer manufacturing industry, this paper applies 3D CAD technology and its secondary development techniques to develop a dedicated CAD system for worm gear reducers within the SolidWorks environment. The entire design process is approached from a first-person perspective, detailing the steps from 3D modeling to virtual assembly, with extensive use of tables and formulas to enhance clarity.
1. Introduction
In modern mechanical design, the use of parametric 3D modeling software has become a standard practice. We chose SolidWorks as the core platform due to its robust feature-based modeling capabilities, including extrude, revolve, sweep, loft, and various other operations. For the secondary development, we utilized Visual Basic 6.0 (VB6.0) because of its flexible user interface, strong interaction with users, and powerful error-handling mechanisms, which greatly facilitated the programming of automation routines. The primary goal was to create a fully parametric worm gear reducer system that could quickly generate models based on input design parameters.
| Software Component | Version / Description | Role in Design |
|---|---|---|
| SolidWorks | 2012 or later (Windows-based) | 3D modeling, assembly, motion simulation |
| Visual Basic | VB6.0 | Secondary development, automation of parametric design |
| Windows OS | Windows 7/10 | Operating system platform |
2. 3D Modeling of Typical Parts
2.1 Worm Gear and Worm Modeling
Given the design parameters, we first created the overall sketch of the worm gear in SolidWorks. The sketch was edited with geometric relations, and a revolved base feature was applied to generate the worm gear blank. For the involute tooth profile, we employed a point-and-spline approximation method to construct the tooth shape accurately. This approach involved calculating a series of points along the involute curve using the parametric equations of the involute, then fitting a spline through these points. The tooth was then cut using a sweep-cut feature, followed by circular pattern and mirror operations to complete the worm gear’s full set of teeth. The worm was modeled similarly, with its helical thread generated by a helix curve and a sweep-cut along the path.
The involute profile of a worm gear tooth can be mathematically described as follows. For a base circle radius \( r_b \), the involute coordinates are given by:
$$ x = r_b (\cos \theta + \theta \sin \theta) $$
$$ y = r_b (\sin \theta – \theta \cos \theta) $$
where \(\theta\) is the roll angle in radians. By discretizing \(\theta\) into a sufficient number of points, we obtained the spline data for the tooth profile.
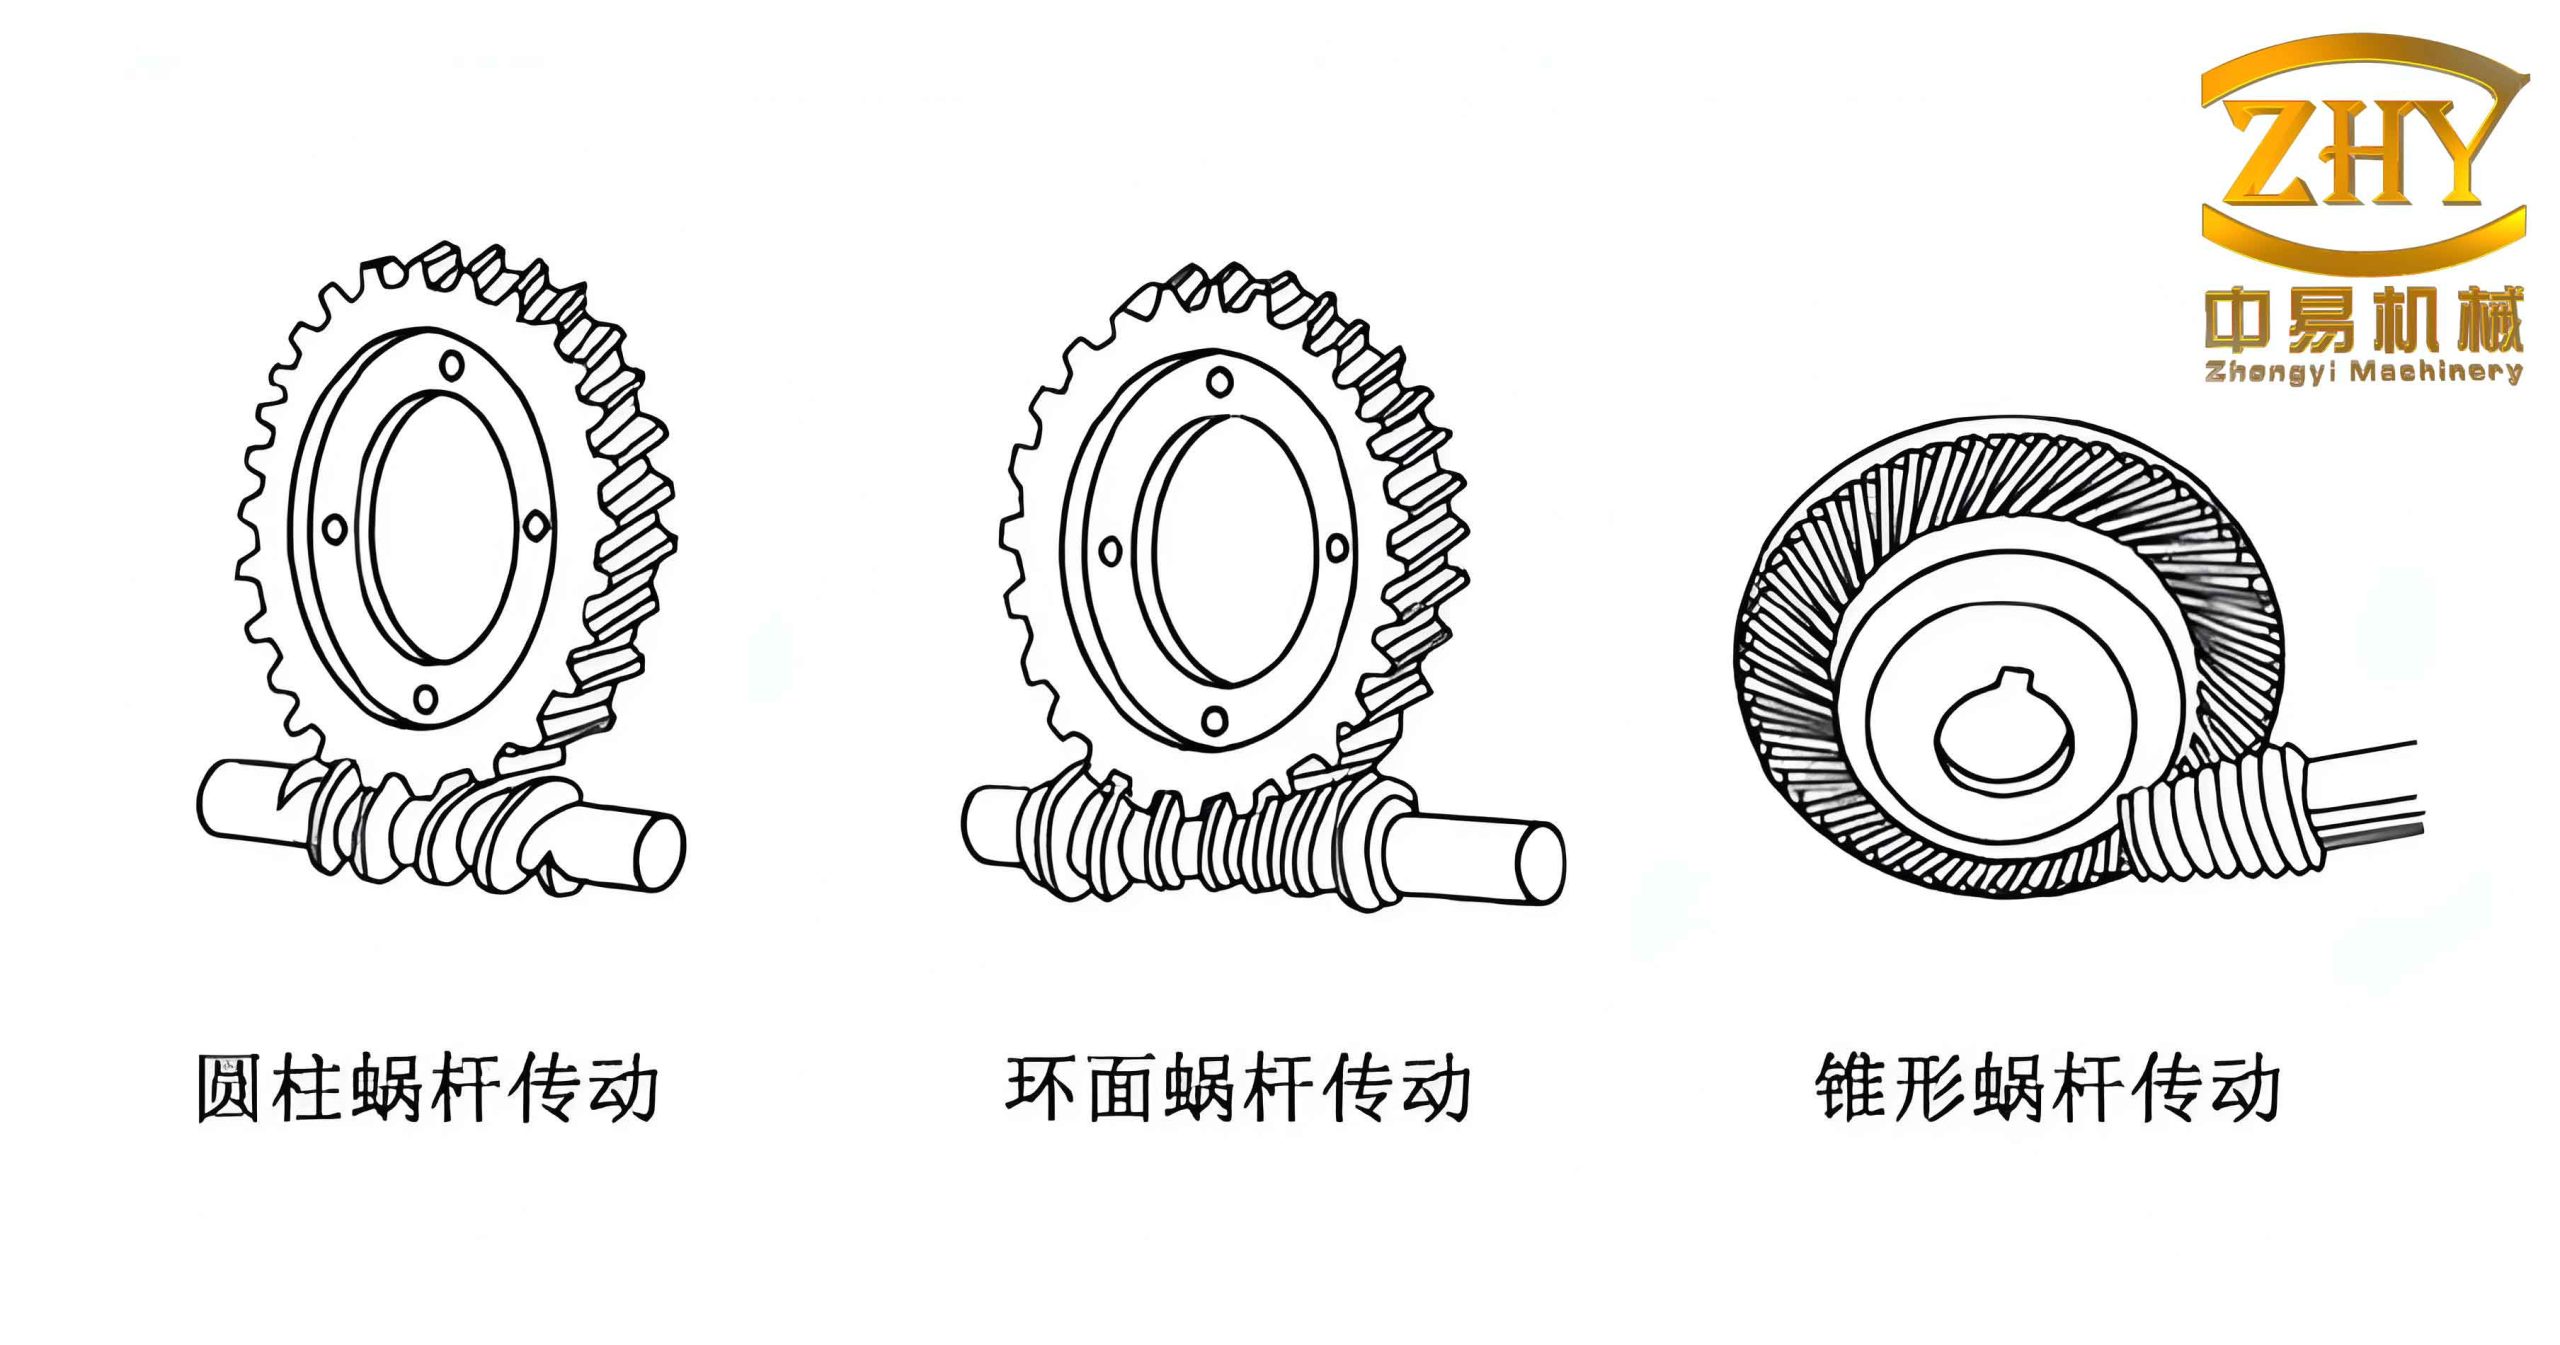
Typical design parameters for a worm gear pair used in our system are listed in Table 2.
| Parameter | Symbol | Value (Example) |
|---|---|---|
| Module | \( m \) | 4 mm |
| Worm pitch diameter | \( d_1 \) | 40 mm |
| Worm gear pitch diameter | \( d_2 \) | 160 mm |
| Worm gear number of teeth | \( z_2 \) | 40 |
| Worm number of starts (threads) | \( z_1 \) | 2 |
| Lead angle | \( \gamma \) | 11.31° |
| Center distance | \( a \) | 100 mm |
| Pressure angle | \( \alpha \) | 20° |
The relationships among these parameters are fundamental to worm gear design. The worm pitch diameter \( d_1 \) is related to the module \( m \) and the diameter factor \( q \) by:
$$ d_1 = m \cdot q $$
where \( q \) is a standard value (e.g., for our example, \( q = 10 \)). The worm gear pitch diameter is computed as:
$$ d_2 = m \cdot z_2 $$
The center distance \( a \) is then:
$$ a = \frac{d_1 + d_2}{2} = \frac{m(q + z_2)}{2} $$
The lead angle \( \gamma \) of the worm is given by:
$$ \gamma = \arctan\left(\frac{z_1}{q}\right) $$
These formulas were directly incorporated into our parametric design system using VB6.0, allowing automatic updating of the 3D model when input parameters change.
2.2 Gearbox Housing Modeling
The gearbox housing is a critical component that provides support and rigidity for the transmission parts. We modeled the housing using a combination of features: extrude boss/base, fillet, chamfer, cut-extrude, and linear pattern. The base of the housing was created by extruding a rectangular sketch, then adding mounting flanges, ribs, and bearing bosses. Ventilation holes and oil drain plugs were also included. The final housing model ensures sufficient strength and stiffness to withstand the loads during operation.
| Feature Type | Purpose | Example Dimensions (mm) |
|---|---|---|
| Extrude (Boss) | Create main housing body | 200 x 150 x 100 |
| Fillet | Round sharp edges | Radius R5 |
| Cut-Extrude | Create bearing seats | Diameter 50, depth 20 |
| Linear Pattern | Array bolt holes | 4 holes, spacing 80 |
| Shell | Thin out walls for weight reduction | Wall thickness 8 |
3. Virtual Simulation Assembly
Virtual assembly is an important part of emerging virtual product development. By employing virtual assembly technology, we can verify the fit and assemblability of various components at the design stage, ensuring design correctness. This approach helps in performing virtual analysis and solving technical issues that may arise from parts design to final product, ultimately shortening the development cycle, reducing production costs, and optimizing product performance.
3.1 Subassembly of the Worm Shaft
We began by creating a new assembly document in SolidWorks. Using the Insert Components command, we placed the worm shaft as the first fixed part. Then, we inserted the key into the shaft’s keyway. Mating was applied as follows:
- Coincident: bottom face of key with bottom of keyway.
- Concentric: cylindrical face of key with cylindrical face of keyway.
- Parallel: side face of key with side face of keyway.
Next, we successively added the worm gear, adjusting shims, bevel gear, worm gear spacer, round nut, and bearings. The resulting subassembly of the worm shaft is shown in the following table which summarizes the mating types used.
| Component Pair | Mating Type | Description |
|---|---|---|
| Key and Worm Shaft Keyway | Coincident + Concentric + Parallel | Fix key in keyway |
| Worm Gear and Shaft | Concentric | Align worm gear bore with shaft |
| Adjusting Shim and Shaft | Coincident | Position axial distance |
| Bearing Inner Ring and Shaft | Concentric + Coincident | Mount bearing on shaft shoulder |
| Round Nut and Shaft | Thread (advanced mate) | Simulate nut tightening |
3.2 Complete Assembly
After completing all subassemblies (e.g., input shaft, output shaft, housing, covers), we performed the final total assembly. The assembly sequence followed a bottom-up approach: first placing the housing as the base, then inserting the worm shaft subassembly, followed by the worm gear shaft subassembly, bearings, seals, and finally the top cover and fasteners. Interference detection was run to ensure no part collisions. The complete worm gear reducer assembly contains over 50 individual parts, all parametrically linked to the initial design parameters.
4. Key Design Formulas and Tables
Throughout the design process, we utilized several important formulas for both geometry and strength verification. The following table summarizes the critical equations used in our parametric system.
| Parameter | Formula | Remarks |
|---|---|---|
| Worm thread height | \( h_a = m \) | Addendum height (standard) |
| Worm thread root height | \( h_f = 1.2 m \) | Standard dedendum height |
| Whole tooth height | \( h = 2.2 m \) | For standard worm |
| Worm axial pitch | \( p_x = \pi m \) | Measured along worm axis |
| Worm lead | \( l = z_1 \cdot p_x \) | Lead = number of starts × axial pitch |
| Worm reference diameter | \( d_1 = m \cdot q \) | q from design table |
| Worm gear reference diameter | \( d_2 = m \cdot z_2 \) | Standard gear formula |
| Center distance | \( a = \frac{m(q + z_2)}{2} \) | Primary design parameter |
| Lead angle | \( \gamma = \arctan\left(\frac{z_1}{q}\right) \) | Important for efficiency |
| Sliding velocity | \( v_s = \frac{\pi d_1 n_1}{60 \cos \gamma} \) | \( n_1 \) in rpm |
| Contact stress (Hertzian) | \( \sigma_H = Z_E \sqrt{\frac{K T_2}{a^3}} \) | Simplified check |
| Bending stress at tooth root | \( \sigma_F = \frac{2K T_2 Y_{FS}}{b m d_2} \) | \( Y_{FS} \) form factor |
In the contact stress formula above, \( Z_E \) is the elastic coefficient (depends on material properties), \( K \) is the load factor (combination of dynamic, overload, and distribution factors), and \( T_2 \) is the torque on the worm gear. For our typical example with steel worm and bronze worm gear, \( Z_E \approx 155\ \text{MPa}^{1/2} \). The bending stress formula uses the form factor \( Y_{FS} \), which is a function of the equivalent number of teeth on the worm gear, incorporating the lead angle effect.
We also integrated efficiency calculations into the system. The efficiency \( \eta \) of a worm gear drive is given by:
$$ \eta = \frac{\tan \gamma}{\tan(\gamma + \rho)} $$
where \( \rho = \arctan \mu \) is the friction angle, and \( \mu \) is the coefficient of friction (typically 0.02–0.10 depending on lubrication and sliding velocity). This formula allows our system to estimate power losses and heat generation early in the design phase.
5. Motion Simulation and Interference Check
Using SolidWorks’ motion analysis capabilities, we simulated the rotation of the worm and worm gear to verify proper meshing and detect any interference. The motion simulation confirmed that the tooth profiles engaged smoothly throughout the entire revolution. No collisions were observed when the parts were properly aligned with the calculated center distance and axial offsets. This step is crucial to ensure that the designed worm gear reducer will function correctly before any physical prototype is built.
6. Conclusion
The three-dimensional modeling and motion simulation of the worm gear reducer based on SolidWorks allow engineers to evaluate products more intuitively. This approach shortens the design cycle, improves product design efficiency, and has positive significance for promoting manufacturing informatization and the development of other equipment. By leveraging the parametric capabilities and secondary development tools, our system can automatically generate customized worm gear reducers for a wide range of input conditions. The extensive use of tables and formulas throughout this paper demonstrates the systematic and mathematical foundation of the design methodology, ensuring reliability and repeatability. Future work may include finite element analysis of the housing and optimization of the tooth profile for higher load capacity.