
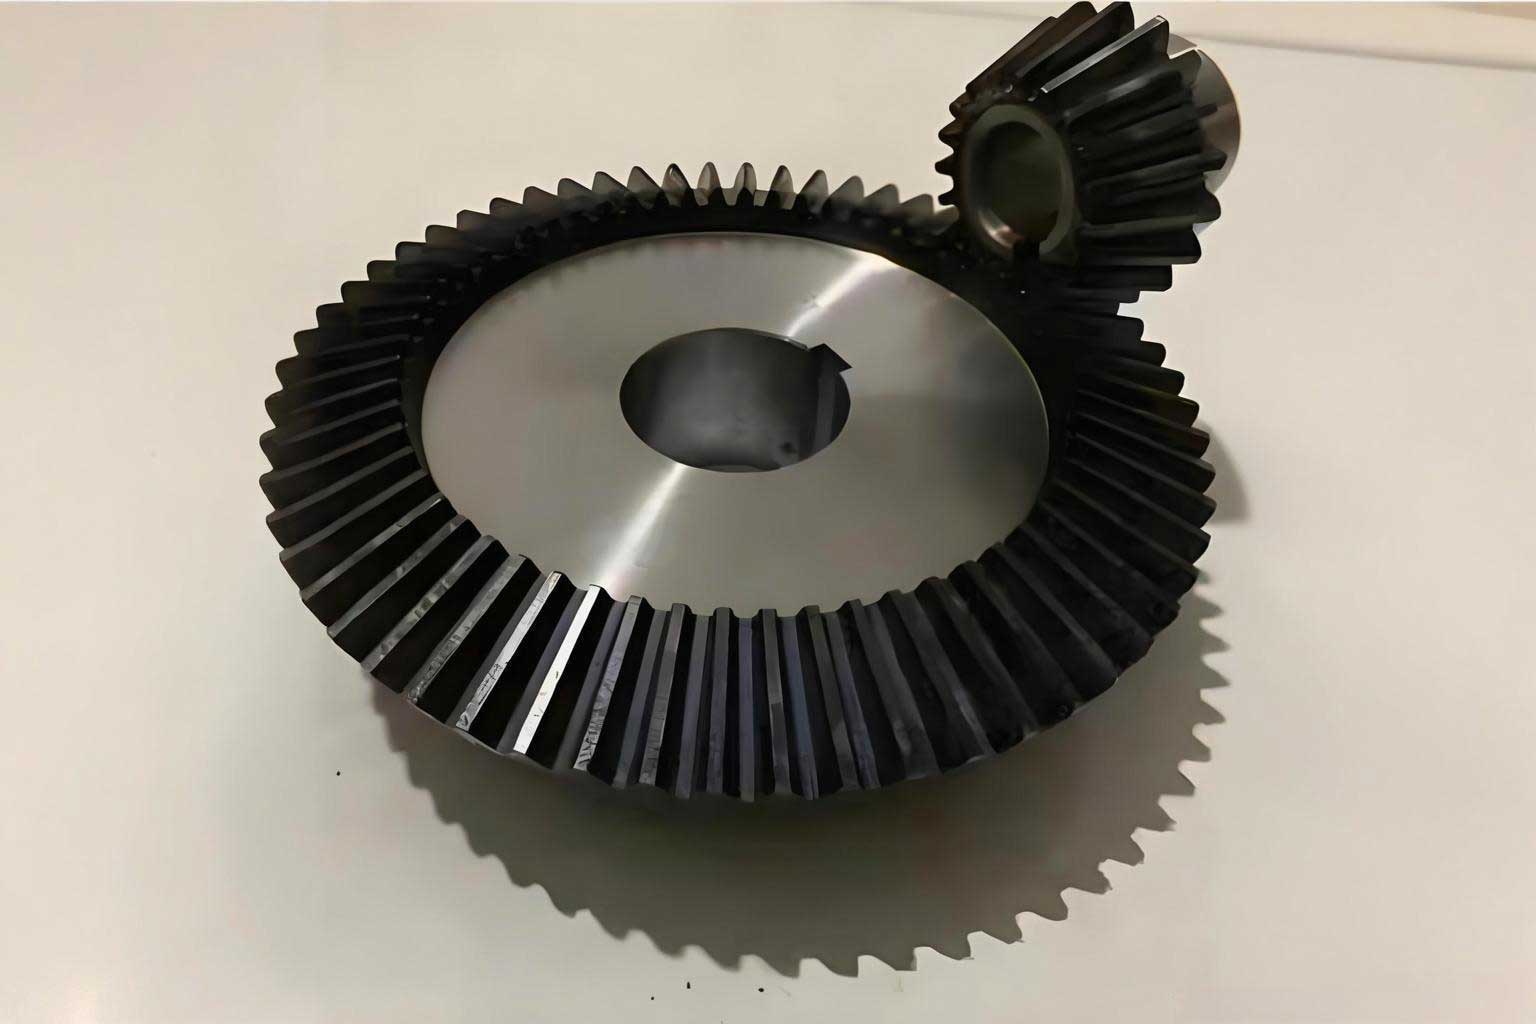
In the field of heavy machinery, large miter gears—straight bevel gears with a pitch diameter typically ranging from 500mm to over 3000mm—are critical components for transmitting power between intersecting shafts at a 90-degree angle. Their high load-bearing capacity makes them indispensable in applications such as large-scale cranes, mining equipment, and marine propulsion systems. However, the manufacturing of these large miter gears presents significant challenges. Traditionally, methods like gear shaping (planing) and broaching have been employed. These are inherently intermittent indexing processes, characterized by low automation, suboptimal precision, and limited production efficiency. The reliance on dedicated, expensive machinery and custom-formed cutters further constrains production flexibility and increases cost for small to medium batch sizes.
This article explores an innovative machining strategy: the use of a standard ball end mill on a versatile vertical CNC milling machine to machine the tooth flanks of large miter gears. This approach decouples the manufacturing process from specialized gear-cutting equipment, leveraging the widespread availability and programming flexibility of multi-axis CNC technology. The core of the method lies in the precise mathematical modeling of the miter gear tooth surface, the strategic planning of the tool path, and the subsequent generation of efficient NC code. We detail the complete technical workflow, from the derivation of the spherical involute equations and the calculation of cutter location points to simulation-based verification and practical implementation. This methodology offers a promising alternative for high-mix, low-volume production of large miter gears, enhancing both precision and automation levels.
Limitations of Conventional Miter Gear Manufacturing
The conventional manufacturing landscape for large miter gears is dominated by processes designed for high-volume production of smaller gears, which become inefficient when scaled. The primary limitations are summarized below:
| Conventional Method | Key Characteristics | Major Limitations for Large Gears |
|---|---|---|
| Gear Shaping / Planing | Intermittent cutting and indexing using a reciprocating forming tool. | Very low material removal rate (MRR); long cycle times; accuracy depends on the precision of the mechanical indexing system; tool wear on large surfaces is uneven. |
| Broaching | Continuous cutting action using a complex, multi-toothed broach tool. | Extremely high cost and long lead time for broach tool fabrication; requires massive broaching machines; unsuitable for low-volume production. |
| Form Milling on Planer/Mill | Using a formed milling cutter on a modified planer or gantry mill. | Each module/pressure angle requires a dedicated, expensive formed cutter; poor surface finish due to step-overs; difficult to achieve high geometric accuracy. |
These limitations underscore the need for a more flexible, software-driven machining approach. The proposed method replaces dedicated forming tools with a standard ball end mill, whose motion is controlled by NC code derived directly from the gear’s geometric model, thereby addressing the issues of tooling cost and process flexibility.
Mathematical Foundation: Modeling the Miter Gear Tooth Surface
To machine the complex, doubly-curved surface of a miter gear tooth with a ball end mill, a precise mathematical model is essential. The active tooth profile of a straight bevel gear is a spherical involute, a curve lying on the surface of a sphere.
2.1 Generation of the Spherical Involute
The spherical involute can be generated by imagining a plane tangent to the base cone of the miter gear (with a radius equal to the base cone distance, $R_b$) rolling without slip over the base cone. A point on this plane traces the spherical involute in space. The geometry is defined by the base cone angle $\delta_b$ and the generating angle $\varphi$.
In a coordinate system $(F; X_1, Y_1, Z_1)$ attached to the gear, the parametric equations for a point on the spherical involute surface, defined by the radial parameter $R$ (cone distance, where $R_b \le R \le R_a$) and the generating angle $\varphi$, are given by:
$$
\begin{align}
x(R, \varphi) &= R (\sin\delta_b \cos\varphi \cos\psi + \sin\varphi \sin\psi) \\
y(R, \varphi) &= R (\sin\delta_b \sin\varphi \cos\psi – \cos\varphi \sin\psi) \\
z(R, \varphi) &= -R \cos\delta_b \cos\psi
\end{align}
$$
where $\psi = \varphi \sin\delta_b$ represents the roll angle of the generating plane. For a standard miter gear, the pressure angle $\alpha$ at the pitch cone relates to the base cone angle via $\sin\delta_b = \sin\delta \cos\alpha_n$, where $\delta$ is the pitch cone angle (45° for a standard miter gear).
2.2 Surface Normal Vector for Cutter Compensation
When machining with a ball end mill, the center of the tool (the tool center point, or TCP) must be offset from the desired part surface by the tool radius along the local surface normal. Therefore, calculating the unit normal vector $\vec{n}$ at every point on the tooth flank is crucial for generating the correct tool path.
The normal vector $\vec{N}$ to a surface defined by $ \vec{S}(u,v) = [x(u,v), y(u,v), z(u,v)] $ is found using the cross product of the partial derivatives: $\vec{N} = \frac{\partial \vec{S}}{\partial u} \times \frac{\partial \vec{S}}{\partial v}$. Applying this to our parameters $u=R$ and $v=\varphi$:
$$
\vec{N}(R, \varphi) = \begin{vmatrix}
\vec{i} & \vec{j} & \vec{k} \\
\frac{\partial x}{\partial R} & \frac{\partial y}{\partial R} & \frac{\partial z}{\partial R} \\
\frac{\partial x}{\partial \varphi} & \frac{\partial y}{\partial \varphi} & \frac{\partial z}{\partial \varphi}
\end{vmatrix}
$$
Solving this determinant yields the components of the non-unit normal vector. For conciseness, let $a = \sin\delta_b$ and $b = \cos\delta_b$. The components are:
$$
\begin{align}
N_x &= R b (a \sin\varphi \sin\psi \cos\psi – \cos\varphi \sin^2\psi) \\
N_y &= -R b (\cos\varphi \sin\psi \cos\psi + a \sin\varphi \sin^2\psi) \\
N_z &= R (1 – a^2) \sin^2\psi
\end{align}
$$
The crucial unit normal vector, required for tool offset, is then:
$$
\vec{n}(R, \varphi) = \frac{\vec{N}(R, \varphi)}{\|\vec{N}(R, \varphi)\|}
$$
This vector $\vec{n}$ dictates the direction in which the ball end mill’s center must be positioned relative to the contact point on the miter gear tooth surface.
CNC Machining Strategy and Tool Path Planning
The machining process is divided into two distinct phases: roughing and finishing. Roughing uses a larger, flat-end or tapered mill to quickly remove the bulk of material between tooth spaces, leaving a uniform allowance (e.g., 0.5-1.0 mm) for the finishing operation. This discussion focuses on the finishing operation, which defines the final accuracy and surface quality of the miter gear.
3.1 Machine and Tool Setup
The machining is performed on a 3-axis or, preferably, a 3.5-axis vertical CNC milling center. The 0.5 axis refers to a rotary table (C-axis) upon which the gear blank is mounted. The ball end mill is held in a standard milling chuck. A critical setup step is tilting the milling head (or, if using a universal head, orienting the spindle) so that the axis of the tool is parallel to the pitch cone element (base cone generator) of the miter gear at the point of contact. This alignment, as illustrated in the setup diagram, minimizes gouging and ensures the cutting profile of the ball approximates the local surface curvature effectively.
3.2 Finishing Tool Path: V-direction Raster Strategy
For finishing the complex tooth flank, a “raster” or “zig-zag” path is adopted, but with a specific orientation. The tool paths are planned along the V-direction of the surface—that is, along lines of constant generating angle $\varphi$. This corresponds to machining along the “height” of the tooth from the heel to the toe. The process is executed in a series of passes:
- Indexing: The rotary C-axis positions the gear blank so that the center plane of a specific tooth gap is aligned with the tool.
- Contouring Pass: The ball end mill moves along a path defined by a sequence of points on a single $\varphi$-line, from the root to the tip (or vice-versa). At each point, the TCP is calculated as: $\vec{P}_{TCP} = \vec{P}_{surface} + r_{tool} \cdot \vec{n}$, where $r_{tool}$ is the ball nose radius.
- Step-over: After completing one pass, the tool retracts, and the C-axis rotates by a small angular increment $\Delta\varphi$. This defines a new constant-$\varphi$ path adjacent to the previous one.
- Repetition: Steps 2 and 3 are repeated until the entire tooth flank, bounded by the start and end $\varphi$ angles corresponding to the two sides of the tooth, is covered.
- Tooth Indexing: After one tooth space is finished, the C-axis rotates by the tooth spacing angle ($360^\circ / Z$, where Z is the number of teeth) to machine the next gap.
The step-over distance $\Delta L$ on the surface is controlled by the angular increment $\Delta\varphi$. The relationship is approximately $\Delta L \approx R \cdot \Delta\varphi \cdot \sin\delta_b$. Choosing $\Delta\varphi$ involves a trade-off between surface finish (requiring small steps) and machining time (favored by larger steps).
Automated Tool Path Generation via MATLAB
Manually calculating the thousands of TCP points required is impractical. We utilize MATLAB to automate this process. The inputs are the miter gear geometric parameters and the chosen machining parameters.
4.1 Example Miter Gear Parameters
Consider a large miter gear pair with the following specifications, typical for heavy machinery:
| Parameter | Symbol | Pinion (Drive) | Gear (Driven) |
|---|---|---|---|
| Number of Teeth | $Z$ | 26 | 77 |
| Module (at Large End) | $m$ | 30 mm | |
| Pressure Angle | $\alpha$ | 20° | |
| Pitch Diameter | $d$ | 780 mm | 2310 mm |
| Shaft Angle | $\Sigma$ | 90° | |
| Face Width | $B$ | 341 mm | |
| Pitch Cone Angle | $\delta$ | $\arctan(Z_1/Z_2) \approx 18.66^\circ$ | $90^\circ – \delta_1 \approx 71.34^\circ$ |
From these, we calculate the key geometric variables for the spherical involute model, such as the base cone angle $\delta_b$ and the range for $R$ (from inner to outer cone distance) and $\varphi$ (covering the active profile from root to tip).
4.2 MATLAB Algorithm for TCP Extraction
A MATLAB script performs the following operations:
- Parameter Initialization: Defines gear constants ($\delta_b$, $R_{min}$, $R_{max}$, $\varphi_{min}$, $\varphi_{max}$) and machining constants ($r_{tool}$, $\Delta R$, $\Delta\varphi$).
- Grid Creation: Creates a meshgrid of $(R, \varphi)$ points covering the tooth flank.
- Surface Point Calculation: Uses Equations (1)-(3) to compute $\vec{P}_{surface}(R_i, \varphi_j)$ for every grid point.
- Normal Vector Calculation: Uses the derived formulas to compute $\vec{n}(R_i, \varphi_j)$ for every grid point.
- TCP Calculation: Computes $\vec{P}_{TCP}(R_i, \varphi_j) = \vec{P}_{surface}(R_i, \varphi_j) + r_{tool} \cdot \vec{n}(R_i, \varphi_j)$.
- Path Sequencing: Organizes the TCP points into the correct order for the V-direction raster strategy (constant $\varphi$, varying $R$).
- Output: Exports the ordered list of $(X, Y, Z)$ coordinates for the TCP, along with the corresponding C-axis rotation angles, to a file.
The script can also generate 3D plots of the surface points and their normals for visual verification, as shown in the figure below (conceptual representation from the original study).
NC Code Generation and Machining Simulation in VERICUT
The generated TCP coordinates are post-processed into machine-specific G-code. For our application, a 3.5-axis milling center with a rotary table is assumed. The code structure for machining one tooth flank segment involves linear (G01) and rapid (G00) moves coordinated with rotary (C-axis) positioning.
5.1 Sample NC Code Structure
A simplified code block for a single finishing pass might look like this:
| NC Block | Explanation |
|---|---|
| G90 G54 G00 Xx1 Yy1 Zz1 | Rapid to safe start position above the workpiece. |
| G00 Cc1 | Rotary table indexes to the starting $\varphi$ angle for this pass. |
| G01 Zz2 Ff1 | Feed down to engagement depth. |
| G01 Xx2 Yy2 Zz3 Ff2 | Linear feed move along the first V-direction path (series of points). |
| G00 Zz1 | Rapid retract. |
| G00 Cc2 | Index to the next $\varphi$ angle (c2 = c1 + $\Delta\varphi$). |
| … [Repeat] … | The process repeats for all $\varphi$ steps. |
5.2 Virtual Verification with VERICUT
Before physical cutting, the NC program is verified using simulation software like VERICUT. This critical step prevents costly collisions and machining errors.
- Model Setup: A virtual machine environment is built, modeling the specific CNC mill (e.g., a 4-axis vertical mill), the tool holder, the ball end mill, and the gear blank.
- Program Loading: The generated G-code is loaded into the VERICUT controller.
- Simulation Run: The software simulates the entire machining process in a virtual 3D environment. It checks for:
- Gouging: The tool removing material where it shouldn’t.
- Collisions: Interference between the tool, holder, machine components, and workpiece/fixture.
- Air Cutting: Inefficient tool motion.
- Accuracy: Visual inspection of the resulting virtual gear tooth form.
A successful simulation, showing a smoothly machined tooth space without errors, validates the correctness of the mathematical model, tool path planning, and post-processing logic for the miter gear.
Practical Considerations and Conclusions
6.1 Practical Implementation Notes
Transitioning from simulation to physical machining involves several considerations:
- Workholding: The large size and weight of the miter gear blank demand a robust, precision rotary table and a rigid fixture to withstand cutting forces without deflection.
- Tool Selection: A coated carbide ball end mill is recommended for finishing hardened or high-strength steel blanks. The tool radius must be smaller than the smallest concave curvature on the tooth fillet.
- Cutting Parameters: Optimal spindle speed (N), feed per tooth (fz), and axial depth of cut must be selected based on the workpiece material, tool material, and system rigidity. For large miter gears, a conservative approach is often necessary.
- Coolant: High-pressure flood coolant is essential to manage heat, evacuate chips from the deep tooth space, and prolong tool life.
6.2 Conclusion
This article has presented a comprehensive methodology for the NC machining of large miter gears using a standard ball end mill. By moving away from dedicated forming tools and intermittent mechanical processes, this approach offers significant advantages in flexibility, scalability, and precision for low-to-medium volume production. The key enablers of this method are:
- The precise mathematical model of the miter gear tooth as a spherical involute surface.
- The algorithm for calculating the surface normal and subsequent tool center points.
- The strategic V-direction raster tool path that efficiently covers the complex flank geometry.
- The automated workflow from MATLAB-based point generation to verified NC code.
The successful simulation and subsequent physical trial cuts, as evidenced in the related research, confirm the validity of the underlying calculations and process planning. This digital manufacturing strategy effectively bridges the gap between advanced geometric modeling and practical, accessible machine tools, providing a viable and modern solution for producing high-quality large miter gears. Future work could focus on optimizing the tool path for minimum time, integrating adaptive machining for worn tools, or extending the principle to spiral bevel gears using more advanced 5-axis tool positioning.