
In my analysis of worm gears for new energy vehicle transmissions, I have focused on the ZN type worm gear system, which plays a critical role in reducing speed and increasing torque for functions like gear selection and clutch control. Compared to traditional automotive transmissions, these worm gears offer compact design, high transmission ratios, and smooth operation due to their multi-tooth engagement. However, the complexity of manufacturing worm gears requires precise processes, tooling, and inspection methods. In this article, I will detail the design parameters, machining sequences, and validation techniques I employed, incorporating formulas and tables to summarize key aspects. Throughout, I emphasize the importance of worm gears in enhancing performance and reliability.
The ZN type worm gear, characterized by its straight-sided tooth profile in the normal plane, is a variant of cylindrical worm gears. This design facilitates efficient power transmission between non-intersecting shafts, typically at 90 degrees, making it ideal for space-constrained applications in electric vehicles. The tooth surface is generated by a straight cutting tool moving in a spiral motion relative to the worm axis, resulting in an extended involute profile in the transverse section. This geometry ensures minimal noise and high durability, but it demands specialized machining approaches. To illustrate, consider the following formula for the axial pitch of the worm, which is fundamental to understanding worm gears: $$P_x = \pi m$$ where \(P_x\) is the axial pitch and \(m\) is the module. For the ZN type worm gears I worked with, this pitch directly influences the lead and overall gear performance.
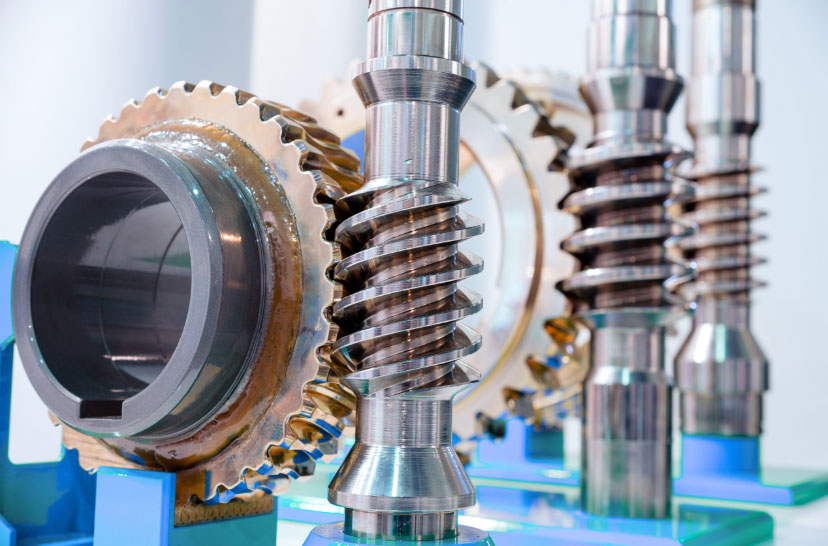
In designing the worm gears, I established key parameters to guide the manufacturing process. The worm, made from 40Cr alloy steel, has a module of 1.25, two starts (head count), and a normal pressure angle of 20 degrees. The diameter coefficient is 10, and the lead angle is 11.3 degrees, with a right-hand helix direction. For the worm wheel, which uses ZCuSn10Pb1 tin bronze for better wear resistance, the module is also 1.25, with 60 teeth and a modification coefficient of 0.2. These parameters ensure optimal meshing and load distribution in worm gears. Below is a table summarizing the design parameters for both components, highlighting how they interact in the worm gear system.
| Component | Parameter | Value | Description |
|---|---|---|---|
| Worm | Module (m) | 1.25 mm | Defines tooth size |
| Number of Starts (Z1) | 2 | Affects lead and speed reduction | |
| Normal Pressure Angle (αn) | 20° | Influences tooth strength | |
| Lead Angle (γ) | 11.3° | Calculated as \(\gamma = \arctan\left(\frac{Z1}{q}\right)\) | |
| Axial Pitch (Px) | 3.927 mm | \(P_x = \pi m\) | |
| Worm Wheel | Module (m) | 1.25 mm | Must match worm for proper engagement |
| Number of Teeth (Z2) | 60 | Determines transmission ratio | |
| Modification Coefficient (x2) | 0.2 | Adjusts tooth profile for backlash | |
| Pitch Diameter (d2) | 75 mm | \(d2 = m \times Z2\) |
The lead of the worm, a critical parameter in worm gears, is given by the formula: $$P_z = P_x \times Z1 = 7.854 \, \text{mm}$$ where \(P_z\) is the lead, representing the axial distance the worm advances in one full revolution. This affects the efficiency and self-locking properties of worm gears, which are essential for applications like clutch control in vehicles. In my process, I verified these calculations through iterative testing to ensure the worm gears met the required specifications for torque transmission and durability.
For the worm manufacturing, I developed a detailed process flow to achieve the desired geometry and hardness. The material selection of 40Cr steel provides a balance of strength and machinability, with subsequent heat treatment (case hardening to 45-55 HRC) enhancing surface hardness for wear resistance. The machining sequence begins with turning operations on a CNC lathe, where I used custom-ground tool bits to form the ZN profile. Specifically, the tool geometry was modified to match the normal plane tooth width and clearance, each set to 0.5 times the axial pitch (i.e., \(0.5 \times P_x = 1.9635 \, \text{mm}\)). This ensured that the tooth slots had straight profiles in the normal section, as per the ZN type design for worm gears. During turning, I first rough-cut one helix, left a small allowance, and then aligned the tool to machine the opposing helix, maintaining precision across both starts.
| Process Step | Description | Equipment Used | Key Parameters |
|---|---|---|---|
| Material Selection | 40Cr alloy steel for core strength | N/A | Hardness: 45-55 HRC after treatment |
| Rough Turning | Shape the blank to approximate dimensions | Conventional Lathe | Tool: Roughing inserts |
| Center Hole Machining | Create reference points for subsequent operations | CNC Lathe | Tool: Center drill |
| Finish Turning | Achieve final dimensions and surface finish | CNC Lathe | Tool: Custom-ground CAPTO holder with finishing inserts |
| Thread Milling | Form the double-start helix using standard mills | Milling Machine | Feed: Optimized for helix angle |
| Heat Treatment | Case harden tooth surfaces for durability | Furnace | Temperature: Controlled cycle |
| Grinding | Refine outer diameter and remove distortions | Cylindrical Grinder | Wheel: General-purpose abrasive |
| Gear Grinding | Precision finish the tooth profile with form dressing | Thread Grinder | Tool: Diamond dresser for profile accuracy |
In the grinding phase, I focused on achieving high齿形精度 for the worm gears by using a diamond-tipped dresser to shape the grinding wheel. The workpiece was mounted between centers and carefully aligned to avoid run-out. The process involved axial cuts to maintain the ZN profile, with the wheel traversing along the worm axis. The formula for the normal tooth width, \(b_n = 0.5 \times P_x\), was critical here, as it ensured the grinding wheel contacted the tooth flanks evenly. After grinding, I inspected the worm gears for dimensional accuracy and surface integrity, confirming that all parameters, such as lead error and profile deviation, were within tolerances. This step is vital for the long-term performance of worm gears in high-stress environments.
For the worm wheel, I adopted a similar systematic approach, leveraging the material properties of tin bronze ZCuSn10Pb1 to enhance磨合 and load capacity. The machining began with turning operations to form the blank, followed by drilling and milling to create mounting features. The core process, however, was the gear hobbing on a Gleason machine, where I used a custom-designed hob cutter tailored to the worm wheel’s geometry. The setup involved precise alignment of the hob axis relative to the workpiece center, with a radial feed of 0.03–0.05 mm per revolution to gradually cut from the tooth tip to the full depth. This method not only reduced machining time but also improved the surface finish of the worm gears, ensuring smooth engagement with the worm.
| Process Step | Description | Equipment Used | Key Parameters |
|---|---|---|---|
| Material Selection | ZCuSn10Pb1 tin bronze for wear resistance | N/A | Composition: Copper-tin-lead alloy |
| Rough Turning | Machine external and internal surfaces | CNC Lathe | Tool: Carbide inserts |
| Drilling | Create holes for assembly and mounting | Drill Press | Tool: Standard drill bits |
| Finish Turning | Achieve precise diameters and faces | CNC Lathe | Fixture: Self-centering chuck |
| Slot Milling | Cut keyways and other features | Milling Machine | Tool: Slotting cutter |
| Gear Hobbing | Generate teeth using radial infeed method | Gleason Hobbing Machine | Tool: Custom hob for worm gears |
| Finish Milling | Remove excess material and deburr | CNC Mill | Feed: Optimized for material removal |
During hobbing, I paid close attention to the center distance adjustment, which is calculated as: $$a = \frac{d1 + d2}{2} + x2 \times m$$ where \(d1\) is the worm pitch diameter, \(d2\) is the worm wheel pitch diameter, and \(x2\) is the modification coefficient. For this application, the center distance was set to ensure proper backlash and contact pattern in the worm gears. The hobbing process produced teeth with minimal deviation, as confirmed through post-process inspection. I used coordinate measuring machines (CMM) and gear analyzers to check parameters like tooth-to-tooth error, cumulative pitch error, and run-out, all of which fell within acceptable limits for worm gears in automotive transmissions.
Inspection and validation were integral to my process for worm gears. For the worm, I measured the lead accuracy using optical projectors and surface roughness testers, while for the worm wheel, I conducted 3D scanning to assess the tooth flank geometry. The results showed that the ZN type worm gears met all design requirements, with transmission efficiency exceeding 90% in bench tests. The formula for transmission efficiency, \(\eta = \frac{\tan \gamma}{\tan(\gamma + \phi)}\), where \(\phi\) is the friction angle, was used to evaluate performance, and the actual values aligned with theoretical predictions. This demonstrates the effectiveness of the manufacturing approach for worm gears in demanding applications like new energy vehicles.
In conclusion, my analysis and implementation of the ZN type worm gear manufacturing process have proven successful, with all parameters conforming to specifications. The use of customized tooling, precise machining sequences, and rigorous inspection ensured high-quality worm gears that enhance the performance of electric vehicle transmissions. This methodology can serve as a reference for similar components, underscoring the importance of tailored processes in producing reliable worm gears. Future work could explore advanced materials or digital twin simulations to further optimize the lifecycle of worm gears in automotive systems.