
In the realm of precision power transmission, the cycloidal drive stands out for its exceptional torque density, high reduction ratios, and remarkable durability. As a designer focused on advancing mechanical systems, I have witnessed a paradigm shift from traditional two-dimensional drafting to comprehensive three-dimensional digital prototyping. This transition is not merely a change in tools but a fundamental evolution in the design philosophy for complex assemblies like the cycloidal drive. The ability to visualize, simulate, and validate a design before physical prototyping dramatically accelerates development cycles, reduces costly errors, and unlocks new levels of optimization. This article delves into the methodologies for creating a fully parametric three-dimensional model of a cycloidal drive, detailing the critical steps from component modeling and kinematic definition to virtual assembly and interference analysis, thereby establishing a robust digital prototyping workflow.
Foundations of the Cycloidal Drive Mechanism
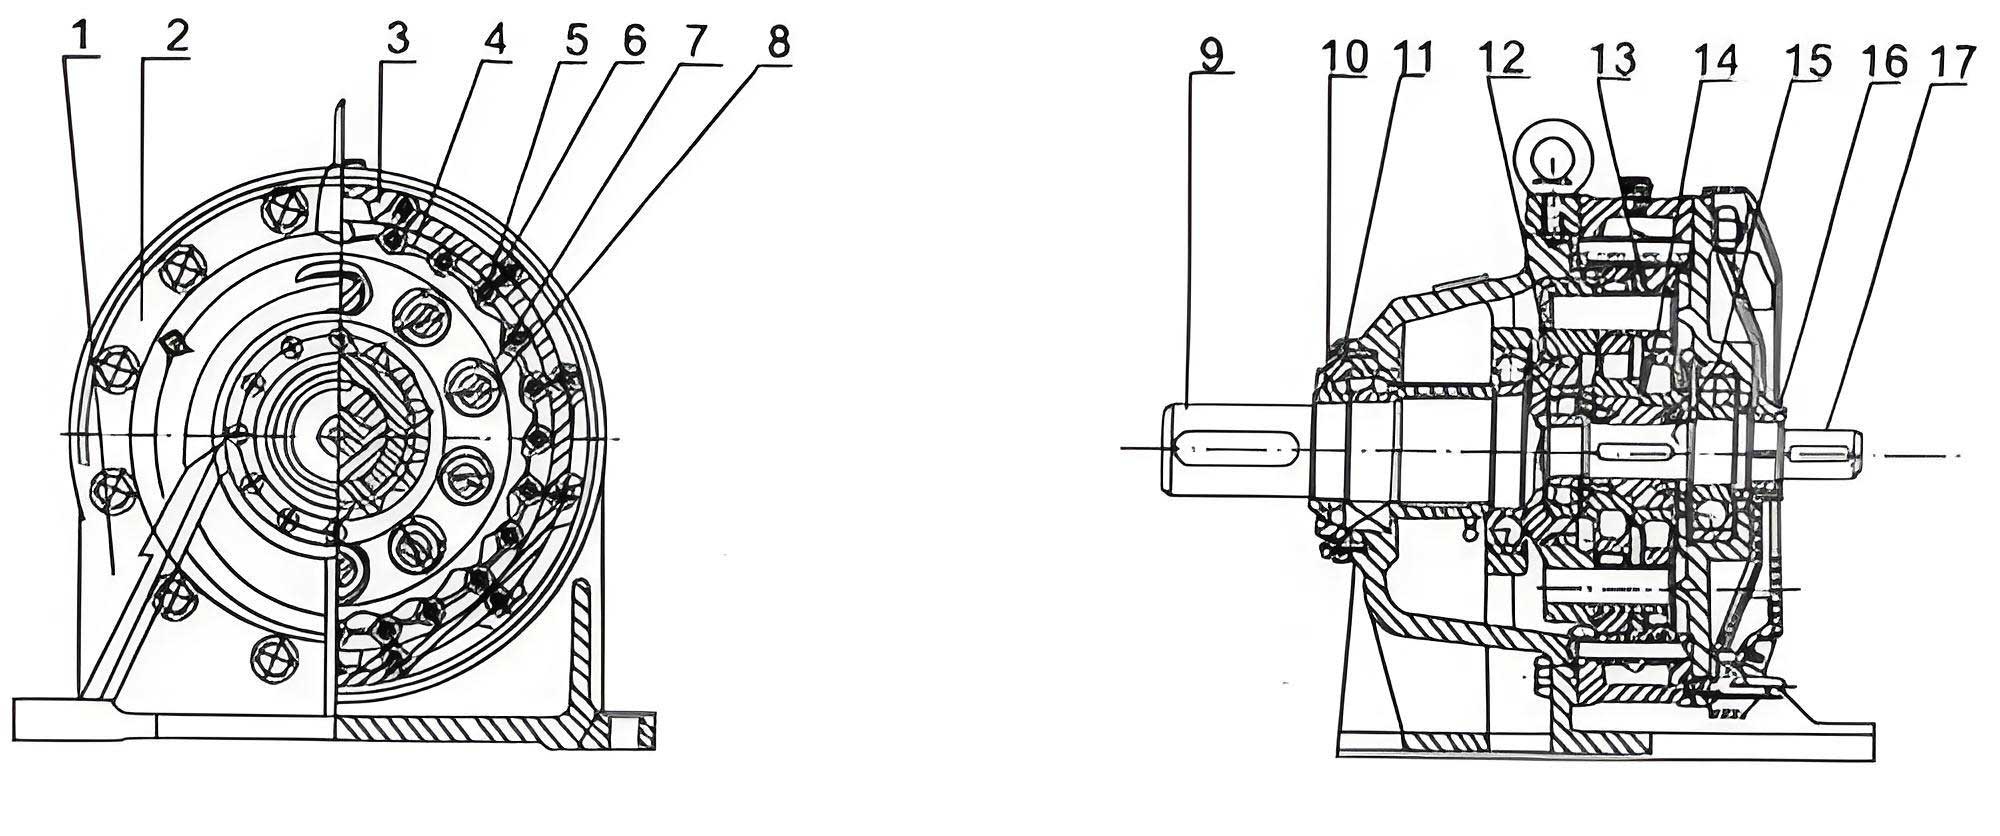
The operational principle of a cycloidal drive is elegant yet mathematically intensive. It relies on the meshing action between a lobed disc, known as the cycloidal disc or cam, and a ring of stationary pins. The key to its high reduction ratio lies in the difference between the number of lobes on the disc (N) and the number of pins (Z). When the eccentric input shaft rotates, it imparts an eccentric motion to the cycloidal disc. This motion causes the disc to simultaneously roll and precess around the inside of the pin ring. For each full revolution of the input shaft, the disc rotates backward by a small angle equal to the difference in the number of lobes and pins. This slow, reversed rotation is then extracted through a set of output pins or rollers in the disc’s holes, connected to the output shaft.
The heart of this mechanism, and the most challenging aspect to model accurately, is the profile of the cycloidal disc. Its shape is not a simple circle or involute but is derived from a curtate trochoid. The foundational equations defining the theoretical profile of the cycloidal disc’s lobe are given in parametric form. The coordinates of a point on the generating circle relative to the fixed pin circle are described by:
$$
x_0 = R_p \sin(\theta) – \frac{E}{Z_p} \sin(Z_p \theta)
$$
$$
y_0 = R_p \cos(\theta) – \frac{E}{Z_p} \cos(Z_p \theta)
$$
Where the parameter $\theta$ sweeps from $0$ to $2\pi$. However, this curve represents the path traced by the center of a rolling circle. To obtain the actual working profile of the cycloidal drive disc, we must offset this curve by the radius of the roller pins ($R_r$) along its normal. This results in the final tooth flank equations:
$$
x = x_0 + R_r \frac{ \frac{dy_0}{d\theta} }{ \sqrt{ (\frac{dx_0}{d\theta})^2 + (\frac{dy_0}{d\theta})^2 } }
$$
$$
y = y_0 – R_r \frac{ \frac{dx_0}{d\theta} }{ \sqrt{ (\frac{dx_0}{d\theta})^2 + (\frac{dy_0}{d\theta})^2 } }
$$
These equations are paramount for creating a precise digital model. The variables involved are critical design parameters that define the performance and physical geometry of the drive. A clear understanding of each is essential for successful parametric modeling.
| Symbol | Parameter | Definition & Role |
|---|---|---|
| $Z_p$ | Number of Pin Teeth | The count of stationary pins in the housing. This is typically one greater than the number of lobes on the disc ($Z_p = N + 1$). |
| $N$ | Number of Cycloidal Disc Lobes | The count of lobes on the rotating disc. The reduction ratio is fundamentally $N : (N – Z_p)$ or $N : -1$. |
| $R_p$ | Pitch Circle Radius of Pins | The radius of the circle on which the centers of the stationary pins are located. |
| $E$ | Eccentricity | The offset of the cycloidal disc’s center from the input shaft’s center. This value dictates the amplitude of the disc’s wobbling motion. |
| $R_r$ | Roller Pin Radius | The radius of the cylindrical rollers placed over the stationary pins or the output rollers. |
| $\theta$ | Generation Angle | The independent parameter (typically from $0$ to $2\pi$) used to calculate points along the profile curve. |
Parametric 3D Modeling of Core Components
Moving from theory to a tangible digital model requires a strategic approach within a 3D CAD environment. The process begins with the most defining component: the cycloidal disc.
Creating the cycloidal disc profile directly within CAD software often involves using an equation-driven curve tool. By inputting the final flank equations for $x(\theta)$ and $y(\theta)$, a precise, fully parametric curve is generated. An alternative, highly flexible method is to use an external calculation. One can write a simple script in a language like Python to compute a dense array of $(x, y)$ coordinate pairs using the equations above. This data is saved as a simple text file (e.g., `profile_points.txt`) and then imported into the CAD software as a spline through points. This method decouples the complex calculation from the CAD system and allows for easy manipulation of the base parameters. Once the closed profile is created, a simple extrusion or revolved boss gives the disc its thickness. The holes for the output rollers are then patterned equally around the disc’s center, completing the core component of the cycloidal drive.
The housing or pin ring presents a different set of challenges. It is an irregular, often cylindrical, shell-like structure with critical internal features. The modeling sequence is vital for maintaining design intent and ease of modification.
- Base Shape Creation: Start with a sketch of the main outer profile and revolve or extrude it to form the initial solid body.
- Internal Cavity & Pin Bosses: Use the shell or thickness removal command to hollow out the housing. Then, create a sketch on the internal face defining the pitch circle for the pins. Extrude cylindrical bosses or holes at these locations to serve as seats for the pin assemblies.
- Mounting and Service Features: Add flanges, bolt holes, sealing grooves, and oil ports using a combination of extruded cuts, hole wizard tools, and chamfers/fillets.
- Adaptive Design for Assembly: In an advanced workflow, the position and size of features like pin holes can be made adaptive, driven by the master parameters (like $R_p$ and $R_r$) defined during the cycloidal disc creation. This ensures all components update synchronously when the design is modified.
Other components like the eccentric input bearing assembly, output shaft with pins, and side covers follow more conventional modeling techniques but must adhere to the kinematic envelope defined by the moving disc.
Master Model and Parameter Management
A robust digital prototype of a cycloidal drive is not a collection of independent parts but a system of interrelated components. Implementing a master model strategy is crucial. This involves creating a central spreadsheet, a dedicated part file, or using the CAD software’s built-in parameter table to define all critical global variables.
| Global Parameter | Sample Value | Linked To |
|---|---|---|
| Reduction_Ratio | 11:1 | Derived from N and Z_p; used in documentation. |
| Z_p (NumPins) | 12 | Cycloid profile eq., housing pin pattern, ratio. |
| N (NumLobes) | 11 | Cycloid profile eq., reduction ratio. |
| Rp (PinCircleRadius) | 65 mm | Cycloid profile eq., housing sketch. |
| E (Eccentricity) | 2.5 mm | Cycloid profile eq., eccentric bearing size. |
| Rr (RollerRadius) | 6 mm | Cycloid profile offset, pin/roller parts. |
| Torque_Output | 500 Nm | Used for FEA validation, shaft sizing. |
Every dimension in the disc profile, housing pin circle, roller diameter, and bearing bore should be linked to these global parameters through simple algebraic relations (e.g., `Housing_Pin_Diameter = 2 * Rr + 0.1mm` for clearance). Changing a single value, like the eccentricity `E`, automatically triggers a cascade of updates throughout the entire assembly, ensuring geometric consistency and saving immense manual editing time. This parametric backbone is what transforms a static model into a dynamic digital prototype.
Virtual Assembly and Kinematic Simulation
With all components modeled, the virtual assembly phase begins. This is where the digital prototype truly comes to life, allowing for the validation of fit, function, and motion.
The assembly process should follow a logical, constraint-driven sequence mirroring the physical assembly. Standard mating constraints like `Insert` (for shafts and bearings), `Concentric`, and `Mate` are used. However, the assembly of the cycloidal drive has unique requirements:
- Eccentric Sub-Assembly: First, assemble the eccentric cam onto the input shaft, applying a concentric constraint. Then, place the bearing over the eccentric, ensuring its inner race is concentrically constrained to the cam.
- Cycloidal Disc Placement: Insert the cycloidal disc over the eccentric bearing. Its central bore is concentrically constrained to the bearing’s outer race. A crucial `Mate` constraint between the disc’s side face and a reference plane on the shaft ensures proper axial location.
- Output Mechanism: The output pins (or rollers) are inserted into the holes of the disc. A `Tangent` constraint is often more appropriate than `Concentric` here, as it allows the disc to roll smoothly against the pins without over-constraining the system for simulation purposes.
- Housing and Stationary Pins: The housing is brought in, and the stationary pins are constrained to their respective holes in the housing with an `Insert` constraint.
- Final Meshing: The most critical step is ensuring the disc meshes with the pins. This can be achieved by applying a series of `Tangent` constraints between the cycloidal profile of the disc and several of the stationary rollers. In practice, constraining it to two or three opposing pins is sufficient to fully define its position kinematically.
Once assembled, the model is ready for interference detection. The CAD software’s interference check tool analyzes all components in their current positions. It is advisable to perform this check at multiple stages (sub-assembly and final assembly) and, critically, at different points in the motion cycle by manually rotating the input shaft or using a motion study. This dynamic interference check can reveal collisions that a static check might miss, such as the disc lobes clipping the pins due to insufficient clearance or the output pins contacting the sides of their holes.
For true kinematic validation, a motion study is set up. A rotary motor is applied to the input shaft. Contact sets are defined between the cycloidal disc and the stationary pins, and optionally between the output pins and the disc holes. When the simulation is run, one can observe the smooth, wobbling motion of the disc and the slow, reversed rotation of the output mechanism. The software can plot angular displacement, velocity, and acceleration, providing quantitative validation of the reduction ratio. Observing this virtual motion is the ultimate proof of a correctly modeled and assembled cycloidal drive.
From Digital Prototype to Design Validation and Documentation
The value of the digital prototype extends far beyond mere visualization. It serves as the foundation for a suite of advanced engineering analyses that inform and validate the design.
Finite Element Analysis (FEA) can be performed directly on the assembled model. By fixing the housing, applying the rated output torque to the output shaft, and defining material properties, stress concentrations on the cycloidal disc lobes, output pins, and housing can be identified. The results guide material selection and potential geometric optimizations, such as adding slight root fillets to the disc lobes to reduce stress. Static analysis verifies the design’s structural integrity under load.
Mass properties calculation is instantaneous, providing accurate data for weight, center of gravity, and moments of inertia. This information is vital for system integration, especially in robotics or aerospace applications where weight and balance are critical.
Furthermore, the complete digital assembly is the direct source for manufacturing documentation. Exploded view drawings can be automatically generated to illustrate the assembly sequence for service manuals. Individual part drawings with fully associative dimensions, geometric tolerances, and surface finish symbols are created from the 3D models. Bill of Materials (BOM) tables are automatically populated within these drawings, listing part numbers, quantities, and materials. This seamless integration from 3D model to 2D drawing ensures drawing accuracy and dramatically reduces drafting time.
Conclusion: The Integral Role of Digital Prototyping
The transition to a fully digital design workflow for complex mechanical systems like the cycloidal drive represents a significant leap forward in engineering practice. By building a parametric 3D model anchored in the fundamental kinematic equations, we create more than a digital mock-up; we create a flexible, intelligent prototype. This digital twin allows for exhaustive exploration of the design space—rapidly iterating on parameters like eccentricity, pin size, or lobe count to optimize for torque, efficiency, or size. It enables rigorous validation through motion simulation and interference checking long before metal is cut, preventing costly manufacturing errors. It streamlines the creation of accurate manufacturing and assembly documentation. Ultimately, mastering this digital prototyping process for the cycloidal drive leads to more reliable, optimized, and cost-effective products, shortening time-to-market and enhancing competitive advantage in the field of precision motion control. The future of mechanical design is inextricably linked to the depth and sophistication of these virtual development environments.