
The fundamental operating principle of a planetary roller screw assembly involves the conversion of rotary motion into linear motion, or vice versa, through the rolling contact of threaded elements. Among its variants, the circulating type is distinguished by its ability to handle small leads within confined spaces while maintaining high precision. This characteristic is enabled by a unique structural feature: a dedicated threadless zone within the nut. This work details a comprehensive design and virtual assembly methodology specifically for this circulating planetary roller screw assembly, focusing on the critical aspects of the nut’s threadless zone geometry, component matching, and a systematic assembly procedure.
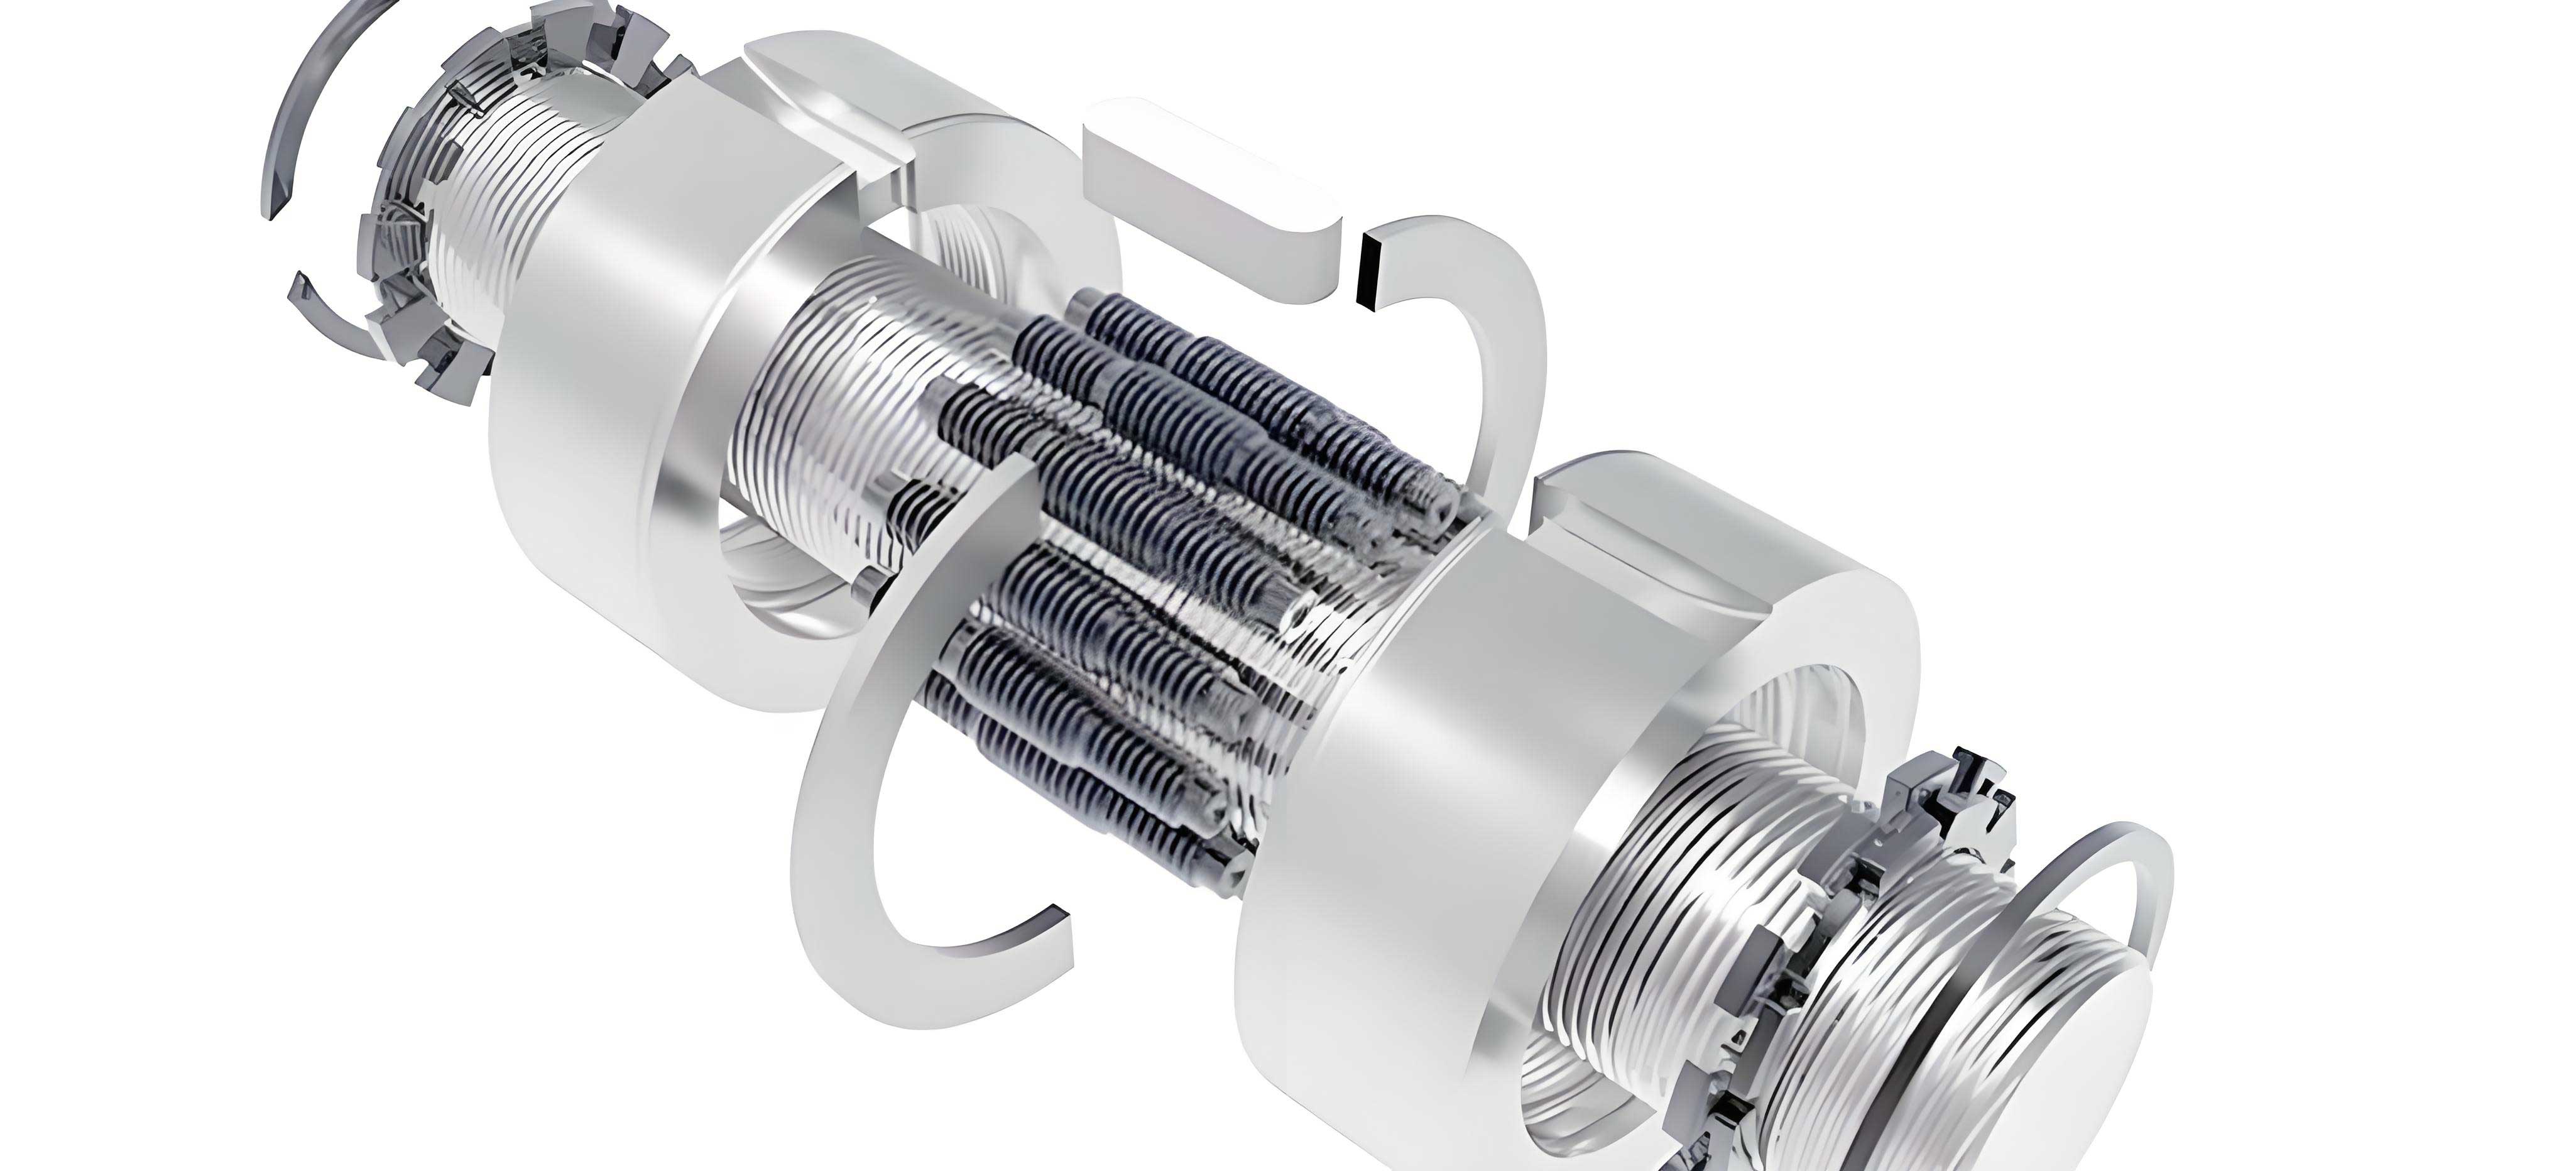
The core components of a circulating planetary roller screw assembly are the central screw, a set of planetary rollers, a nut with a partial thread, a cam ring, and a carrier. During operation, the rotation of the screw causes the rollers to spin on their own axes and revolve around the screw axis. The rollers engage with the internal thread of the nut via their own thread-like grooves, thereby translating the rotary motion of the screw into linear motion of the nut. When a roller reaches the end of the nut’s threaded section, it enters the threadless zone. Here, a profiled cam on the cam ring guides the roller radially outward, allowing it to “step over” the crest of the screw thread. Subsequently, the roller is guided back into engagement with the next thread start on the nut, completing the recirculation cycle and enabling continuous linear travel. The successful function of this entire planetary roller screw assembly hinges on the precise geometric design of this recirculation path and the accurate virtual assembly of all components.
1. Detailed Component Design and Matching
The design of a planetary roller screw assembly requires meticulous coordination between the screw, rollers, and nut to ensure proper kinematic and force transmission. The following sections outline the key design considerations and derived formulas.
1.1 Screw, Roller, and Nut Thread Profile Matching
The screw and nut typically employ a triangular thread profile, while the planetary rollers feature non-helical “grooves” designed for point contact. Several fundamental matching conditions must be satisfied for a functional planetary roller screw assembly.
First, the concentric condition ensures all components share a common axis and maintain proper contact:
$$d_n = d_s + 2d_r$$
where $d_n$, $d_s$, and $d_r$ are the pitch diameters of the nut, screw, and roller, respectively.
Second, the screw and nut must have the same hand of helix and an equal number of starts and pitch:
$$n_s = n_n$$
$$P_s = P_n$$
where $n_s$ and $n_n$ are the number of starts, and $P_s$ and $P_n$ are the pitches of the screw and nut.
Despite having the same pitch, the differing pitch diameters result in different helix angles, with the screw’s helix angle ($\lambda_s$) being larger than the nut’s ($\lambda_n$):
$$\lambda_s = \arctan\left(\frac{n_s P_s}{\pi d_s}\right) > \lambda_n = \arctan\left(\frac{n_n P_n}{\pi d_n}\right)$$
To guarantee point contact, the flank profile of the roller groove is designed as a circular arc. The radius of this arc ($R_{r2}$) is determined from the roller’s pitch diameter and the flank angle ($\alpha/2$). For a standard 90° included angle contact, it simplifies to:
$$R_{r2} = \frac{d_r}{2\sin(45^\circ)}$$
The most critical aspect of the circulating planetary roller screw assembly is the design of the nut’s threadless zone, which facilitates roller recirculation. As a roller enters this zone, the cam ring lifts it radially to clear the screw thread crest. The radial path of the roller’s centroid is central to defining the threadless zone’s geometry.
The maximum radial lift height ($h_r$) the roller must achieve is the sum of the crest clearances between the roller and screw:
$$h_r = \frac{d_{r3} – d_r}{2} + \frac{d_{s3} – d_s}{2}$$
where $d_{r3}$ and $d_{s3}$ are the major diameters of the roller and screw.
Consequently, the distance from the screw axis to the roller centroid at its highest point ($R_{r3}$) is:
$$R_{r3} = \frac{d_s}{2} + \frac{d_r}{2} + h_r = \frac{d_s}{2} + \frac{d_{r3}}{2} + \frac{d_{s3} – d_s}{2}$$
The threadless zone in the nut’s bore must accommodate this radial motion. Its profile can be constructed from three contiguous arc segments. The central, deepest arc segment corresponds to the roller’s highest lift position, and its radius ($R_{r1}$) is:
$$R_{r1} = \frac{d_s}{2} + d_r + h_r$$
The angular extent of this central arc segment is defined by the recirculation path. The projected linear travel of the roller centroid along the nut axis during the step-over phase is related to the screw pitch and the thread flank angle:
$$\overset{\frown}{DE} = \frac{P_s}{\tan(\alpha/2)}$$
where $\overset{\frown}{DE}$ is the arc length on the roller’s pitch circle during recirculation.
This arc length corresponds to a specific rotation angle ($\beta$) of the roller assembly (carrier) around the screw:
$$\frac{\overset{\frown}{DE}}{\pi d_c} = \frac{\beta}{360^\circ}$$
where $d_c$ is the pitch diameter of the carrier/roller assembly. Solving for $\beta$ gives:
$$\beta = \frac{P_s \cdot 360^\circ}{\pi d_c \tan(\alpha/2)}$$
The nut’s threadless zone must accommodate both forward and reverse motion, so its total angular width is $2\beta$.
The rollers are equally spaced by the carrier. The angle between adjacent rollers is:
$$\phi = \frac{360^\circ}{N}$$
where $N$ is the number of rollers. To prevent interference, the recirculation angle $\beta$ must be less than half the inter-roller spacing:
$$\beta < \frac{\phi}{2}$$
Combining these relations yields a constraint on the number of rollers based on fundamental design parameters:
$$N < \frac{\pi d_c \tan(\alpha/2)}{P_s}$$
This shows that the maximum number of rollers in a planetary roller screw assembly is governed by the carrier diameter, thread angle, and screw pitch.
| Parameter | Description | Governing Relation |
|---|---|---|
| $d_n$, $d_s$, $d_r$ | Pitch Diameters (Nut, Screw, Roller) | $d_n = d_s + 2d_r$ |
| $\lambda_s$, $\lambda_n$ | Helix Angles (Screw, Nut) | $\lambda_s = \arctan(n_s P_s / \pi d_s)$, $\lambda_n = \arctan(n_n P_n / \pi d_n)$ |
| $h_r$ | Max. Roller Radial Lift | $h_r = (d_{r3} – d_r)/2 + (d_{s3} – d_s)/2$ |
| $\beta$ | Carrier Rotation for Recirculation | $\beta = (P_s \cdot 360^\circ) / (\pi d_c \tan(\alpha/2))$ |
| $N_{max}$ | Maximum Number of Rollers | $N < \pi d_c \tan(\alpha/2) / P_s$ |
1.2 Carrier and Cam Ring Design
The carrier, or cage, maintains the angular position and spacing of the planetary rollers. It features straight axial slots that hold the rollers. The semi-circular profile of these slots matches the roller’s major diameter ($d_{r3}$). The carrier rotates at the same speed as the rollers’ revolution around the screw (the orbital speed). Its dimensions are constrained by the surrounding components: its outer ridge diameter ($D_B$) must be less than the nut’s minor diameter ($d_{n1}$) but greater than the sum of the screw major diameter and roller minor diameter ($d_{r1}$). Its inner bore diameter ($d_b$) must be larger than the screw’s major diameter to avoid interference.
$$d_{s3} + d_{r1} < D_B < d_{n1}$$
$$d_b > d_{s3}$$
The length of the carrier slot ($l_b$) must allow for axial movement of the roller during recirculation and is given by:
$$l_b = 2R_b + 2n_s P_s + s_1 + s_2$$
where $R_b$ is the radius of the slot’s semi-circular end (so $2R_b = d_{r3}$), and $s_1$, $s_2$ are axial clearances or portions of the roller length. For proper assembly sequencing, specific reference planes are established on the carrier relative to its slots and ends.
The cam ring is the key element enabling recirculation in this planetary roller screw assembly. It contains a raised cam profile (often a simple ramp or step) with a height equal to one lead of the screw ($n_s P_s$). The guiding flank of this cam must have an angle matching the thread half-angle ($\alpha/2$) to smoothly engage the roller groove. The cam ring’s internal dimensions must clear the screw, and its cam profile’s inner diameter ($d_{t1}$) should match the carrier’s outer ridge diameter ($D_B$) for proper alignment. The angular width of the cam profile ($\phi_{t1}$) corresponds to the angular width of the carrier slot ($\phi_b$).
$$d_t > d_{s3}; \quad d_{t1} = D_B; \quad \phi_{t1} = \phi_b$$
2. Virtual Modeling of the Planetary Roller Screw Assembly Components
Using the derived design relationships, a three-dimensional virtual model of the entire planetary roller screw assembly can be constructed. The process begins with defining the core parameters, as exemplified in the table below.
| Component | Major Diameter (mm) | Pitch Diameter (mm) | Minor Diameter (mm) | Starts | Hand | Count | Included Angle (°) | Pitch (mm) |
|---|---|---|---|---|---|---|---|---|
| Screw | 32.68 | 32.00 | 31.20 | 1 | Right | 1 | 60 | 1.0 |
| Roller | 8.18 | 7.50 | 6.70 | – | – | 12 | 60 | – |
| Nut | 47.80 | 47.00 | 46.32 | 1 | Right | 1 | 60 | 1.0 |
The screw and nut threads are modeled using a sweep-cut operation. The sweep path is a helix, and the profile is a triangle. A critical step is defining the contact geometry. While the screw and nut thread flanks are modeled as straight lines, the roller groove flanks are modeled as circular arcs to simulate point contact. The initial triangular profiles for the screw, nut, and roller are shown in the cross-sections below. After the sweep, fillets are added to the sharp crests and roots of the threads.
Proper meshing requires careful adjustment of these profiles. The roller’s groove arc must be positioned so that its theoretical contact line is tangent to the screw and nut’s straight flanks. This involves fine-tuning the radial position of the roller’s triangular profile and the radius of its groove arc to eliminate interference and establish the correct point contact condition, as illustrated in the cross-sectional engagement diagrams.
A crucial modeling consideration for the virtual assembly of this planetary roller screw assembly is the phasing of the thread starts. To ensure all roller grooves can engage simultaneously with both the screw and nut threads, the helical threads of the screw and nut must be synchronized. This is achieved by ensuring the thread start points on the screw and nut pitch diameters are aligned to the same axial reference plane after accounting for a 180° phase shift due to their opposing positions relative to the rollers. This alignment guarantees that when the rollers are placed, they will mesh correctly with both components without mismatch.
3. Systematic Virtual Assembly Methodology
The assembly of a circulating planetary roller screw assembly in a virtual environment requires a strict sequence to account for the helical nature of the threads and the specific positioning of the recirculation components. The following step-by-step methodology ensures a correct and interference-free assembly.
Step 1: Orientation and Preparation. Verify the hand of helix for both screw and nut (both must be identical, e.g., right-handed). Select the cam ring orientation accordingly. The two cam rings are positioned with a specific axial separation $h = s_1 + s_2 + P_s/N + P_s$, where $s_1$ and $s_2$ are portions of the roller length. The roller major diameter must be less than the axial distance $g$ between the leading edges of the cam profiles on the two rings.
Step 2: First Cam Ring and Nut Assembly. Assemble the first cam ring concentrically into one end of the nut. Constrain it so that the center plane of its cam profile aligns with the edge of the nut’s threaded section, i.e., at the beginning of the threadless zone.
Step 3: Carrier and Second Cam Ring Assembly. Insert the carrier into the nut. Align the centerline of one specific carrier slot with the center plane of the first cam ring’s profile. Then, insert the second cam ring into the opposite end of the nut. This second cam ring must be rotationally offset such that its cam profile is positioned at the opposite side of the threadless zone. The angular offset between the center planes of the two cam profiles is equal to the inter-roller angle, $\phi = 360^\circ / N$.
Step 4: Sequential Roller Insertion. This is the most critical phase. The rollers must be inserted in a specific order, each at a different axial position relative to the carrier, to match the helical lead. The axial position of the $i$-th roller’s center plane relative to the end face of the first cam ring is given by:
$$l_i = m + s_1 + \frac{N – i}{N} P_s$$
where $i = 1, 2, …, N$, and $m$ is a fixed axial offset based on assembly setup. For the first roller ($i=1$), $l_1 = m + s_1 + P_s$. For the last roller ($i=N$), $l_N = m + s_1$.
| Roller Number (i) | Distance to Cam Ring Face ($l_i$) | Carrier Reference Plane |
|---|---|---|
| 1 | $l_1 = m + s_1 + P_s$ | Primary reference plane $b_1$ |
| 2 | $l_2 = m + s_1 + \frac{N-1}{N}P_s$ | Secondary plane $b_2$ (offset by $P_s/N$) |
| 3 | $l_3 = m + s_1 + \frac{N-2}{N}P_s$ | Tertiary plane $b_3$ (offset by $2P_s/N$) |
| … | … | … |
| N | $l_N = m + s_1$ | Final reference plane |
The assembly proceeds as follows: Insert Roller 1 into the pre-aligned carrier slot. Constrain its axis to be parallel and at the correct radial distance (e.g., $(d_s/2 + d_r/2)$) from the nut axis. Align the roller’s own center plane (perpendicular to its axis) with the carrier’s primary reference plane ($b_1$). Its end face should be in contact with the cam profile.
Insert Roller 2 into the next carrier slot (rotated by $\phi$ degrees). Perform similar constraints, but this time align its center plane with the carrier’s secondary reference plane ($b_2$), which is axially offset from $b_1$ by $P_s/N$. This offset accounts for the helical lead over one inter-roller angular step.
Repeat this process for all remaining rollers, each time using the corresponding carrier reference plane. After inserting all $N$ rollers, they will be axially staggered in a pattern that perfectly matches one full lead ($P_s$) over one full revolution ($360^\circ$) of the carrier, ensuring they all lie on the same virtual helix and can engage simultaneously.
Step 5: Final Screw Integration. With the nut, cam rings, carrier, and rollers fully assembled, the final step is to insert the screw. Thanks to the precise phasing of the thread starts established during modeling (Step 2 from the modeling section) and the correct axial staggering of the rollers, the screw can now be inserted concentrically. Its threads will mesh perfectly with the grooves of all planetary rollers without interference. The resulting fully assembled planetary roller screw assembly model is now ready for motion simulation, interference checking, and further analysis.
4. Conclusion
The design and assembly of a high-performance circulating planetary roller screw assembly demands a rigorous and systematic approach. This work has detailed a comprehensive methodology covering the critical aspects. The geometric design of the nut’s threadless zone and the associated cam ring was analytically derived, providing formulas for key parameters such as the recirculation angle ($\beta$), radial lift ($h_r$), and the constraint on the number of rollers ($N$). A component matching strategy was established, emphasizing the concentric condition, helix angle relationship, and the precise design of thread profiles to achieve the required point contact. Finally, a step-by-step virtual assembly procedure was presented. This procedure resolves the challenge of assembling helically phased components by introducing a system of axial reference planes on the carrier, ensuring each planetary roller is positioned at the correct axial location corresponding to its angular position. This holistic methodology, encompassing analysis, modeling, and assembly sequencing, provides a valuable reference framework for the engineering development and virtual prototyping of reliable and efficient circulating planetary roller screw assemblies.