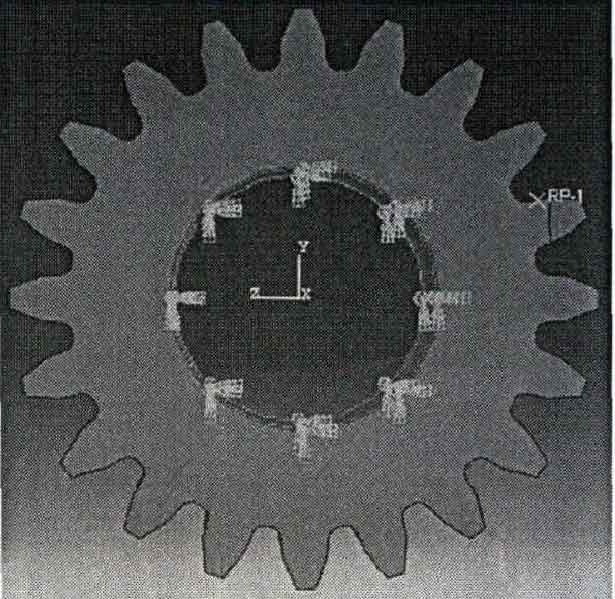
The model used for the numerical simulation of gear bending fatigue is the same as that used in the bending fatigue test of 42CrMo steel heavy equipment transmission gear. Therefore, the analysis model is created according to the design parameters of heavy-duty gear in the finite element software ABAQUS, as shown in Figure 1.
Mesh generation is very important to the results of finite element. The quality of mesh directly affects its solution accuracy and time. Due to the simple structure of the gear itself, in order to achieve the mesh quality that can be used by the gear, the original mesh generation function of ABAQUS can be directly selected, so the gear can be directly meshed in ABAQUS. The division results are shown in Figure 2:
Because the numerical simulation of bending fatigue test is mainly analyzed on the loaded gear teeth, and other parts are not analyzed, the relatively simple tetrahedral isoparametric element (c3d4) is selected as the grid type of the gear as a whole. In order to obtain the real and accurate simulation results as much as possible, it is necessary to consider that the loaded part of the gear is on the gear teeth, When the gear extends from the center of the shaft hole to the gear teeth, there is a large gradient and an obvious stress-strain field. When dividing the mesh, the parts of the gear teeth need to be subdivided. The mesh fineness at the gear teeth is higher than that of the wheel body. The mesh size of the gear teeth is 1.5mm and the mesh size near the shaft hole is 5mm. The mesh size of the middle part gradually transits. This meshing method has regular mesh shape, and at the same time, the number of meshes is small, which greatly saves the calculation time required in the finite element post-processing process, that is, the refinement of gear teeth can ensure the calculation accuracy. The whole model includes 13022 nodes and 56167 units.
Since the material of the transmission gear of the heavy equipment used in the above bending fatigue test is 42CrMo steel, the elastic material behavior parameters set in the numerical simulation are: elastic modulus E = 2100000mpa, Poisson’s ratio μ= 0.28, the elastic type is isotropic, and the plastic material behavior parameters are set as: the plastic strain is 0 under the stress of 930mpa and the plastic stress is 0.02 under the stress of 1080mpa. The plastic hardening is isotropic. When setting the evolution parameters, according to the energy principle, the softening of yield stress is linear, the stiffness degradation is set to maximize, the power law is selected as the mixed mode behavior, 42200 n / M is set as the fracture energy in three directions, and the power exponent is 1. In order to eliminate the generated elastic wave, protect the static equilibrium equation, prevent its failure in finite element expansion and reduce the divergence of the model, 0.00005 is set as its viscous stability coefficient.
In order to improve the convergence of model analysis, in the incremental step option, the maximum number of incremental steps is 1000000, the initial incremental step is set to 0.01, the minimum value is 0.00000001, and the maximum value is 0.1.
During the test, the gear is completely fixed on the fixture. It is necessary to limit not only the movement of the gear in the X, y and Z directions, but also the rotation freedom of the gear in the X, y and Z directions. Therefore, when setting the boundary conditions, the annular area and two side areas of the gear shaft hole are set to be completely fixed. Not only U1 = U2 = U3 = 0, but also ur1 = UR2 = UR3 = 0, so as to ensure that the gear is stationary during loading. The constraint results are shown in Fig. 3.
During the numerical simulation, the load applied on the gear teeth shall be completely consistent with the load applied on the gear teeth during the test. The contact mode of the numerical simulation shall be consistent with the contact mode between the upper indenter and the gear teeth during the bending fatigue test, that is, it shall be set as line contact (the plane of the line where the indenter contacts the gear is tangent to the base circle of the gear). During the test, the application of gear load is completed by the action of its indenter. Therefore, in the numerical simulation, the upper indenter is simplified, the load is applied to the gear tooth surface by means of concentrated force through the contact line, a row of nodes on the loading line are selected for loading, and the load and nodes are set with uniform coupling relationship. The magnitude, direction and action point of the force are the same as those required in the test. The maximum value of the number of cycles is the same as that set in the bending fatigue test, which is 10000000. When the number of cycles exceeds this value, it is called out of range. It is considered that the gear tooth can reach infinite cycle under this load condition, and the analysis stops.


