1. Verification of tooth profile shape in reverse engineering software
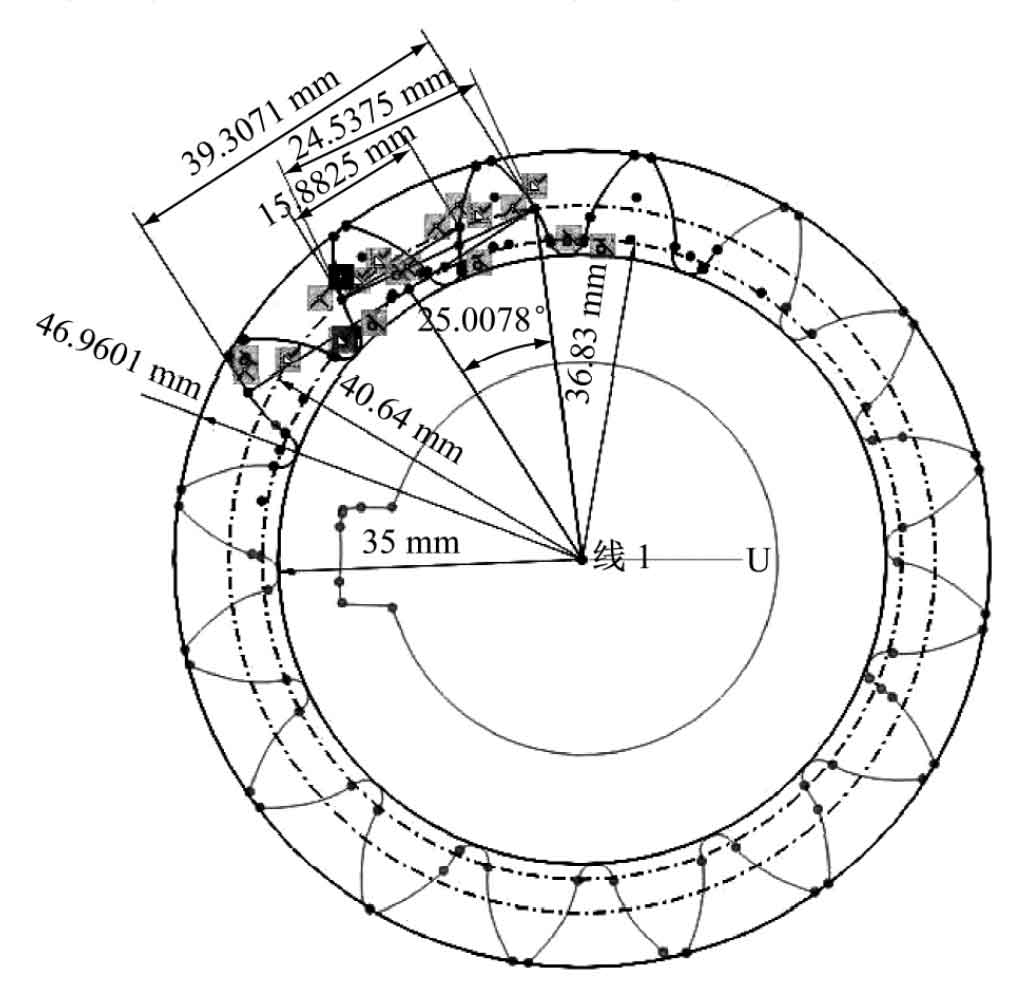
The figure shows the tooth profile in the reverse engineering software. The steps of tooth profile shape verification in the reverse engineering software are as follows:
1) The three-dimensional scanning data of involute spur gear is imported into the reverse engineering software. In the reverse engineering software, the circle is drawn with three points to fit the tooth top circle and tooth root circle. At this time, the diameter of the tooth top circle is da = 46.9601 × 2 = 93.920 2 mm, root circle diameter DF = 35.00 × 2 = 70.00 mm, close to the mapping value.
2) Draw the graduation circle with d = MZ = 81.28 mm and DB = mzcos = 73.664 8 mm through the center of the circle, and map ha = 6.320 1 mm through the circle respectively; HF = 5.64 mm, calculated by the formula, x = 0.244 1, x = 0.239 8, take the average value x = 0.241 95, which is close to that calculated by formula (3). At this time, the diameter of tooth top circle Da = 93.898 2 mm, and the diameter of tooth root circle DF = 69.514 2mm, which is close to the mapping value;
3) For the intersection of the excessive circle and the tooth profile, make the tangent of the base circle and extend it to intersect with the tooth profile respectively. As shown in the figure, the length of the common normal W3 = 39.307 1 mm is measured. Connect the intersection of the circle center, the indexing circle and the tooth profile, and the intersection of the circle center, the base circle and the tangent line respectively. The included angle between the two is 25.007 8 °, which is the tooth profile angle.
To sum up, this group of data is in line with the calculation results.
2. Verification by paired gears
For the reducer gear matched with the involute spur gear, the number of teeth z = 49, the diameter of the tooth top circle Da = 256.80 mm, the diameter of the tooth root circle DF = 232.90 mm, the length of the common normal k = 5, wk = 70.86 mm; Wk - 1 = 56.42 mm, center distance a ‘= 165.12 mm. The center distance a ‘= 165.12 mm, which is close to the theoretical center distance a = m (z1 + Z2) = 165.10 mm, indicates that the involute spur gear set is unchanged or highly modified. Through formula calculation, the module of involute straight tooth cylindrical gear is 5.08, the tooth profile angle is 25 °, the tooth top height coefficient is 1, the tooth root height coefficient is 0.35, the diameter of tooth top circle is da = 256.746 5 mm, the diameter of tooth root circle is DF = 232.888 5 mm, the displacement coefficient is x = – 0.230 7, x = – 0.225 1, and the average value is x = -0.227 9, The displacement coefficient is opposite to that of the motor involute spur gear, and the absolute value is close to the same, which meets the condition of high displacement of this group of gears.

