
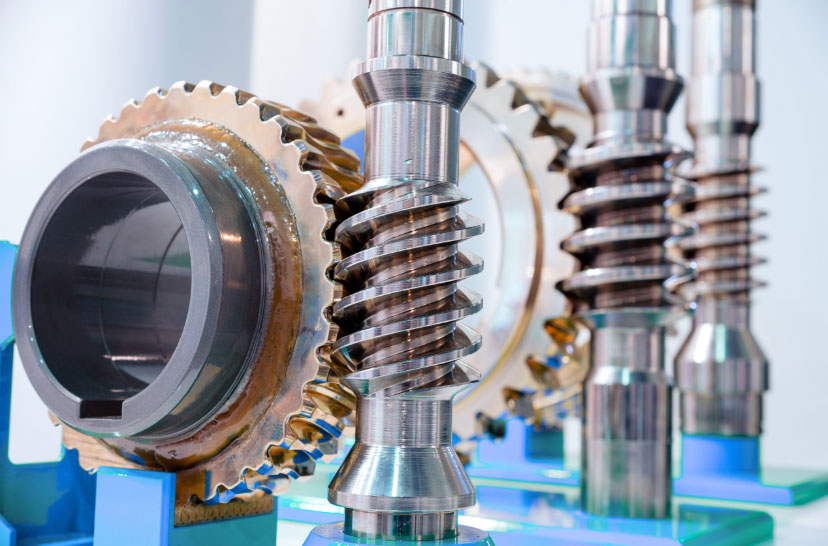
In the field of mechanical engineering, the design and optimization of worm gears are critical for achieving efficient power transmission in various applications, such as automotive systems, industrial machinery, and robotics. Worm gears, consisting of a worm (similar to a screw) and a worm wheel, offer significant advantages including high reduction ratios, compactness, and smooth operation. However, their complex geometry, characterized by helical teeth and intricate contact surfaces, poses challenges in traditional design methods. To address this, I explore the use of parametric design techniques within the Pro/E (Pro/ENGINEER) software platform, specifically version 4.0, to create adaptive three-dimensional models of worm gears. This approach enables rapid customization and regeneration of worm gear assemblies by modifying key design parameters, thereby streamlining the development process and supporting advanced analyses like finite element simulation. Throughout this article, I will delve into the methodology, implementation steps, and benefits of parameterizing worm gears, emphasizing the repeated importance of worm gears in modern mechanical systems.
Parametric design is a powerful paradigm in computer-aided design (CAD) that integrates design intent into digital models through variables, relationships, and constraints. By defining parameters such as dimensions, angles, and material properties, designers can create models that automatically update when parameters change, reducing manual rework and errors. Pro/E, developed by Parametric Technology Corporation (PTC), is a leading CAD software renowned for its robust parametric capabilities, widely used in industries like aerospace, automotive, and consumer electronics. For worm gears, parameterization is particularly valuable due to the interdependence of geometric features—for instance, the module, number of teeth, and lead angle must align to ensure proper meshing and performance. In this context, I focus on ordinary involute cylindrical worm gears, which are prevalent in many applications. The core idea is to establish a set of variable design parameters that govern the worm gear geometry, link them via mathematical relationships derived from worm gear theory, and use Pro/E’s tools to generate 3D entities. This not only accelerates design iterations but also lays groundwork for downstream engineering tasks, such as stress analysis and dynamic simulation, which are essential for optimizing worm gear performance.
The foundational step in parametric design of worm gears involves identifying and defining the key parameters that influence the geometry and functionality. Based on standard worm gear传动 principles, these parameters include the module (M), number of worm threads (Z1), number of worm wheel teeth (Z2), pitch diameter of the worm (d1), worm wheel width (B), lead (S), center distance (a), and pressure angles. To systematize this, I categorize them into primary variable parameters and derived parameters, which are calculated using established worm gear equations. For example, the lead angle (γ) and helix angle (β) are critical for defining the tooth orientation in worm gears. In Pro/E, I initiate the process by accessing the “Tools” menu to add parameters and set initial values. Subsequently, I define relationships among these parameters to enforce design rules. The table below summarizes the primary parameters and their typical roles in worm gear design:
| Parameter | Symbol | Description | Typical Range/Value |
|---|---|---|---|
| Module | M | Defines tooth size; fundamental for scaling worm gears | 1–10 mm |
| Worm Threads | Z1 | Number of starts on the worm; affects reduction ratio | 1–4 |
| Worm Wheel Teeth | Z2 | Number of teeth on the worm wheel; determines gear ratio | 20–100 |
| Pitch Diameter (Worm) | d1 | Reference diameter for the worm; influences strength | M * Q (Q is diameter factor) |
| Lead | S | Axial advance per revolution; key for motion transmission | π * M * Z1 |
| Center Distance | a | Distance between worm and wheel axes; critical for assembly | (d1 + d2) / 2 |
| Pressure Angle (Normal) | α | Angle defining tooth profile; affects load capacity in worm gears | 20°–25° |
To mathematically bind these parameters, I employ relationships in Pro/E. For instance, the lead angle γ is derived from the worm threads and pitch diameter: $$ \gamma = \arctan\left(\frac{Z1}{Q}\right) $$ where Q is the diameter factor (often denoted as q). Similarly, the helix angle β for the worm wheel is set equal to γ for proper meshing in worm gears: $$ \beta = \gamma $$ The normal pressure angle α relates to the transverse pressure angle α_t via the helix angle: $$ \alpha_t = \arctan\left(\frac{\tan(\alpha)}{\cos(\beta)}\right) $$ and the lead S is computed as: $$ S = \pi \cdot M \cdot Z1 $$ These equations ensure that any change in a primary parameter automatically updates the entire worm gear model, maintaining geometric consistency. This parametric framework forms the backbone for constructing 3D entities of both the worm and worm wheel, which I will detail in subsequent sections.
Moving to the worm wheel parametric modeling, the process begins with creating the basic circles that define the tooth geometry. In Pro/E, I use the sketching mode to draw concentric circles representing the pitch circle, base circle, addendum circle, and dedendum circle. These circles are parameterized by adding diameter relations. For example, if d3 is the pitch diameter, d4 the addendum diameter, d5 the base diameter, and d6 the dedendum diameter, the relationships are: $$ d3 = M \cdot Z2 $$ $$ d4 = d3 + 2 \cdot M $$ $$ d5 = d3 \cdot \cos(\alpha_t) $$ $$ d6 = d3 – 2.4 \cdot M $$ These equations tie the circles to the worm gear parameters, enabling dynamic resizing. Next, I generate the involute curve, which is essential for accurate tooth profiles in worm gears. Using Pro/E’s curve-from-equation tool, I select a Cartesian coordinate system and input the parametric equations for an involute. In LaTeX format, the equations are: $$ r = \frac{d5}{2} $$ $$ \theta = t \cdot 45 $$ $$ x = r \cdot \cos(\theta) + r \cdot \sin(\theta) \cdot \theta \cdot \frac{\pi}{180} $$ $$ y = r \cdot \sin(\theta) – r \cdot \cos(\theta) \cdot \theta \cdot \frac{\pi}{180} $$ $$ z = 0 $$ where t is a parameter ranging from 0 to 1. This produces one side of the involute; I then mirror it across a datum plane to create the symmetric profile. To account for the helical nature of worm gears, I copy this involute and rotate it by an angle derived from the helix angle: $$ \text{Rotation Angle} = \arcsin\left(\frac{M \cdot Q \cdot \tan(\beta)}{d5}\right) $$ This step ensures the tooth profile aligns correctly along the worm wheel’s circumference.
With the basic curves established, I proceed to construct the worm wheel body. A rotational surface is created by revolving a sketch around an axis, with dimensions linked to parameters like the wheel width and hub diameter. For instance, the diameter D12 might relate to the worm wheel’s outer dimensions: $$ D12 = 2 \cdot D1 $$ where D1 is a reference dimension. Onto this surface, I project a trajectory curve that serves as the path for sweeping the tooth profile. This curve is a straight line in the sketching plane, but when projected, it follows the surface contour, with its orientation controlled by the helix angle β. The worm wheel主体 is then generated using a rotational solid feature, incorporating parameters for the bore and flange dimensions. To form the teeth, I use the sweep-blend feature in Pro/E. Selecting the projected trajectory as the path, I define two cross-sections at the ends, which are the involute curves previously created. The sweep-blend removes material to carve out the first tooth slot. Replicating this tooth around the wheel involves a copy-rotate operation: I copy the tooth feature and rotate it by an angle equal to $$ \frac{360}{Z2} $$ degrees about the wheel axis. Finally, I apply a pattern feature to array this tooth, with the number of instances set to Z2 – 1 and the increment angle tied to the same relation. This completes the worm wheel’s parameterized model, allowing regeneration with new parameters via the “Regenerate Model” command. Throughout this process, the focus on worm gears ensures that all steps are tailored to their unique geometry, such as the need for helical adjustments and precise involute profiles.
Shifting to the worm parametric modeling, the approach shares similarities but addresses the worm’s helical thread structure. After defining parameters specific to the worm—such as worm length L, lead S, and addendum height HA1—I establish relations akin to those for the worm wheel. A key step is creating the worm’s helical trajectory, which defines the path of the thread. Using the curve-from-equation tool with cylindrical coordinates, I input the equations: $$ r = \frac{M \cdot Q}{2} $$ $$ \theta = t \cdot \text{tx} \cdot \text{la} $$ $$ z = t \cdot \text{la} $$ where tx is a scaling factor and la is the lead length. This generates a螺旋线 that serves as the sweep path for the worm thread. Concurrently, I sketch the worm’s basic circles and involute curve on a datum plane, following the same method as for the worm wheel, but adjusted for the worm’s smaller diameter and steeper helix. The worm body is created via an extrusion feature: a circle of diameter related to the root diameter is extruded to a length equal to 2 * la, with relations: $$ \text{Diameter} = M \cdot Q – 2.4 \cdot M $$ $$ \text{Length} = 2 \cdot \text{la} $$ This forms the worm shaft before threading.
For the thread itself, I employ a sweep-blend feature along the helical trajectory. The cross-section is the involute tooth profile, scaled appropriately for the worm. This creates a single-thread worm. To model multi-thread worms common in worm gears, I copy and rotate the thread feature around the worm axis, with the rotation angle calculated based on the number of threads Z1. For example, for a double-thread worm, I rotate by 180 degrees. After threading, I add finishing features like chamfers and fillets using rotational cut features, with dimensions parameterized. A notable relation for chamfer size might be: $$ \text{Chamfer Size} = 1.5 \cdot M $$ This ensures that features scale with the worm gear module. The completed worm model can be regenerated by modifying parameters such as M, Z1, or L, demonstrating the flexibility of parametric design for worm gears. The integration of these worm and worm wheel models allows for assembly and interference checking, further enhancing the design process for worm gear systems.
The benefits of this parametric approach for worm gears are manifold. By encapsulating design intent in parameters and relations, I reduce the time required for design iterations from hours to minutes. For instance, changing the module M from 2 mm to 3 mm automatically updates all dependent dimensions—tooth sizes, diameters, and clearances—ensuring a consistent and functional worm gear pair. This is crucial in industries where customization is frequent, such as in定制 gearboxes or robotic actuators. Moreover, the parameterized models serve as a foundation for advanced engineering analyses. Using Pro/E’s simulation modules or exporting to finite element analysis (FEA) software, I can perform stress tests on worm gears under load, optimize material usage, and predict wear patterns. Dynamics simulation can also be conducted to evaluate the meshing behavior and efficiency of worm gears, which often suffer from sliding friction losses. The table below compares traditional and parametric design methods for worm gears, highlighting efficiencies:
| Aspect | Traditional Design | Parametric Design with Pro/E |
|---|---|---|
| Design Time | Weeks for multiple iterations | Days or hours via parameter changes |
| Error Rate | High due to manual updates | Low with automated relations |
| Customization | Limited and time-consuming | High, with quick regeneration |
| Integration with CAE | Manual model preparation needed | Seamless export for FEA/CFD |
| Scalability | Difficult for different sizes | Easy through parameter scaling |
Furthermore, this methodology extends beyond worm gears to other standardized mechanical components, such as spur gears, bearings, and cams, promoting a modular design philosophy. In educational contexts, it aids students in understanding worm gear geometry by visualizing parameter effects in real-time. However, challenges include the initial setup time for defining parameters and relations, which requires a deep understanding of worm gear theory. Additionally, complex features like undercuts or lubrication grooves in worm gears may need extra parameterization efforts. To address this, I recommend creating a library of parameterized worm gear templates in Pro/E, which can be reused across projects, saving even more time.
In conclusion, the parametric design of worm gears using Pro/E represents a significant advancement in mechanical CAD. By leveraging Pro/E’s capabilities, I have demonstrated how to build adaptive 3D models of both worm and worm wheel, driven by a set of variable parameters. The process involves defining key worm gear parameters, establishing mathematical relationships, and using features like sweep-blend and patterning to generate accurate geometries. This approach not only accelerates the design cycle for worm gears but also enhances accuracy and facilitates subsequent engineering analyses. As industries demand more efficient and customized power transmission solutions, parametric design tools will become indispensable for developing robust worm gear systems. Future work could involve integrating these models with optimization algorithms to automatically select parameters for maximum efficiency or minimal weight, further pushing the boundaries of worm gear technology. Ultimately, the emphasis on worm gears throughout this discussion underscores their enduring relevance in engineering, and parametric design ensures they can be tailored to meet evolving challenges.