
In this research, we focus on the worm gear transmission mechanism and develop a parametric design system using feature-based modeling techniques. The worm gear is widely used in various mechanical transmissions due to its advantages such as high single-stage transmission ratio, smooth operation, compact structure, and self-locking capability. However, traditional manual design processes are time-consuming and prone to errors, especially when dealing with complex calculations and iterative modifications. To address these issues, we adopt SolidWorks as the software platform and Visual Basic as the programming tool for secondary development. By calling the API (Application Programming Interface) functions, we automate the design, verification, and three-dimensional (3D) modeling of the worm gear system. This parametric approach significantly improves efficiency and accuracy, simplifies the tedious design and calculation processes, shortens the product development cycle, and provides a theoretical foundation for simulation and dimensional accuracy measurement.
Throughout this paper, we emphasize the term ‘worm gear’ to highlight the primary object of our study. The parametric design system we propose can handle both the worm (the male component) and the worm gear (the female component) in a unified framework. Our work is based on established mechanical design standards and the latest computer-aided design (CAD) techniques. The following sections detail the determination of system parameters, material selection, design criteria, calculation procedures, parametric modeling methods, and the implementation of the software system.
Parametric Design Method for Worm Gear Systems
Determination of Worm Gear System Parameters
The design of a worm gear system begins with the determination of essential parameters that uniquely define the final geometric dimensions. These parameters are not fixed values but are selected based on specific working conditions and material properties. According to mechanical design handbooks, the following input parameters are typically required:
| Parameter | Symbol | Description |
|---|---|---|
| Load condition | – | Steady, shock, or variable loads |
| Transmission type | – | Closed or open drive |
| Input power | P | Power transmitted by the worm shaft (kW) |
| Worm rotational speed | n1 | Speed of the worm (rpm) |
| Transmission ratio | i | Ratio of worm speed to gear speed |
| Expected efficiency | η | Estimated efficiency of the gear pair |
| Service life | Lh | Required operating hours (hours) |
The materials for the worm and worm gear are chosen according to the application environment. To ensure good anti-friction and anti-scoring properties, the worm is usually made of alloy steel or carbon steel (e.g., carburized steel, quenched steel, nitrided steel), while the worm gear ring is often made of bronze or cast iron. Common worm gear materials include cast tin bronze, cast aluminum-iron bronze, and gray cast iron. Since the worm gear is generally weaker than the worm, it becomes the critical component in the transmission. Table 2 summarizes typical material selections.
| Component | Material Examples | Characteristics |
|---|---|---|
| Worm | 20CrMnTi (carburized), 40Cr (quenched), 38CrMoAl (nitrided) | High hardness, good wear resistance |
| Worm Gear | ZCuSn10P1 (tin bronze), ZCuAl10Fe3 (aluminum bronze), HT200 (gray iron) | Good anti-friction, lower strength than steel |
Design Criteria for Worm Gear Transmissions
The failure modes of worm gear drives are similar to those of gear drives: pitting, scuffing, wear, and tooth breakage. However, due to the perpendicular axes and high sliding velocity, scuffing and wear are more common. Since the worm has continuous helical teeth and higher material strength, failures usually occur on the worm gear teeth. The design criteria depend on the type of drive:
- Closed transmissions: The main failure modes are scuffing and pitting. Therefore, the design is based on the contact fatigue strength of the worm gear tooth surface, followed by verification of bending fatigue strength and worm shaft rigidity.
- Open transmissions: The main failure modes are wear and tooth breakage. Hence, the design is based on the bending fatigue strength of the worm gear tooth root, with subsequent verification of contact strength and worm shaft rigidity.
Design Procedure for Worm Gear Systems
Figure 1 (conceptual flowchart) illustrates the overall design process. We start by determining the preliminary parameters: center distance a, module m, pitch circle diameter of worm d1, number of worm threads z1, number of worm gear teeth z2, pressure angle α (usually 20°), worm length L, and worm gear face width b2. For a closed drive, the contact strength design equation is:
$$ a \geq \sqrt[3]{\left( \frac{Z_E Z_{\rho}}{\sigma_{HP}} \right)^2 K T_2 } $$
where a is the center distance, ZE is the elastic coefficient, Zρ is the contact zone coefficient, σHP is the permissible contact stress, K is the load factor, and T2 is the torque on the worm gear. After obtaining a preliminary center distance, we select standard values for module and worm pitch circle diameter from mechanical design tables.
The design flow involves iterative calculations. The following table summarizes the key formulae used in the design and verification stages.
| Item | Formula | Description |
|---|---|---|
| Center distance (contact strength) | $$ a \ge \sqrt[3]{\left( \frac{Z_E Z_{\rho}}{\sigma_{HP}} \right)^2 K T_2 } $$ | Preliminary design for closed drives |
| Bending strength verification | $$ \sigma_F = \frac{1.53 K T_2}{d_1 d_2 m Y_{Fa} Y_{Sa}} \le \sigma_{FP} $$ | Check bending stress at worm gear tooth root |
| Worm shaft rigidity | $$ y = \frac{F_t L^3}{48 E I} \le [y] $$ | Deflection check for worm shaft |
| Standard module and d1 | $$ m = \frac{2a}{z_2 + q} $$, where q = d1/m | Select from standard series |
| Sliding velocity | $$ v_s = \frac{\pi d_1 n_1}{60 \cos \gamma} $$ | Relative sliding speed between worm and gear |
After calculating geometric dimensions, we verify the design using the bending fatigue strength and worm shaft deflection. If the verification fails, we adjust the center distance, module, or worm diameter and repeat the process until all conditions are satisfied.
Parametric Modeling of Worm and Worm Gear
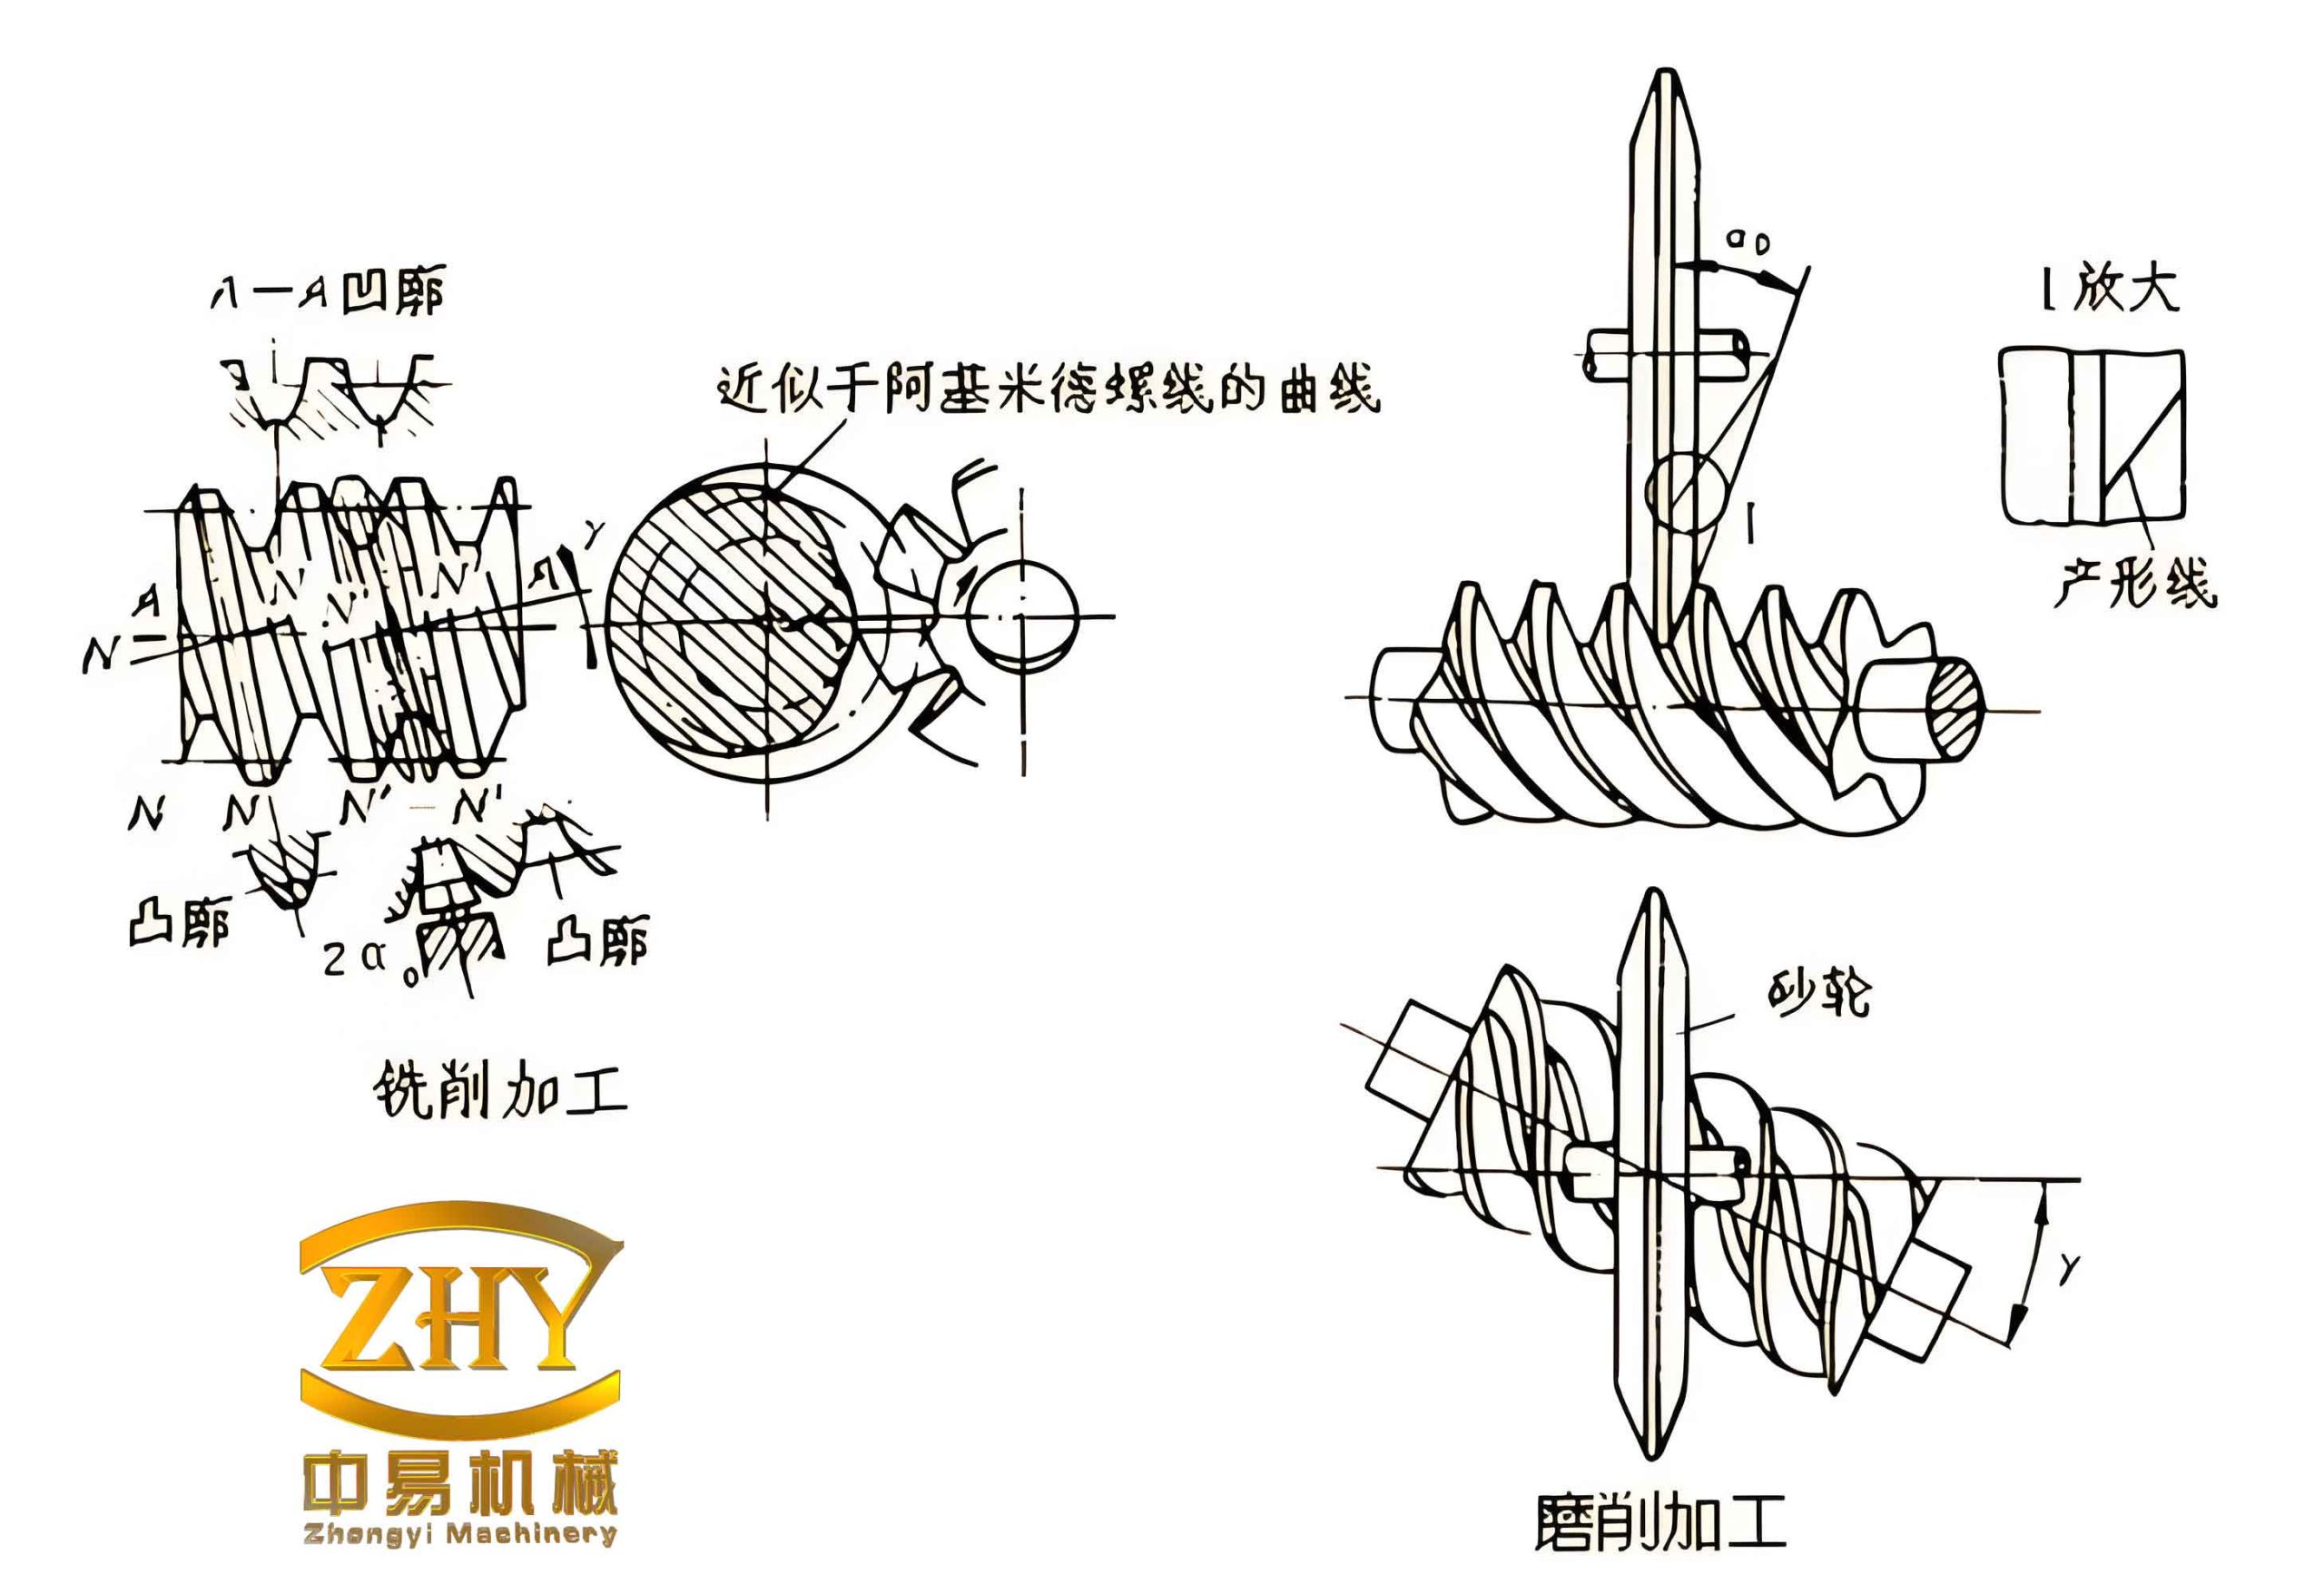
Once the final geometric parameters are approved, we use Visual Basic to drive SolidWorks via its API functions. Each modeling step corresponds to specific API calls. The following subsections describe the parametric modeling of the worm (ZA type, Archimedean cylindrical worm) and the worm gear.
Parametric Modeling of the Worm
The Archimedean worm is formed by sweeping a trapezoidal tooth profile along an Archimedean spiral. The mathematical model of the tooth groove cross-section is shown conceptually in the earlier figure. The coordinates of the four vertices of the trapezoid are given by:
$$ \begin{aligned}
x_1 &= \frac{p_x}{4} + (d_{a1} – d_1) \tan \alpha, \quad y_1 = \frac{d_{a1}}{2} \\
x_2 &= \frac{p_x}{4} + (d_{f1} – d_1) \tan \alpha, \quad y_2 = \frac{d_{f1}}{2} \\
x_3 &= -\frac{p_x}{4} – (d_{f1} – d_1) \tan \alpha, \quad y_3 = \frac{d_{f1}}{2} \\
x_4 &= -\frac{p_x}{4} – (d_{a1} – d_1) \tan \alpha, \quad y_4 = \frac{d_{a1}}{2}
\end{aligned} $$
where px is the axial pitch (equal to the lead for a single-start worm), α is the pressure angle (20°), d1 is the pitch circle diameter, da1 is the addendum circle diameter, and df1 is the dedendum circle diameter.
The modeling steps for the worm are:
- Create the worm blank: Extrude a cylinder with diameter equal to the addendum circle and length equal to the worm thread length L.
- Generate the Archimedean spiral: Define a helix with base circle diameter equal to the worm pitch circle, pitch equal to the lead (for multi-start worms, lead = z1 × px), and height equal to L.
- Create the tooth groove profile sketch: Draw the trapezoidal contour using the coordinates above on a plane perpendicular to the helix at the start point.
- Sweep cut: Use the profile as the cutting contour and the helix as the path to perform a swept cut, removing material to form one thread groove. For multi-start worms, perform a circular pattern of this cut feature around the worm axis with the number of instances equal to z1.
- Add shaft sections: Extrude cylindrical bosses at both ends of the threaded portion to represent the shaft journal.
Table 4 summarizes the API functions used in each step.
| Step | SolidWorks API Function | Description |
|---|---|---|
| 1. Blank extrusion | PartDoc.FeatureManager.FeatureExtrusion2 | Create a cylindrical base |
| 2. Helix creation | PartDoc.InsertHelix (via CurveFeature) | Define Archimedean spiral |
| 3. Profile sketch | SketchManager.CreateLine, etc. | Draw trapezoid on a plane |
| 4. Swept cut | PartDoc.FeatureManager.InsertCutSwept2 | Perform sweep cut along helix |
| 5. Circular pattern | PartDoc.FeatureManager.FeatureCircularPattern | Pattern cut for multi-start worm |
Parametric Modeling of the Worm Gear
The worm gear modeling is more complex due to the involute tooth profile. The involute curve is defined in Cartesian coordinates as:
$$ \begin{aligned}
x &= R_b (\cos \theta + \theta \sin \theta) \cos \phi – R_b (\sin \theta – \theta \cos \theta) \sin \phi \\
y &= R_b (\cos \theta + \theta \sin \theta) \sin \phi + R_b (\sin \theta – \theta \cos \theta) \cos \phi
\end{aligned} $$
where Rb is the base circle radius of the worm gear, θ is the roll angle, and φ is the tooth space half-angle. The base circle radius is related to the pitch circle radius R2 and pressure angle α by Rb = R2 cos α.
The modeling steps for the worm gear are:
- Create the gear blank: Extrude a cylinder with diameter equal to the worm gear outside diameter (addendum circle).
- Form the throat: Revolve a cut around the gear axis to create the concave throat shape that matches the worm. The profile is defined by the throat radius (which is the center distance minus the worm addendum).
- Generate the involute tooth space profile: Use the parametric equation to compute a set of points on the involute curve. Connect these points with a spline, then mirror the spline to create the symmetrical tooth space. Add the root circle arc to close the profile.
- Create a helical guide curve: The guide curve is a helix whose pitch equals the worm lead and whose base diameter matches the worm gear pitch diameter. This helix defines the path for sweeping the tooth space.
- Swept cut: Use the involute tooth space profile as the cutting contour and the helix as the path to perform a swept cut, creating one tooth space.
- Circular pattern: Pattern the swept cut feature around the gear axis with the number of teeth z2 to obtain the full gear.
- Finishing operations: Add chamfers, center bore, keyway, etc.
The generation of the involute points is done by a Visual Basic loop that calculates (x, y) for a range of θ values (typically from 0 to the maximum roll angle at the addendum). The spline fitting is achieved via the API function SketchSpline.
Table 5 lists the API functions relevant to worm gear modeling.
| Step | SolidWorks API Function | Description |
|---|---|---|
| 1. Blank extrusion | PartDoc.FeatureManager.FeatureExtrusion2 | Create cylindrical blank |
| 2. Throat cut (revolve) | PartDoc.FeatureManager.FeatureRevolveCut | Form the concave throat |
| 3. Involute profile | SketchManager.CreateSpline (through points) | Generate involute via VB calculation |
| 4. Helix guide curve | PartDoc.InsertHelix | Create helical path |
| 5. Swept cut | PartDoc.FeatureManager.InsertCutSwept2 | Cut one tooth space |
| 6. Circular pattern | PartDoc.FeatureManager.FeatureCircularPattern | Pattern teeth |
Implementation of the Parametric Design System
We developed a user-friendly interface using Visual Basic. The main window is divided into two areas: the working parameter input area and the results display area. The user enters the required parameters (power, speed, ratio, etc.) and clicks the “Design” button. The program first calculates the preliminary center distance using the contact strength formula, then selects standard module and worm pitch circle diameter from an internal database. After verifying bending strength and shaft rigidity, the final dimensions are displayed. If verification fails, the system prompts the user to adjust the center distance or select a different module.
Once the design is verified, the user can proceed to 3D modeling by clicking the “Model” button. The system reads the final geometric parameters and calls the SolidWorks API functions to generate the worm and worm gear automatically. The entire process is integrated into a single application, eliminating the need for manual calculations and repetitive modeling operations.
The above image illustrates the parametric design system interface where users can input working conditions and view results. The system also supports manual entry of geometric dimensions for users who prefer to skip the automated design and directly model a worm gear pair with known parameters.
Design Example and Results
To demonstrate the system, we consider a typical ZA worm gear transmission driven by a Y-series three-phase induction motor. The input conditions are: worm shaft input power P = 9 kW, worm speed n1 = 1440 rpm, transmission ratio i = 57 (reducer), steady load, uniform and without shock, unidirectional rotation, expected life 12000 hours, operating 8 hours per day. The materials selected were 40Cr steel for the worm (quenched) and ZCuSn10P1 tin bronze for the worm gear. After executing the design program, the following final parameters were obtained:
| Parameter | Symbol | Value |
|---|---|---|
| Center distance | a | 200 mm |
| Module | m | 5 mm |
| Worm pitch circle diameter | d1 | 50 mm |
| Worm addendum circle diameter | da1 | 60 mm |
| Worm dedendum circle diameter | df1 | 38 mm |
| Number of worm threads | z1 | 1 |
| Number of worm gear teeth | z2 | 57 |
| Worm gear pitch circle diameter | d2 | 285 mm |
| Worm gear addendum circle diameter | da2 | 295 mm |
| Worm gear dedendum circle diameter | df2 | 273 mm |
| Lead angle | γ | 5.71° |
| Sliding velocity | vs | 5.23 m/s |
All verification checks (contact stress, bending stress, worm shaft deflection) were satisfied. The system then automatically generated the 3D solid models of the worm and worm gear in SolidWorks. The resulting worm gear pair exhibited correct meshing geometry and proper tooth profiles. This example confirms that the parametric design system can effectively replace manual iterative design, reducing the design time from hours to minutes and minimizing human errors.
Conclusion
In this research, we developed a comprehensive parametric design system for worm gear transmissions using SolidWorks and Visual Basic. The system automates the entire workflow: from input of working conditions, through material selection, design calculation, verification, to final 3D modeling. By integrating design standards and using API functions, we eliminated repetitive manual tasks and improved accuracy. The system supports both automatic and manual parameter input, making it flexible for various applications. The use of ‘worm gear’ throughout this paper emphasizes the core component of our system. The parametric modeling techniques described here can be extended to other types of worm gears (e.g., involute, ZN) and even other gear types. Future work may include integrating finite element analysis (FEA) for stress validation and developing a web-based interface for wider accessibility. We believe this system will significantly benefit engineers and researchers in reducing product development cycles and enhancing design quality.