
The transmission of power from a prime mover to a working machine is a fundamental requirement in mechanized systems. Speed reducers, serving as the quintessential power transmission devices, play a pivotal role in this process by effectively matching speed and torque characteristics. The design phase of these reducers is critical, determining their performance, reliability, and cost-effectiveness. In my experience, the adoption of Computer-Aided Design (CAD) and associated technologies has revolutionized this process. Utilizing three-dimensional CAD not only drastically shortens the design cycle but also enhances the overall quality and reliability of the product. This article details my approach to developing a specialized CAD system for worm gear speed reducers, based on the SolidWorks platform and leveraging its secondary development capabilities. The focus is on creating a robust, parameterized design workflow that encapsulates everything from component modeling and assembly to simulation and performance evaluation.
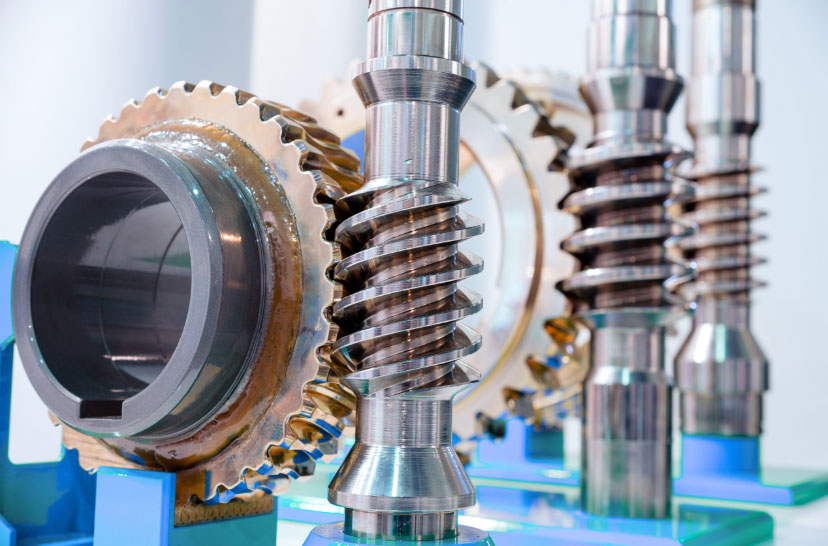
Worm gear drives represent a unique and vital category of speed reducers, distinguished by their ability to provide high reduction ratios in a single stage, compact design, and inherent self-locking capability. These attributes make them indispensable in applications ranging from conveyor systems and material handling equipment to precision instruments and heavy machinery. The core of the worm gear drive is the meshing pair: the worm (a screw-like gear) and the worm wheel (a gear with throated teeth). Their operation involves a complex interplay of sliding and rolling contact, which directly influences efficiency, wear, and thermal performance. A deep understanding of these characteristics is essential for effective design.
Fundamental Structure and Design Parameters of Worm Gear Reducers
The architecture of a typical worm gear speed reducer is comprised of several key components, each with a specific function. The housing or gearbox provides the structural foundation, ensuring precise alignment and support for the rotating elements while containing lubricant. The worm and worm wheel form the primary torque-transmitting pair. Shafts transmit power to and from this pair, while bearings support the shafts and manage radial and axial loads. Seals prevent lubricant leakage and contamination ingress, and auxiliary components like breathers and drain plugs complete the assembly. The design process begins with defining the operational requirements, which are then translated into specific geometric and material parameters for each component. Proper selection of these parameters is paramount.
The performance of worm gears is governed by a set of interrelated equations. The primary speed reduction ratio, \( i \), is determined by the number of threads on the worm (\( Z_1 \)) and the number of teeth on the worm wheel (\( Z_2 \)):
$$ i = \frac{Z_2}{Z_1} $$
For a single-start worm (\( Z_1 = 1 \)), the ratio is simply the number of teeth on the worm wheel. The lead angle of the worm (\( \gamma \)), a critical parameter affecting efficiency and self-locking, is related to the worm’s axial pitch (\( p_x \)) and pitch diameter (\( d_1 \)):
$$ \gamma = \arctan\left(\frac{Z_1 \cdot p_x}{\pi \cdot d_1}\right) = \arctan\left(\frac{Z_1 \cdot m}{\ d_1}\right) $$
where \( m \) is the axial module. The center distance (\( a \)) between the worm and worm wheel axes is a fundamental design dimension:
$$ a = \frac{d_1 + d_2}{2} $$
where \( d_2 \) is the pitch diameter of the worm wheel, given by \( d_2 = m \cdot Z_2 \).
The efficiency (\( \eta \)) of a worm gear set is notably lower than that of other gear types due to significant sliding friction. It can be estimated by:
$$ \eta = \frac{\tan \gamma}{\tan(\gamma + \rho’)} $$
where \( \rho’ \) is the equivalent friction angle, dependent on the coefficient of friction (\( \mu \)) between the mating surfaces (\( \rho’ = \arctan \mu \)). The self-locking condition occurs when the worm’s lead angle is less than the equivalent friction angle (\( \gamma < \rho’ \)). This property is advantageous for hoisting applications but must be considered carefully in designs requiring back-driving capability.
| Design Parameter | Symbol | Typical Range/Considerations |
|---|---|---|
| Reduction Ratio | \( i \) | 5:1 to 100:1 (single stage); higher ratios are common. |
| Center Distance | \( a \) | Determines overall size; standardized values often used (e.g., 40mm, 50mm, 63mm…). |
| Module (Axial) | \( m \) | Standardized values (e.g., 1, 1.25, 1.5, 2… mm). Larger modules for higher loads. |
| Number of Worm Threads | \( Z_1 \) | 1 to 4. Single-thread for high ratio, multi-thread for higher efficiency. |
| Lead Angle | \( \gamma \) | Typically 1° to 30°. Affects efficiency and self-locking tendency. |
| Pressure Angle | \( \alpha_n \) | Commonly 20° or 14.5° (for ZI worms). Influences tooth strength and contact. |
| Material Pairing | – | Hardened steel worm (e.g., 16MnCr5) vs. bronze worm wheel (e.g., CuSn12, CuAl10Fe3). |
Three-Dimensional Parametric Modeling of Components
The foundation of my CAD system is a fully parametric three-dimensional model. This approach allows for rapid design iteration and variant generation by simply modifying a set of driving parameters. I employ SolidWorks as the core modeling environment, utilizing its feature-based modeling paradigm alongside Visual Basic for Applications (VBA) for automation and custom user interface creation.
Parametric Worm Modeling
Creating an accurate 3D model of the worm is the first step. The worm’s geometry is defined by its thread profile (typically trapezoidal or involute-based for ZA, ZN, ZI types) and its helical path. I use a combination of sketch-driven and curve-driven features. The process begins by defining key parameters in a central design table: module \( m \), number of threads \( Z_1 \), pressure angle \( \alpha_n \), pitch diameter \( d_1 \), and worm length \( L_w \).
The helical path is created using the Helix/Spiral feature, where the pitch (\( P \)) is calculated as \( P = \pi \cdot m \cdot Z_1 \). The profile of a single thread is sketched on a plane normal to the helix at its start point. For an Archimedes (ZA) worm, the axial profile is a trapezoid. The relationship between the axial pressure angle (\( \alpha_x \)) and normal pressure angle (\( \alpha_n \)) is given by:
$$ \tan \alpha_x = \frac{\tan \alpha_n}{\cos \gamma} $$
This profile sketch is then swept along the helical path using the ‘Sweep’ feature to create the threaded body. Finally, the ends are chamfered, and reference geometries for bearing seats and keyways are added, all driven by the initial parameters.
Parametric Worm Wheel Modeling
Modeling the worm wheel is more complex due to its enveloping, throated shape designed to wrap around the worm. My methodology involves a multi-step boolean operation. First, I model a cylindrical gear blank with an outer diameter and face width determined by the design formulas. The critical throat diameter (\( d_{a2} \)) and radius (\( r_{a2} \)) are calculated:
$$ d_{a2} = d_2 + 2 \cdot h_{a2} \quad \text{and} \quad r_{a2} = a – \frac{d_{a1}}{2} $$
where \( h_{a2} \) is the addendum of the worm wheel and \( d_{a1} \) is the tip diameter of the worm.
Next, I generate the cutting tool geometry—this is essentially a virtual model of the worm, offset by the desired backlash and clearance. Using the ‘Indent’ or ‘Cavity’ feature in an assembly context, I subtract the volume of this “cutter worm” from the gear blank, simulating the hobbing process. This creates the precise, enveloping tooth form on the worm wheel. The tooth count \( Z_2 \) is a direct input, and the resulting geometry updates automatically if the worm parameters change, ensuring correct meshing. The final step involves adding the hub, web, and keyway features, all parametrically linked.
| Modeling Step | Feature/Tool Used | Key Input Parameters | Output Geometry |
|---|---|---|---|
| Worm Helical Path | Helix/Spiral | Pitch \( P \), Revolutions, Start Angle | 3D Guide Curve |
| Worm Thread Profile | Sketch (on normal plane) | Module \( m \), Pressure Angle \( \alpha_n \), Tip/Clearance | 2D Sweep Profile |
| Worm Solid Creation | Sweep | Profile + Path | Worm Threaded Body |
| Worm Wheel Blank | Revolved Boss/Base | Throat Diameter \( d_{a2} \), Face Width | Cylindrical Preform |
| Tooth Generation | Indent / Cavity (Boolean) | Worm Cutter Assembly, Backlash value | Enveloping Tooth Form |
Housing and Bearing Seat Design
The housing is designed to be structurally rigid, provide accurate bearing alignment, facilitate heat dissipation, and allow for easy assembly and maintenance. My parametric model starts with a basic shell defined by the center distance \( a \), the outer dimensions of the worm and wheel, and required wall thicknesses (\( \delta \)). Common empirical formulas guide this:
$$ \text{Housing Wall Thickness} \approx 0.04a + 3 \text{mm} \quad (\text{for cast iron}) $$
$$ \text{Rib Thickness} \approx 0.8\delta $$
Features like bearing housings are created using the ‘Hole Wizard’ and ‘Extrude’ commands, with their positions driven by the shaft centerlines. Mounting flanges, breather ports, oil level indicators, and drain plugs are added as standard features from a custom library. All fillets and rounds are applied to reduce stress concentration. The model is built symmetrically where possible, and a configuration is created for just the upper or lower housing half to simplify manufacturing drawings.
Virtual Assembly, Interference Checking, and Kinematic Simulation
Once all component models are generated, they are brought into a master assembly file. I employ a bottom-up assembly strategy. The first component (usually the lower housing) is inserted as fixed. Subsequent components—shafts, worm gears, bearings, seals—are inserted and mated using standard constraints (Coincident, Concentric, Distance). The mating of the worm and worm wheel is the most critical, ensuring proper alignment of the pitch cylinders and correct axial positioning. I define this using a combination of a ‘Gear’ mate (specifying the ratio \( Z_2:Z_1 \)) and distance mates to control backlash.
After full assembly, a comprehensive interference detection analysis is run. This virtual check identifies any unintended overlaps between components, such as a bolt head clashing with a rib or a seal groove being misaligned. Identifying and resolving these conflicts digitally eliminates costly physical prototyping errors.
Following successful assembly, I utilize SolidWorks Motion Analysis to simulate the kinematics and basic dynamics of the reducer. By applying a rotary motor to the worm input shaft and a load (torque or force) to the worm wheel output shaft, I can animate the assembly and extract valuable performance data:
- Angular velocity of the output shaft, verifying the reduction ratio.
- Contact forces at the meshing teeth of the worm gears.
- Reaction forces on bearing locations, crucial for bearing life calculations.
- Visual confirmation of smooth, uninterfered motion.
The output torque \( T_2 \) is related to the input torque \( T_1 \) and efficiency \( \eta \) by:
$$ T_2 = T_1 \cdot i \cdot \eta $$
The simulation can help validate this relationship under dynamic conditions.
Performance Analysis and Design Validation
The 3D model serves as the foundation for advanced engineering analysis. I integrate several validation checks directly into the CAD system through custom macros and linked calculations.
Bending and Contact Stress Analysis: While full Finite Element Analysis (FEA) can be performed, initial sizing checks use standardized equations. The bending stress (\( \sigma_F \)) and contact (Hertzian) stress (\( \sigma_H \)) for the worm wheel teeth are estimated. For the worm wheel tooth bending stress (Lewis formula adapted):
$$ \sigma_F = \frac{F_t \cdot K_A \cdot K_v}{b \cdot m_n \cdot Y_F \cdot Y_\epsilon} $$
where \( F_t \) is the tangential force at the worm wheel pitch circle, \( K_A \) is the application factor, \( K_v \) is the dynamic factor, \( b \) is the face width, \( m_n \) is the normal module (\( m_n = m \cdot \cos \gamma \)), \( Y_F \) is the tooth form factor, and \( Y_\epsilon \) is the contact ratio factor.
The contact stress, which is often the limiting factor for worm gears due to the sliding action, is calculated using an equation of the form:
$$ \sigma_H = Z_E \cdot \sqrt{ \frac{F_t}{d_2 \cdot b} \cdot \frac{K_A \cdot K_v}{ \cos \alpha_n \cdot \cos \gamma } \cdot Z_I } $$
where \( Z_E \) is the elasticity factor and \( Z_I \) is a geometry factor for the contact line. These calculated stresses are compared against allowable limits for the bronze material.
Thermal Power Rating: The efficiency loss in worm gears manifests as heat. The thermal power capacity \( P_{th} \) must exceed the actual input power \( P_1 \). It is estimated by:
$$ P_{th} = \frac{k \cdot A \cdot \Delta T}{1000} \quad \text{[kW]} $$
where \( k \) is the overall heat transfer coefficient of the housing (W/m²°C), \( A \) is the effective heat-dissipating surface area of the housing (m²), and \( \Delta T \) is the allowable temperature rise (°C). If the thermal rating is insufficient, the design must be modified—by adding fins to the housing, incorporating a fan on the worm shaft, or specifying an oil cooler.
| Analysis Type | Governing Equation / Principle | Key Output / Design Check |
|---|---|---|
| Tooth Bending Stress | Modified Lewis Equation | \( \sigma_F \leq \sigma_{FP} \) (Allowable bending stress) |
| Surface Contact Stress | Hertzian Contact Theory (adapted) | \( \sigma_H \leq \sigma_{HP} \) (Allowable contact stress) |
| Thermal Rating | Heat Generation vs. Dissipation | \( P_{th} \geq P_1 \) (Input Power) |
| Bearing Life (L10) | ISO 281 Standard | Calculated life in hours > Required life |
| Shaft Deflection | Beam Bending/Torsion Formulas | Max deflection < Permissible limit (e.g., 0.01*m) |
Manufacturing and Assembly Considerations Integrated into CAD
The transition from design to manufacture is seamless when manufacturing considerations are embedded in the CAD model. I incorporate several practices to ensure this. All critical dimensions are associated with tolerances (ISO IT grades) within the model’s annotations. Standard stock sizes for materials (bar diameters, plate thicknesses) are considered to minimize waste. For the worm gears, the manufacturing method is implied by the geometry: the worm is typically ground or turned, and the worm wheel is hobbed. The 3D model of the worm wheel can be used to generate tool paths for CNC hobbing machines or to design the hob cutter itself.
For assembly, I create exploded-view animations within SolidWorks to visualize the assembly sequence. A bill of materials (BOM) is automatically generated from the assembly file, listing every component, its material, and quantity. This BOM integrates directly with enterprise resource planning (ERP) systems. Furthermore, I define clearances for lubrication channels and specify grease fittings or oil fill locations directly on the housing model.
Case Study: Design of a Reducer for a Conveyor Drive
To illustrate the complete workflow, I applied this CAD system to design a worm gear reducer for a slow-moving conveyor belt. The requirements were: Input Power \( P_1 = 3.7 \text{ kW} \), Input Speed \( n_1 = 1450 \text{ rpm} \), Output Speed \( n_2 \approx 29 \text{ rpm} \), Service Life > 15,000 hours, intermittent operation.
- Parameter Calculation: The desired ratio is \( i = 1450 / 29 = 50 \). I selected a single-start worm (\( Z_1 = 1 \)), so \( Z_2 = 50 \). A center distance of \( a = 100 \text{ mm} \) was chosen from standards. Using design formulas, module was calculated as \( m \approx 4 \text{ mm} \), leading to a worm pitch diameter \( d_1 \approx 40 \text{ mm} \) and a lead angle \( \gamma \approx 5.71^\circ \).
- 3D Modeling: These parameters were input into the custom user form in SolidWorks. The system automatically generated the 3D models for the hardened steel worm and bronze worm wheel, followed by the shafts and cast iron housing.
- Analysis: The system’s built-in calculators performed the stress and thermal checks. The contact stress was within limits for continuous bronze. The thermal power rating for the plain housing was borderline, so I selected the model configuration with integrated cooling fins, which increased \( P_{th} \) sufficiently.
- Output: Detailed manufacturing drawings for each part, an assembly drawing, an exploded view, a complete BOM, and a simulation video showing the motion were automatically compiled into a PDF report. The entire process, from requirement input to final documentation, was completed in a fraction of the time required for traditional 2D drafting methods.
Conclusion and Future Directions
The integration of three-dimensional CAD and parametric modeling into the design process for worm gear speed reducers provides an unparalleled advantage. It facilitates a holistic approach where geometric modeling, performance analysis, manufacturability assessment, and documentation are interlinked and driven by a single set of master parameters. This methodology ensures design integrity, drastically reduces errors and development time, and allows for rapid exploration of design alternatives. The ability to perform virtual assembly and motion simulation provides critical insight into the function and fit of the assembly before any metal is cut. By developing and utilizing such a specialized CAD system, I have consistently achieved designs for worm gear reducers that are reliable, efficient, and optimized for both performance and cost. Future enhancements will involve tighter integration with cloud-based analytics for real-time performance prediction under varied loads, and the incorporation of generative design algorithms to explore novel, lightweight housing geometries that maintain rigidity while improving thermal dissipation.