
The machining of the inner bore in miter gears, a critical process for ensuring final assembly quality, presents a unique and persistent challenge. Typically, this operation is performed either by broaching the hole with a cylindrical broach on a press or by grinding it on an internal grinder. However, the stringent requirement for runout tolerance between the pitch cone axis and the bore axis transforms a seemingly straightforward task into a significant alignment dilemma during grinding. The conventional method of indicating and adjusting each gear blank individually is not only time-consuming but also prone to human error, leading to inconsistent quality and rejected parts. After extensive experimentation and practical application on the shop floor, I developed and successfully implemented a dedicated fixture for grinding the inner bore of miter gears. This fixture, which has been used to process over a thousand components with a 100% qualification rate, fundamentally simplifies the process by ensuring precise and repeatable location based on the gear’s own functional geometry—the tooth spaces. The following is a detailed exposition of the design principles, manufacturing process, and operational methodology of this fixture.
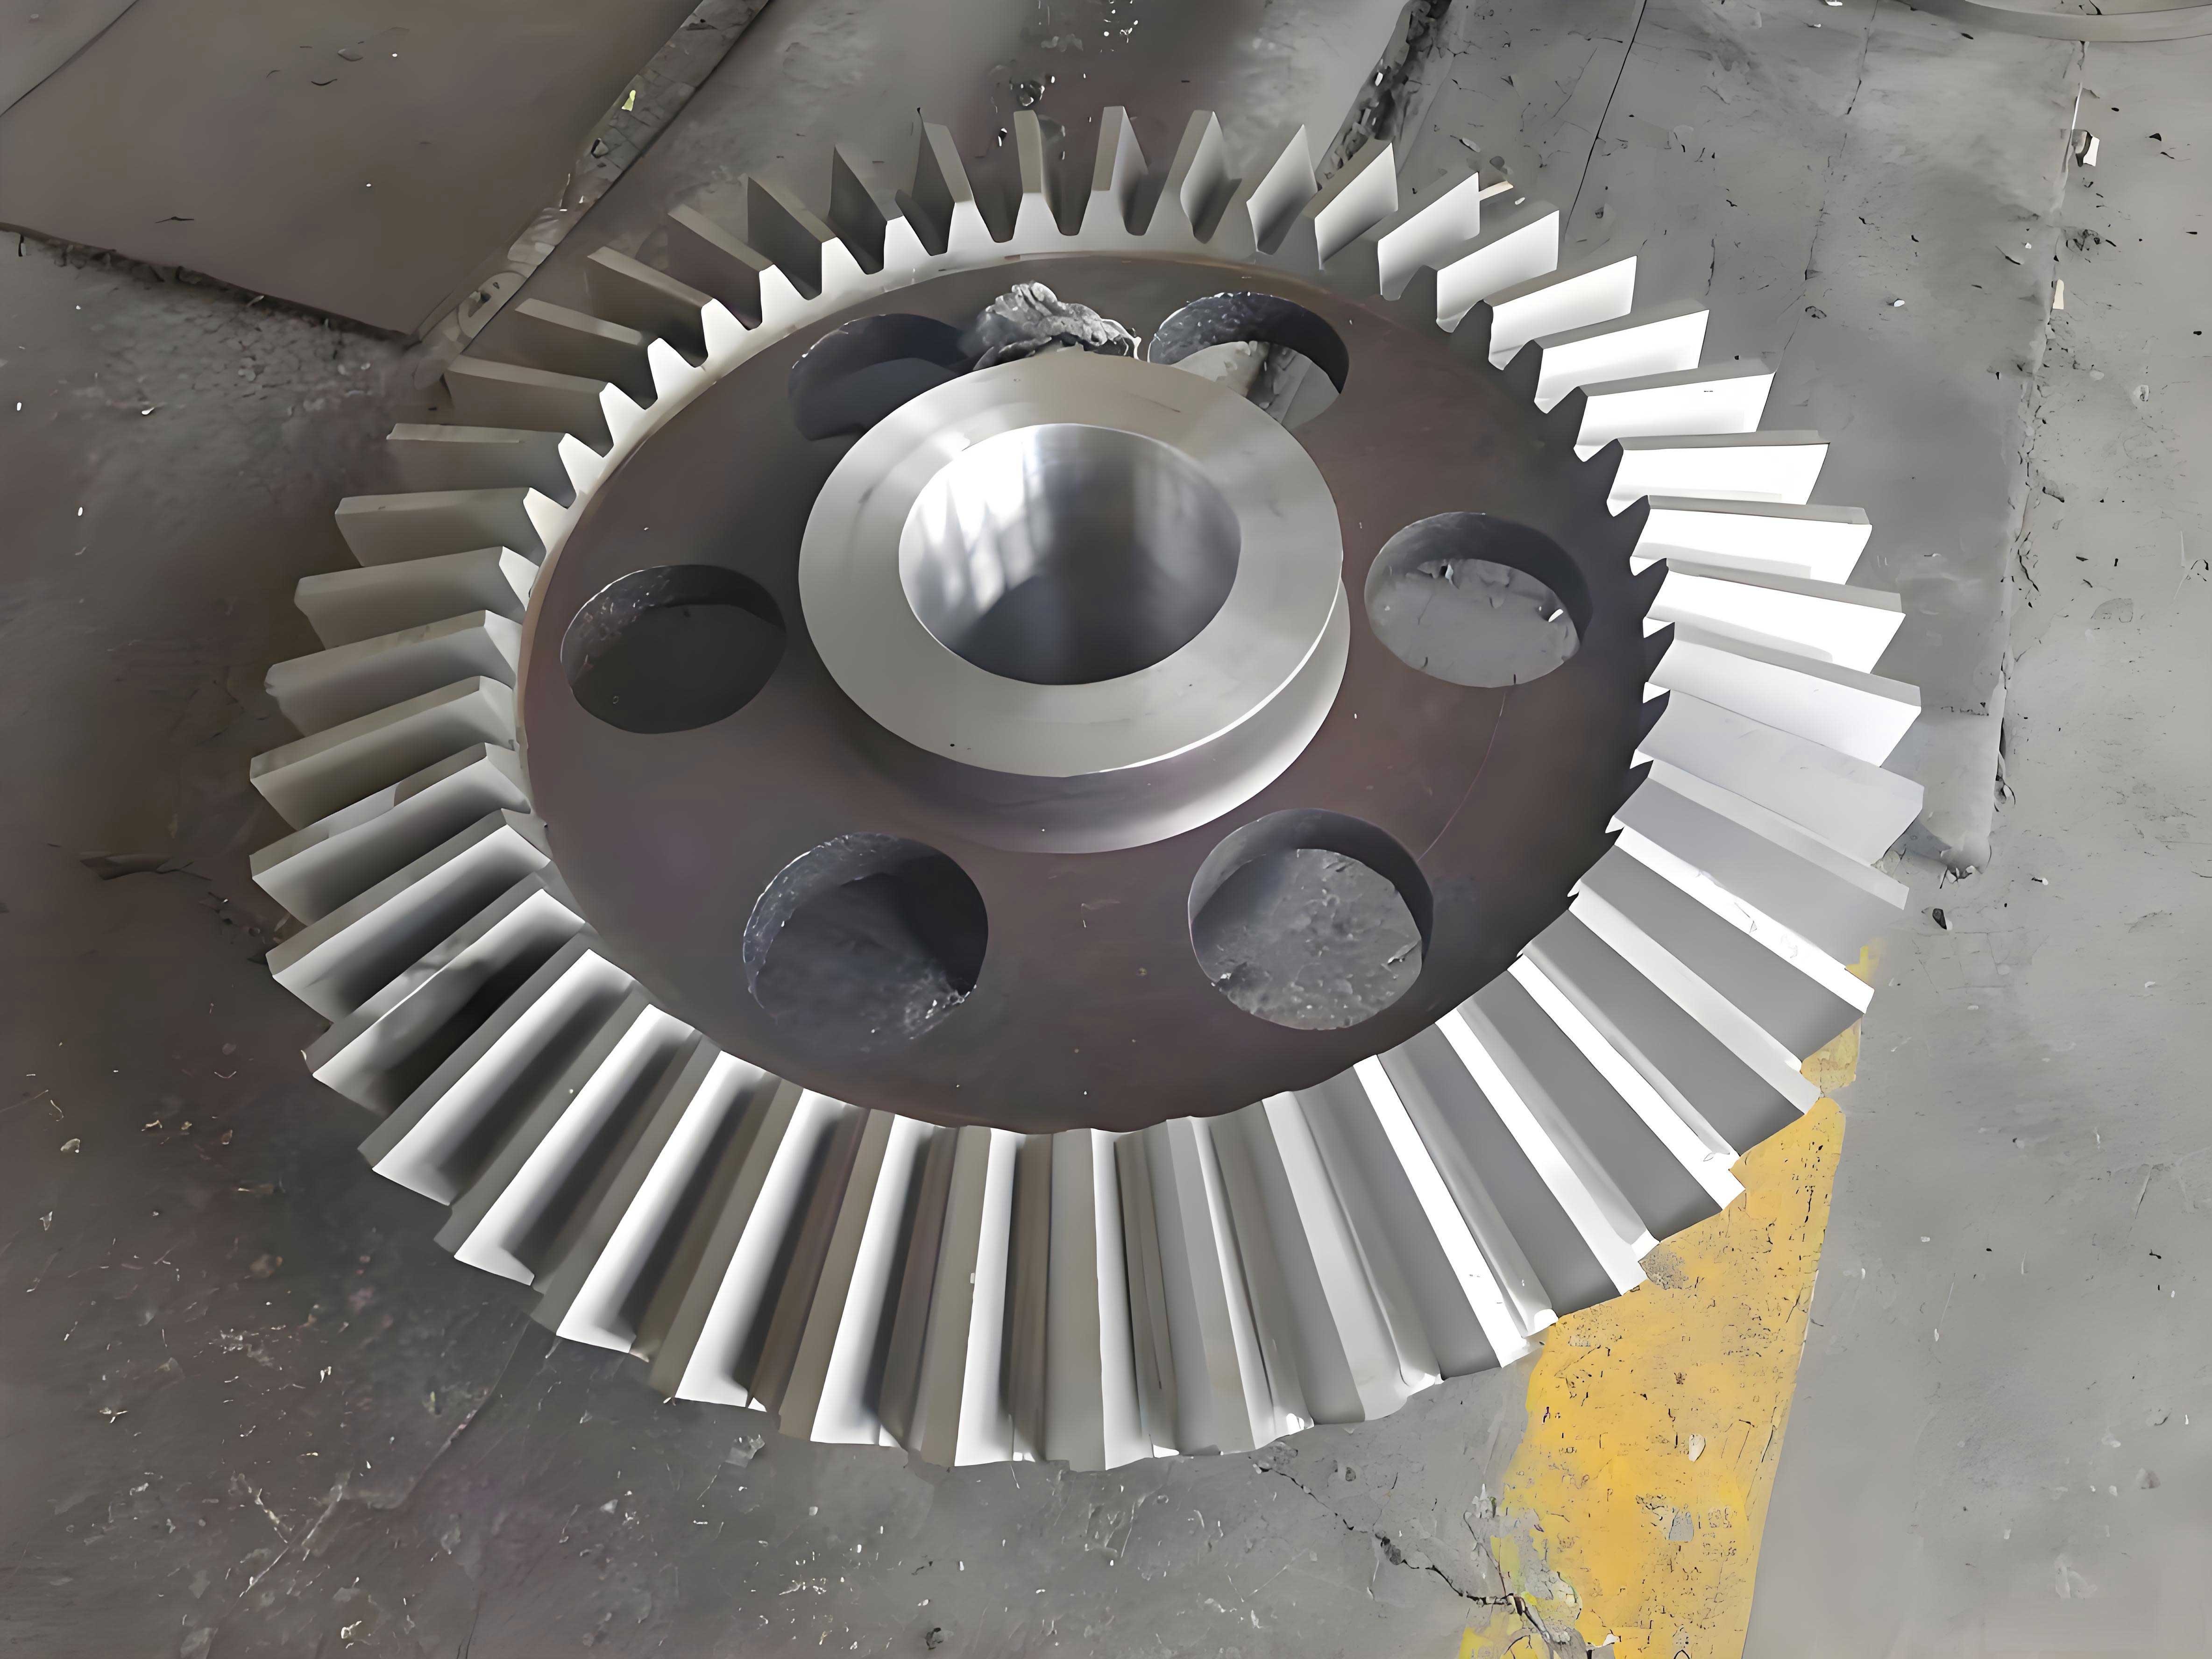
The core principle of this fixture is to use the involute tooth flanks of the miter gear itself as the primary datum for location, thereby inherently respecting the geometric relationship between the pitch cone and the desired bore axis. This is achieved not by directly clamping on the teeth, which could cause damage, but through an intermediary system of precision pins seated in the tooth spaces. The design can be broken down into three major sub-assemblies: the locating pin assembly (cylinders and their cage), the fixture body with its precisely machined conical bore, and the clamping mechanism.
Determination of Locating Pin Diameter
The diameter of the cylindrical pins is the most critical design parameter. The pins must sit securely in the tooth space, making contact on both flanks, and must protrude sufficiently above the addendum circle to be engaged by the fixture body. The selection can be made empirically by trial with pins of various sizes on the actual gear tooth, referencing both the heel and toe of the miter gear. Alternatively, a calculated approximation can be used.
For a standard miter gear with a pressure angle $\alpha$, the pin diameter $d_p$ that contacts the flanks at the pitch circle can be estimated. The relationship involves the transverse circular pitch $p_t$ and the pressure angle. A simplified and practical formula, derived from the geometry of an involute spline or gear tooth, is:
$$ d_p \approx \frac{\pi m_n}{2 \cos \psi} $$
where $m_n$ is the normal module and $\psi$ is the spiral angle (zero for straight bevel gears). For straight teeth miter gears, a very common and effective rule of thumb is:
$$ d_p \approx 1.728 \cdot m_n $$
where $m_n$ is the module. This typically results in a pin that contacts the flanks slightly above the pitch line. The primary goal is to ensure the pin is tangent to both involute profiles without jamming at the root or slipping over the tip. The following table summarizes the pin diameter selection criteria:
| Selection Method | Procedure | Advantage |
|---|---|---|
| Empirical Fit | Place pins of various diameters into the tooth space at both ends (heel & toe) of the miter gear. Select the largest diameter that fits snugly without forcing. | Most accurate for a specific gear; accounts for manufacturing variations. |
| Calculated Approximation | Use formula $d_p \approx 1.728 \cdot m$. For module $m=4$, $d_p \approx 6.912$ mm. Round to nearest standard pin size (e.g., 7.0 mm). | Fast, repeatable, good for standardization across batches of identical miter gears. |
| Reference to Tooth Depth | Ensure $d_p > 1.6m$ but $d_p < 2.2m$ to guarantee protrusion above the addendum circle. The pin height $h_p$ above the addendum should be $h_p \ge 0.3m$. | Guarantees reliable engagement by the fixture cone. |
Once the diameter is determined, the pin length is chosen to be approximately 1.5 to 2 times the face width of the miter gear, providing sufficient guiding surface. The pins are manufactured from tool steel (e.g., AISI 52100). A small center hole is drilled in each end for subsequent heat treatment support. After hardening to 58-62 HRC, the pins are precision centerless ground to achieve a consistent diameter with a tight tolerance, typically within $\pm 0.002$ mm, and a high surface finish. The consistency in pin diameter is paramount, as any variation directly introduces locating error for the miter gears.
Fabrication of the Pin Retaining Cage (Spider)
To simultaneously place three pins into three equally spaced tooth spaces, a retaining cage, often called a spider, is constructed. This component mimics the function of a bearing cage. Its primary body is a conical shell, the internal angle of which closely matches the outside (face cone) angle of the miter gear being processed. This conical shell is first turned on a lathe.
Subsequently, three axial slots are machined (via milling) into this conical shell at 120-degree intervals. The width of these slots is slightly greater than the final diameter of the locating pins to allow for free radial movement during engagement, while their length exceeds the pin length. The slots must be parallel to the axis of the cone. The pins are then placed into these slots and are loosely retained by a thin wire ring that fits into circumferential grooves machined near the ends of the pins, or by a simple clip mechanism. This assembly allows the three pins to float radially just enough to self-center within the tooth spaces of the miter gear when pressed together, ensuring that all three pins make positive contact. The conical shape of the cage helps guide the gear into position during loading.
Machining of the Fixture Body’s Conical Bore
The fixture body is the main structural element that transfers the located position of the miter gear to the grinding machine table. Its most critical feature is an internal conical bore. The angle of this cone must precisely match the effective angle formed by the outer surfaces (the tangent points) of the three locating pins when they are seated in the gear’s tooth spaces. This angle, $\theta_{fixture}$, is not simply the pitch cone angle of the miter gear; it is a derived angle that ensures the bore axis, once the gear is clamped, is perpendicular to the plane defined by the three pin contact points, thus aligning it correctly.
To determine this angle empirically, the pin-and-cage assembly is placed onto an unmachined miter gear blank. Using a precision vernier bevel protractor or a sine bar setup, the angle $\beta$ between the axis of the gear blank (established via a mandrel) and the exposed cylindrical surface (generatrix) of one of the pins is carefully measured. This measurement should be repeated for all three pins to check for consistency. The complementary angle, or the included angle of the required cone, is then calculated. If $\beta$ is the angle between the pin’s outer line and the gear axis, the included angle of the fixture’s conical bore, $2\alpha_f$, is often approximately twice the complement of $\beta$, but careful trigonometric modeling is essential.
A more robust geometric model is as follows: Consider the three pins making contact at a reference diameter $d_{ref}$ on the tooth flanks. The cone that envelopes these three pins has its apex at the virtual intersection point of the miter gear’s axis and the plane of the pins. The half-angle $\alpha_f$ of this envelope cone can be derived. For a pin diameter $d_p$, seated in a space where the normal to the involute at the contact point makes an angle equal to the pressure angle $\alpha$ relative to the radial line, the effective cone angle depends on the gear’s pitch cone angle $\delta$, the pressure angle, and the offset of the contact point. A simplified determining equation, assuming contact at the reference circle, is:
$$ \tan \alpha_f \approx \frac{(d_{ref} / 2) + (d_p / (2 \sin \alpha))}{L} $$
where $L$ is the axial distance from the apex to the measurement plane. In practice, after calculating an initial angle, the conical bore in the fixture body is machined slightly undersized. The final fitting is achieved via a “bluing” or “spotting” process. Prussian blue is applied to the pins in the cage. The fixture body cone is then offered up to the pin assembly on the master gear. By gently rocking, the high spots on the fixture cone are marked. These spots are carefully scraped or finely ground away in an iterative process until a uniform contact pattern of at least 80% is achieved across all three pin lines. This ensures perfect congruence. The axis of this final conical bore must be held perpendicular to the fixture’s mounting face within a very tight tolerance (e.g., 0.005 mm over 150 mm diameter). This perpendicularity is later used to align the entire fixture on the grinding machine.
Fixture Application and Grinding Process
The use of the fixture systematizes the grinding of miter gear bores. The procedure is as follows:
- Fixture Setup on Machine: The fixture body is securely mounted onto the magnetic chuck or mounting plate of the internal grinding machine. Using a high-precision dial indicator, the mounting face (the back face of the fixture body) is meticulously adjusted until it runs perfectly true with the machine spindle’s axis of rotation. This step ensures that the axis of the conical bore, and hence the future axis of the gear bore, is parallel to the machine’s Z-axis (grinding wheel feed axis).
- Workpiece Loading: The pin cage assembly is placed onto the miter gear blank, ensuring the pins drop into three evenly spaced tooth spaces. This sub-assembly is then inserted into the conical bore of the fixture body. A simple clamping plate (pressure plate) with a central clearance hole is placed over the back of the gear and drawn tight against the fixture body using cap screws or a swing bolt mechanism. The pressure plate often has small radial holes or a knurled outer edge to facilitate hand-tightening.
- Clamping: As the clamping plate is tightened, it forces the miter gear and the pin cage assembly axially into the precision-machined conical bore of the fixture. The cone radially centers the three pins, which in turn locate the gear via its tooth flanks. The gear is now unequivocally positioned. The clamping force is sufficient to hold the gear against grinding forces but must not deform the thin-walled cage or cause pin indentation on the gear teeth.
- Grinding Operation: With the fixture and workpiece secured, the standard internal grinding cycle is performed. The bore is ground to the specified diameter and finish. Because every miter gear in the batch is located from the same datum system (the tooth spaces via the pins and cone), the runout between the ground bore and the pitch cone is consistently maintained within the required limits, typically within 0.01 mm or better, depending on the precision of the fixture’s manufacture.
- Unloading: After grinding, the clamp is released, and the gear along with the pin cage is removed. The pins retract slightly due to the cage’s floating design, allowing for easy removal of the finished miter gear.
Analysis of Locational Accuracy and Error Sources
The repeatable accuracy of this fixture for machining miter gears hinges on minimizing several potential error sources. A mathematical model of the error stack-up is instructive. The primary error in the bore axis location $\Delta E$ can be expressed as a function of contributing factors:
$$ \Delta E = \sqrt{(\Delta_{pin})^2 + (\Delta_{cone})^2 + (\Delta_{perp})^2 + (\Delta_{fit})^2} $$
where:
- $\Delta_{pin}$ = Error due to pin diameter variation and roundness.
- $\Delta_{cone}$ = Error due to angular inaccuracy in the fixture’s conical bore.
- $\Delta_{perp}$ = Error due to non-perpendicularity between the cone axis and the fixture mounting face.
- $\Delta_{fit}$ = Error due to clearance/fit between the pins and the tooth space (should be minimal with correct pin size).
For a high-quality fixture, each term must be controlled. The following table quantifies typical tolerance goals for grinding precision miter gears:
| Error Source | Control Parameter | Target Tolerance | Effect on Bore Runout |
|---|---|---|---|
| Pin Consistency | Diameter tolerance, cylindricity | $\pm 0.001$ mm, 0.0005 mm | Direct 1:1 translation to radial offset of the gear axis. |
| Cone Angle Accuracy | Included angle of fixture bore | $\pm 0$ degrees $1’$ (one arc-minute) | Causes tilt of the gear axis, resulting in axial runout. |
| Axis Perpendicularity | Face runout of fixture body | 0.005 mm TIR (Total Indicator Reading) | Causes the entire bore axis to be tilted relative to the machine spindle. |
| Tooth Space Variation | Gear tooth spacing error | Controlled by gear quality (e.g., AGMA Class 8) | Determines which three teeth are used; minimized by careful initial pin placement. |
By addressing each of these factors during the fabrication of the fixture, the compounded error can be reduced to a level far below the typical runout requirement for miter gears in demanding applications, such as in differentials or precision right-angle drives. The beauty of this system is its self-compensation for minor tooth-to-tooth variations; the three-point location averages out small irregularities, providing a very stable and functional datum derived from the gear’s own working geometry.
In conclusion, the development of this dedicated grinding fixture has revolutionized the process of boring miter gears in our production environment. It elegantly solves the fundamental alignment challenge by using the gear teeth—the very elements that define the gear’s function—as the primary locating datum. The method transforms a skilled, manual, and variable process into a reliable, repeatable, and efficient operation. The principles outlined here, involving precise pin diameter calculation, the fabrication of a floating cage, the meticulous generation of a matching conical bore, and careful error budgeting, provide a comprehensive blueprint for manufacturing similar fixtures. This approach is not only applicable to standard miter gears but can also be adapted for spiral bevel and hypoid gears with appropriate modifications to the pin and cage design to account for curved tooth profiles. The success with thousands of parts stands as testament to the robustness of this fixture-based strategy for achieving precision in the manufacture of miter gears and related bevel gear types.