A large-scale induction hardening cast steel gear used in a 100 ton crane of an iron and steel company had a sudden destructive fracture in the early stage of hot charging. In order to find out the main cause of the failure and put forward the improvement measures, the fracture failure mechanism is analyzed from material composition, microstructure, mechanical properties and assembly heating mode.
The gear material is ZG35CrMo, the module is 25mm, the number of teeth is 85, the outer diameter is 2200mm, the thickness of the outer edge of the gear is about 280mm, and the structure is complex. Quenching and tempering + hobbing + induction hardening along the tooth surface are adopted for gears. Due to the interference fit between the hole and the shaft, on-site inner hole flame heating method was adopted for assembly. During the hot assembly process, two gears broke at the root.
1 Fracture analysis
(1) Macroscopic fracture observation
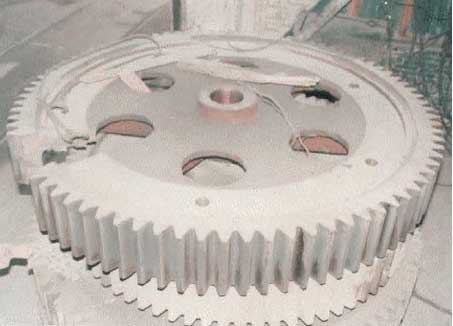
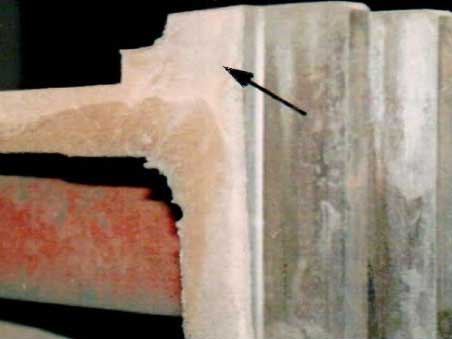
Fig. 1 is a complete picture of the broken gear, Fig. 2 is a picture of the macro fracture. No casting defects such as sand holes and looseness are found on the fracture surface through field observation, and the grains are relatively fine. There is an obvious “mountain pattern” belt on one side of the section plate, a smaller “mountain pattern” belt on the side of the wheel rim along the cogging, and the texture tips of the two patterns point to the same part, and the arrow points to the part, which indicates that this should be the crack opening point, which belongs to a typical cleavage section, and is preliminarily judged as brittle fracture.
(2) Fracture microanalysis
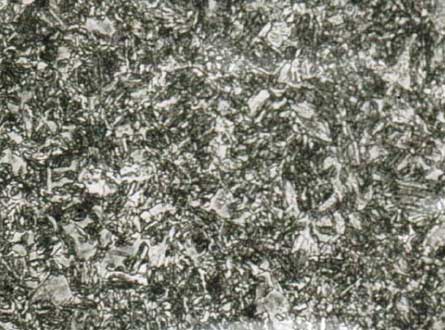
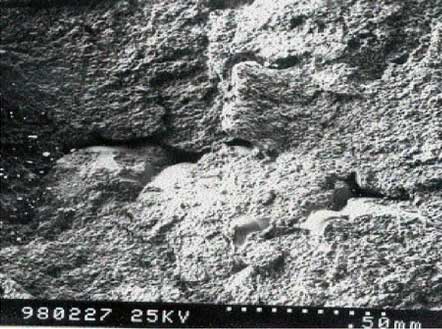
In order to find out the true cause of the fracture, the author cut three pieces of samples parallel to the fracture surface at the fracture of the fractured gear: the first piece (with the fracture retained) as the metallographic and scanning samples, the second piece as the low power analysis sample, and the third piece as the impact test and composition test sample. From the SEM pictures, it can be seen that there are loose and micro holes at the crack source, intergranular features at the fracture surface, and few secondary cracks; the propagation area is in the state of cleavage and quasi cleavage, and there are a few intergranular cracks; the metallographic examination results show that the hardened layer depth at the root is about 5mm, the structure is martensite + bainite + sorbite, and the core is sorbite + pearlite + a small amount of ferrite. There are massive segregation, inclusions and porosity in the structure, but they are all within the allowable range of the standard.


(3) Chemical composition and impact test
The results of chemical composition analysis showed that only the trace of phosphorus exceeded the standard. The average value of normal temperature impact test is AK = 23.5j, within the normal range.


2 Fracture analysis
(1) Casting defects and fracture stress limits
Generally, the gear steel is allowed to have 5.5-level non-metallic inclusions, 3-level looseness and 3-level segregation casting defects [1]. Generally, the steel castings are allowed to have Φ 6 defects through ultrasonic flaw detection. No defect with equivalent diameter greater than 3mm was found on the gear rim. From the formula of crack growth limit stress
σcr=2EEs/πδcr
Where e – Young’s modulus, cast steel is 2.02 × 10⁵N / mm2
Es – plastic surface energy, general metal is 100J / mm2
δ Cr – defect radius, taken as 2.5mm
Calculated σ CR = 225.8n/mm2
It can be seen that in the absence of induced factors, the steel castings will not fracture within the defect range allowed by the standard. Only when the induced stress σ ≥ σ Cr, the original defects have the energy conditions for expansion. However, when the original defect propagates to δ > δ CR under the induced force, the energy difference between the system before and after the crack propagation makes the crack propagation accelerate automatically, and reaches a very high speed in an instant. It has been proved by experiments that the crack propagation speed of steel can reach 2000m/s.
The analysis of the chemical composition, metallographic structure and heat treatment process of the steel shows that there is no factor causing the fracture, so it is necessary to analyze the heat loading process and the thermal stress produced.
(2) Relationship between thermal stress and fracture
When the metal component is heated, it will produce thermal expansion deformation. If the thermal expansion is restricted by the external conditions, the thermal stress will be generated in the metal body. In mechanical structure, there are many reasons for thermal stress, which can be roughly divided into the following categories: ① the thermal expansion or contraction of structural components are subject to external constraints; ② the temperature difference between structural components; ③ the temperature gradient of a component in the structure; ④ the combination of materials with different coefficient of linear expansion.
If the thermal stress is considered as an external force applied to the original defects of the above-mentioned steel castings, the allowable heating temperature of the steel castings calculated according to the crack growth limit stress shall be
Τ=σαE+t
Where σ – crack growth limit stress, σ = σ CY
α – coefficient of thermal expansion, 13.6 × 10⁻⁶ ℃ – 1
E – modulus of elasticity, 2.02 × 10⁵N / mm2
T – ambient temperature
When t = 0 ℃, the allowable direct heating temperature is calculated to be t = 82.2 ℃.
When the gear is heated, the operator uses four gas blowers to bake the inner hole of the gear at the same time. The instantaneous temperature is as high as over 2000 ℃. The thermal expansion of the inner hole produces great tensile stress on the rim. Moreover, the temperature difference in the inner part of the workpiece is far greater than the temperature difference allowed by the above critical fracture stress, which will produce the instantaneous thermal shock stress, When the thermal stress is applied to the object in the form of great speed and impact, the material will lose its ductility. At the root of the tooth, where the stress concentration is easy to form, the original defect will be transformed into the initial crack, and the huge energy will be rapidly transformed into kinetic energy among the particles of the material, which will cause the crack to expand at a high speed and eventually cause brittle fracture.
(3) Cold brittleness of steel
The fracture of steel is the separation of metal atoms. The condition is that the external stress is greater than the bonding force. A large number of experiments show that the actual breaking force is less than 1 / 10 of the atomic binding force. When the ambient temperature is low, the ability of atomic activity is weak. At this time, the microcracks are easy to form between the grain boundaries, especially at the original defects due to the slight impact force, such as the local temperature is too high and the internal thermal stress is accumulated, which can be seen in the micrograph, Then the energy of dislocation propagation is enough to make the microcracks grow into macro cracks, and the Charpy impact value of materials changes with temperature. It can be seen from Fig. 9 that when the ambient temperature is lower than 0 ℃, the material toughness is at a low limit and brittle fracture is more likely to occur. However, the temperature of the broken gear analyzed in this paper is just below 0 ℃.
The basic reason for the fracture of the analyzed gear is that under the low temperature environment, the cast steel material is in the state of cold embrittlement, the local heating temperature is too high and the speed is too fast, the thermal stress increases rapidly to several times the ultimate stress of the material, and the thermal impact force is formed, resulting in the sudden expansion of the component. In addition, the casting defects such as coarse grains, loose grains, inclusions and phosphorus segregation in large-scale steel castings, although not exceeding the standard, are easy to form stress concentration at the defects and form initial cracks under abnormal conditions.
It is suggested that the whole heating method of oil groove should be adopted for the hot installation of large steel casting gears. When the oil is cold, the gears should be immersed in the groove and heated slowly. The oil temperature should not exceed 150 ℃, and the heat preservation should be carried out until the inner hole size meets the assembly requirements. Using this heating method to assemble large cast steel gear, no similar accident happened again, and the normal operation life is more than 5 years.
