Introduction
With the increase of thrust and the improvement of thrust-to-weight ratio of aeroengines,
The higher the gear ratio, the higher the power and speed transmitted by the gears, and the more
The temperature of the wheel engagement surface also needs to be continuously increased, which is important for manufacturing gears.materials put forward more stringent requirements. Spiral bevel gears have It has the advantages of stable transmission, strong carrying capacity, compact structure, etc., and is widely used in Widely used in engine central transmission systems. Central transmission arc gear
Bevel gears are the hub of power transmission, and once they fail, it will cause the entire
The transmission system loses function and the flight mission is interrupted.
The failure modes of aviation bevel gears often manifest as pitting, bonding, wear, plastic deformation, and fracture of the tooth surface. Scholars at home and abroad have conducted in-depth research on the multiple gear fracture failures that occur during engine operation. The analysis of the fracture failure of the straight bevel gear in the gearbox of the GE 90-11B engine indicates that it is caused by the combined effects of residual tensile stress generated by local decarburization and working stress. Afterwards, shot blasting measures were taken to solve the problem. For the three gear failure failures that occurred successively in the central transmission bevel gear of the turbojet engine, after theoretical analysis and experimental measurement, it was believed that the failure was caused by resonance damage. The occurrence of resonance was avoided by modifying the structure. However, there is no relevant report on the analysis of fatigue failure caused by abnormal load on the teeth of the arc-tooth bevel gear due to edge contact, and it is difficult to define the difference between the traditional resonance failure mode.
Active spiral tooth occurred during the central transmission debugging test
The tooth of the bevel gear is broken. The faulty gear is selected to have high resistance to
A new generation of low carbon high alloy with high temperature resistance, corrosion resistance and excellent toughness Golden Steel 15Cr14Co12 Mo5Ni2 Material preparation, research shows that the material surface has good resistance to corrosion after carburizing. With good grinding performance and high contact fatigue resistance, similar failures occur in this material.The failure mechanism of the gear was first discovered, and the cause of the failure was investigated.One step to improve the design and process improvement has certain reference significance.
From macroscopic inspection, fracture analysis, organizational inspection, composition analysis, hardness testing, engagement imprint simulation and verification,Analyze the faulty spiral bevel gear to identify its failure mode and cause, and propose corresponding improvement suggestions.

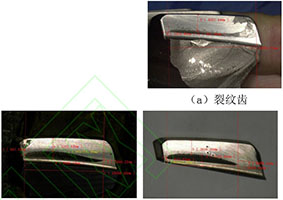
Fracture analysis
The failure of the active spiral bevel gear can be divided into radial, axial, and transverse fractures.
- There are two fractures in the circumferential and radial directions, and the radial fracture is larger than the circumferential fracture. Fine and visible fatigue arc and radiating edge features indicate
The tooth loss and fracture are of fatigue nature, as shown in Figure (a); from fatigue
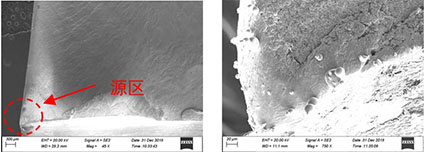
The direction of the arc and radial ribs indicates that fatigue originates from the small end surface and The root of the tooth convex surface has a transition corner point, starting from a point source, as shown in Figure 3 As shown in (b); the circumferential fracture is a radial 1-crack fatigue propagation shape Yes, the radial fracture 2 is relatively rough, with an area smaller than the entire chipping fracture 20% of the area should be a transient fracture formed during the late stage of fatigue expansion. As can be seen from the figure, the crack first expands from the small end surface to the large end surface. and then expand in both axial and radial directions to the web transition section Expand circumferentially in the direction of rotation after the bit, and pass through the 4-tooth trailing edge radially The carrier is cracked and chipped.

Remove the radial fracture 1 with wire cutting and observe it in scanning electron microscope
It can be seen that there are obvious fatigue arcs and radiating ribs on the fracture surface.
From the direction, it can be further judged that the fatigue originates from the small end surface and the teeth The corner of the convex root is a point source, and the source area is bright
There are visible damage marks, but no obvious metallurgical defects, as shown in the picture
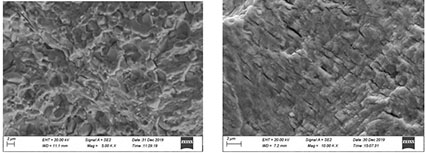
As shown in (a) and (b), the high-magnification image near the source region of tooth breakage shows
The appearance is characterized by granular carbide, and fatigue stripes can be seen locally
as shown in Figure 4(c); a dense and fragile fracture expansion zone can be seen in the fracture expansion zone. The surface of the strip-shaped, as shown in Figure 4(d). Combining the above characteristics,
The fracture of the gear with a clear fault is attributed to high-cycle fatigue.
Organize inspection
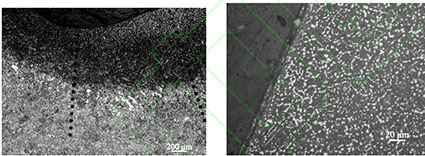
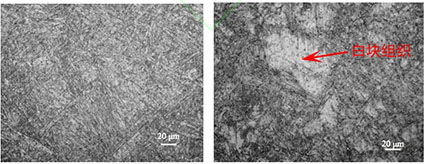
Cut a complete section near the fracture of the faulty driving arc gear Observe the microstructure of the entire tooth, and grade the carbide in the tooth profile Grade 3, meeting the requirements of the standard (Grades 1-4), with a morphology as shown in the figure As shown in (a), deformation can be observed on the surface of the concave meshing area.The characteristic and appearance are shown in Figure 5(b); the core structure is tempered martensite Bainite + a small amount of retained austenite, no abnormalities, morphology like As shown in Figure 5(c), there is a white block at the interface between the infiltrated layer and the substrate.The appearance of the tissue is shown in Figure 5(d), and the location was visualized using The microhardness test results showed that the hardness was 450, 507, and 445, which was significantly lower than the core hardness.The hardness of the part is 552.6, indicating that the white block structure is residual austenite.The body.
Hardness testing
Conduct hardness measurement on the concave surface of the faulty active spiral bevel gear
Test, the result is: tooth surface HRC=63.1, 63.4, 63.2 (drawings Requirements: HRC
=60-67); HRC of heart=50.1, 51.5, 51.4 Single-point hardening is performed on the fillet penetration layer area of the faulty active arc gear tooth heel.The microhardness test results are shown in the figure. From the figure, As shown in the picture, there are soft spots in the transition zone between the infiltrated layer structure and the core structure of the faulty driving arc gear, and there are white blocky structures at corresponding locations.
Ingredient analysis
| 元素 | V | Cr | Co | Fe | Ni | Mo |
| 质量分数 | 0.6 | 13.1 | 13.0 | 66.7 | 2.0 | 4.5 |
Simulation analysis and verification of meshing imprint
In the technical requirements for spiral bevel gears, the contact pattern of the gear pair
There are two types: static contact imprint and dynamic contact imprint. Static contact imprint
The contact mark is the result of a lightly braked installed gear pair on the rolling inspection machine.
After the lower running, the rolling contact marks obtained on the gear working surface
dynamic contact trace after loading, the contact area of the gear material Dynamic color printing within the elastic range is based on the original static contact imprint Upper expansion. The design of colored occlusal marks on the faulted spiral bevel gear should The solution: always an uninterrupted ellipse, always within the tooth surface, no Edge contact; check the position including the theoretical meshing installation position and 8 There are 9 inspection points in total, including 3 theoretical meshing points,
Inspect the position marks, adjust the paired gears to the theoretical meshing installation
Position (i.e. the position where the conical peaks of the large/small gears coincide); 8 inspections
The main basis for setting the position point is the axial force of the engine rotor Next, consider factors such as deformation and bearing clearance changes in the gear working position Changes that have occurred.
According to the requirements of the coloring instructions after grinding the teeth, use
A commercial software and finite element software are used to simulate and analyze the tooth surface contact imprint. And use a dedicated gear rolling inspection machine to verify the actual impression, analyze and verify it. The results are shown in Figure 7-9. The results show that a commercial software analysis Static contact imprint of tooth surface and rolling inspection results of actual machined parts
Basically consistent, the tooth surface markings and the edge of the gear tooth are very
Recently, it is prone to tooth edge contact after applying a working load; 2The loading contact traces of the tooth surfaces analyzed by the software simulation are basically the same,
The tooth surface imprint of the active spiral bevel gear at the theoretical position and position 1
It is far away from the edge of the gear tooth and the contact stress is about 1100 MPa;
The tooth surface impression of the moving spiral bevel gear at position 8 is very close to the edge of the tooth.Recently, there has been a significant increase in contact stress due to the contact of the gear tooth edge.reaching 1600-2000 MPa.


Analysis and discussion
From the fracture inspection of the faulty active spiral bevel gear, it can be seen that the fault
The crack of the gear starts from the corner of the small end surface and the root of the tooth convex surface.It is characterized by a point source, first expanding from the small end face to the large end face,
Then, it expands in both axial and radial directions until reaching the web transition area
Expand circumferentially in the direction of rotation, pass through 4 teeth, and overload in the radial direction The cracked block and the expansion area account for about 80% of the entire fracture area, indicating fatigue expansion.Full expansion; microscopically, there is a large area of tearing edges in the expansion zone Texture features and fine fatigue strip morphology characteristics, combined with high-cycle The basis for judging the fatigue fracture indicates that the failure is caused by active spiral bevel gear The failure nature of wheel cracks is high-cycle fatigue.Through the macroscopic inspection of the faulty spiral bevel gear, it can be known that the active arc The contact pattern of the entire circumference of the bevel gear is uneven, leaning towards the small end One side, near the bottom of the tooth; distribution of contact marks on the driven spiral bevel gear At the small end tooth top, the imprint is incomplete and partially exceeds the working area.It indicates that the side of the faulty spiral bevel gear pair occurred during the working process. edge contact. Shape, size and location of tooth contact area of spiral bevel gear For the smooth operation, load distribution, service life and noise of the gear
The contact mark is a measure of the meshing quality of the spiral bevel gear.
important indicator of quality, and also the most critical issue in the development process of bevel gears. Under this periodic reciprocal abnormal meshing action, it promotes the small
fatigue cracks appear at the corner of the transition between the end face and the root of the tooth convex surface, Insufficient consideration of gear tooth surface processing parameters is the main cause of failure. Therefore, through the optimization of tooth surface processing parameters, the imitation of occlusal imprint,Real, experimental verification, etc., to ensure that the gears fully meet the coloring requirements after trial production Design requirements for the bite mark to improve the gear bite during operation Quality is the main measure to avoid such failures.
Based on the metallographic structure and microstructure of the active spiral bevel gear with fault,
Hardness testing shows that there is a transition zone between the microstructure of the infiltrated layer and the core microstructure. At the “soft spot” zone (approximately 0.8 mm from the surface), corresponding to the position There is residual austenite in the microstructure. To analyze the causes of this phenomenon, we should Due to the active spiral bevel gear 15Cr14 Co12 Mo5 Ni2
material alloy Due to the large number of elements and difficulty in carburizing, if the carbon
If the potential is too high and the diffusion time is insufficient, it can easily lead to carbon elements in the material.and the alloying elements gather in the transition zone of carburizing, resulting in residual austenite with (white mass-like tissue), leading to the appearance of hard spots. Due to
Therefore, by controlling and adjusting the carburizing process and parameters, the
The stability of the martensite during the cooling process is to eliminate and reduce
15Cr14 Co12 Mo5 Ni2 The most effective method for removing residual austenite in the carburized layer
The cause of this failure is that the crack of the active spiral bevel gear started at the small end.
The surface of the transition corner between the face and the root of the tooth convex surface shows no obvious residual in the source region. The residual austenite and other structural defects, the composition, structure, hardness and The degree of fatigue crack initiation meets the standard requirements, indicating that it is consistent with the gear fatigue crack initiation
There is no obvious correlation.
Conclusion
(1) The active spiral bevel gear with fault is broken due to high-cycle fatigue
Nature, and is unrelated to material and metallurgical defects;
(2) Insufficient consideration of gear tooth surface processing parameters, resulting in
Abnormal meshing occurs during the operation of the wheel, and the stress at the root of the tooth increases.Large size is the main reason for gear fatigue fracture. It is recommended to optimize the tooth surface processing parameters and imitate the occlusal imprint Verifying through actual and experimental verification to ensure that the gears fully meet the coloring requirements after trial production
The design of the bite mark requires that the gears avoid producing abnormal
Always bite.
