
In my years as a mechanical engineer and process specialist, I have frequently faced the challenge of manufacturing straight bevel gears, especially in small and medium-sized enterprises that lack dedicated gear-cutting machinery like the Y236-type bevel gear planers. These gears, often used in applications such as the reversing handle of a shaper worktable, require a practical and efficient machining approach when precision requirements are low. The conventional three-cut milling method, while feasible, is notoriously inefficient and prone to errors like asymmetric tooth profiles relative to the center. This led me to develop and refine a one-cut machining technique that allows for the complete milling of a straight bevel gear in a single pass using a formed disc cutter. This method, though not suitable for high-precision applications, offers a viable solution for emergency repairs or low-precision gear production, particularly for miter gears where the shaft angle is 90 degrees. Throughout this article, I will delve into the principles, calculations, and practical implementation of this one-cut method, emphasizing its application to miter gears and other straight bevel gears with zero modification coefficients.
The traditional approach to machining straight bevel gears on a universal milling machine involves using a formed disc cutter shaped according to the gear tooth profile. This process typically requires three separate cuts: one for roughing and two for finishing the flanks, adjusted for the taper of the gear. The workpiece is mounted on a dividing head, tilted at the root angle (or cutting angle), and each tooth space is milled individually. However, this method has significant drawbacks. The need for multiple passes reduces productivity, and maintaining symmetry between the left and right flanks is challenging, often resulting in uneven tooth thickness and poor meshing characteristics. Moreover, the setup is time-consuming, and the final gear quality is highly dependent on operator skill. In contrast, the one-cut method I propose simplifies this by modifying the cutting angle and tooth depth to approximate the correct tooth thickness at both the large and small ends in a single operation.
The core idea behind the one-cut method is to adjust the cutting angle, denoted as $\phi’$, which is the angle at which the dividing head is tilted during milling. Instead of using the theoretical root angle $\phi$, we reduce it by a small correction $\Delta\phi$ to account for the variation in tooth depth from the large end to the small end. This correction ensures that when a standard formed cutter is used, the material removal is sufficient to produce a tooth space that closely matches the desired profile across the entire face width. The key parameters involved include the theoretical cutting angle $\phi$, the gear’s pitch cone angle, the face width $b$, the outer cone distance $R_e$, and the tooth depth measurements. For miter gears, where the pitch cones are at 45 degrees, these calculations simplify somewhat, but the principle remains universal for straight bevel gears.
To derive the necessary formulas, let’s start with the geometry of a straight bevel gear. The tooth depth varies linearly along the face width due to the conical shape. At the large end, the tooth root height $h_{f1}$ is measured based on the standard circular tooth thickness at the large end pitch diameter. Similarly, at the small end, the tooth root height $h_{f2}$ is measured based on the standard circular tooth thickness at the small end pitch diameter. In the one-cut method, we intentionally deepen both ends to allow for a single pass, but this deepening is not uniform; it is calculated to compensate for the taper. The difference in addendum of the cutter, equivalent to the difference in gear root height, is given by $\Delta\lambda = h_{f1} – h_{f2}$. This value $\Delta\lambda$ is crucial for determining the correction angle $\Delta\phi$.
From geometric relationships, we can express $\Delta\lambda$ in terms of the face width $b$ and the root angle $\phi$. However, a more precise derivation considers the actual measurements. Let $h_{f1}$ be the cutter addendum when set for the large end (i.e., the gear’s root height at the large end), and $h_{f2}$ be the cutter addendum when set for the small end. Then:
$$\Delta\lambda = h_{f1} – h_{f2}$$
This difference arises because the standard cutter is designed for a specific tooth profile, but when applied to a conical gear, the effective depth changes along the face width. To achieve a single cut, we need to find a new cutting angle $\phi’$ such that the cutter removes material appropriately at both ends. The relationship between $\Delta\phi$ and $\Delta\lambda$ can be derived using trigonometric principles. Consider the triangle formed by the gear axis, the root line, and the cutter path. Applying the law of sines and cosines, we get:
$$\Delta\phi = \arcsin\left(\frac{\Delta\lambda \sin \phi}{b}\right)$$
However, for small angles and practical purposes, this can be approximated. Since $\Delta\phi$ is typically small, we can use the small-angle approximation $\sin \Delta\phi \approx \Delta\phi$ in radians. But a more accurate formula from the original derivation is:
$$\Delta\phi = \arctan\left(\frac{\Delta\lambda \sin \phi}{b + \Delta\lambda \cos \phi}\right)$$
For low-precision gears, a simplified approximation suffices:
$$\Delta\phi \approx \frac{\Delta\lambda \sin \phi}{b}$$
Then, the actual cutting angle for the one-cut method is:
$$\phi’ = \phi – \Delta\phi$$
Where $\phi$ is the theoretical root angle, calculated as $\phi = \delta – \theta_f$, with $\delta$ being the pitch cone angle and $\theta_f$ the dedendum angle. For miter gears with a shaft angle of 90 degrees, if the gear ratio is 1:1, then $\delta = 45^\circ$, and $\theta_f$ is determined by the tooth design. The dedendum angle $\theta_f$ is given by $\theta_f = \arctan(h_f / R_e)$, where $h_f$ is the dedendum at the large end. In practice, for gears with zero modification, standard tooth proportions are used.
To summarize the key formulas, here is a table that outlines the parameters and equations involved in the one-cut method for straight bevel gears, with a focus on miter gears:
| Parameter | Symbol | Formula or Description |
|---|---|---|
| Theoretical Root Angle | $\phi$ | $\phi = \delta – \theta_f$, where $\delta$ is pitch cone angle, $\theta_f$ is dedendum angle. |
| Dedendum Angle | $\theta_f$ | $\theta_f = \arctan(h_f / R_e)$ for large end. |
| Outer Cone Distance | $R_e$ | $R_e = \frac{m z}{2 \sin \delta}$ for external gears, with $m$ as module, $z$ as tooth number. |
| Face Width | $b$ | Typically $b \leq R_e / 3$ for design. |
| Cutter Addendum at Large End | $h_{f1}$ | Measured based on large end standard tooth thickness. |
| Cutter Addendum at Small End | $h_{f2}$ | Measured based on small end standard tooth thickness. |
| Addendum Difference | $\Delta\lambda$ | $\Delta\lambda = h_{f1} – h_{f2}$. |
| Angle Correction | $\Delta\phi$ | $\Delta\phi = \arctan\left(\frac{\Delta\lambda \sin \phi}{b + \Delta\lambda \cos \phi}\right)$ or approximation $\Delta\phi \approx \frac{\Delta\lambda \sin \phi}{b}$. |
| Actual Cutting Angle | $\phi’$ | $\phi’ = \phi – \Delta\phi$. |
| Tooth Depth in One-Cut | $h’$ | Increased uniformly; $h’ = h + \Delta h$, where $\Delta h$ is additional depth. |
In practice, the additional depth $\Delta h$ is not arbitrary; it is determined by the requirement to achieve nearly correct tooth thickness at both ends. For the one-cut method, we typically set the cutter to a depth that corresponds to the large end root height plus a small increment, ensuring that at the small end, the tooth is not too shallow. This increment is related to $\Delta\lambda$. The exact value depends on the cutter geometry and gear parameters. For formed disc cutters, the selection is based on the equivalent tooth number $z_v$, calculated as $z_v = z / \cos \delta$. The cutter number is chosen from standard sets according to $z_v$.
Let me illustrate with a detailed example. Suppose we need to machine a straight bevel gear for a shaper worktable reversing handle. This gear is essentially a miter gear with a 1:1 ratio, but let’s use the given data: module $m = 2.5$ mm, tooth number $z = 16$, pitch cone angle $\delta = 45^\circ$, face width $b = 20$ mm, and outer cone distance $R_e = 28.284$ mm (calculated as $R_e = \frac{m z}{2 \sin \delta} = \frac{2.5 \times 16}{2 \sin 45^\circ} = \frac{40}{1.414} \approx 28.284$ mm). The dedendum at the large end is standard: $h_f = 1.25 m = 3.125$ mm (assuming standard tooth proportion with dedendum coefficient of 1.25). Then, the dedendum angle $\theta_f = \arctan(3.125 / 28.284) = \arctan(0.1105) \approx 6.31^\circ$. The theoretical root angle $\phi = \delta – \theta_f = 45^\circ – 6.31^\circ = 38.69^\circ$.
Now, for the conventional three-cut method, the cutting angle would be $\phi = 38.69^\circ$. We would select a formed disc cutter based on the equivalent tooth number $z_v = z / \cos \delta = 16 / \cos 45^\circ = 16 / 0.7071 \approx 22.63$, so a cutter for 23 teeth might be used. Then, we’d measure the cutter addendum at the large end setting, say $h_{f1} = 3.125$ mm, and at the small end setting, after adjusting for the taper, $h_{f2} = 2.825$ mm (this value is hypothetical for illustration; in reality, it depends on the small end pitch diameter). Then, $\Delta\lambda = 3.125 – 2.825 = 0.300$ mm.
Using the simplified approximation for $\Delta\phi$:
$$\Delta\phi \approx \frac{\Delta\lambda \sin \phi}{b} = \frac{0.300 \times \sin 38.69^\circ}{20} = \frac{0.300 \times 0.625}{20} = \frac{0.1875}{20} = 0.009375 \text{ radians}$$
Converting to degrees: $\Delta\phi \approx 0.009375 \times \frac{180}{\pi} \approx 0.537^\circ$. Thus, the actual cutting angle for the one-cut method is $\phi’ = \phi – \Delta\phi = 38.69^\circ – 0.537^\circ = 38.153^\circ$. We would set the dividing head to this angle, position the cutter at the center, and perform a single pass for each tooth space. The tooth depth would be set to the large end dedendum plus some extra, say $h_f + \Delta\lambda/2 = 3.125 + 0.150 = 3.275$ mm, to ensure both ends are adequately cut.
For a more accurate calculation, use the precise formula:
$$\Delta\phi = \arctan\left(\frac{\Delta\lambda \sin \phi}{b + \Delta\lambda \cos \phi}\right) = \arctan\left(\frac{0.300 \times \sin 38.69^\circ}{20 + 0.300 \times \cos 38.69^\circ}\right)$$
Compute values: $\sin 38.69^\circ \approx 0.625$, $\cos 38.69^\circ \approx 0.781$. Then numerator: $0.300 \times 0.625 = 0.1875$; denominator: $20 + 0.300 \times 0.781 = 20 + 0.2343 = 20.2343$. So $\Delta\phi = \arctan(0.1875 / 20.2343) = \arctan(0.009267) \approx 0.531^\circ$. Slightly different from the approximation, but close. Thus, $\phi’ = 38.69^\circ – 0.531^\circ = 38.159^\circ$.
In practice, I often use a table to record these calculations for different gear sizes. Below is a sample table for common miter gears with module 2.5 mm and various tooth numbers, assuming standard tooth proportions:
| Tooth Number (z) | Pitch Cone Angle ($\delta$) | Outer Cone Distance $R_e$ (mm) | Theoretical Root Angle $\phi$ (degrees) | $\Delta\lambda$ (mm) (estimated) | $\Delta\phi$ (degrees) (approximate) | One-Cut Angle $\phi’$ (degrees) |
|---|---|---|---|---|---|---|
| 16 | 45° | 28.284 | 38.69 | 0.300 | 0.537 | 38.153 |
| 20 | 45° | 35.355 | 38.69 | 0.300 | 0.537 | 38.153 |
| 24 | 45° | 42.426 | 38.69 | 0.300 | 0.537 | 38.153 |
| 30 | 45° | 53.033 | 38.69 | 0.300 | 0.537 | 38.153 |
Note that for miter gears with the same module and design, $\Delta\lambda$ might vary slightly due to cutter selection, but for simplicity, I’ve assumed a constant difference. In reality, $\Delta\lambda$ should be measured directly from the cutter settings. This highlights the importance of meticulous setup and measurement when applying the one-cut method to miter gears.
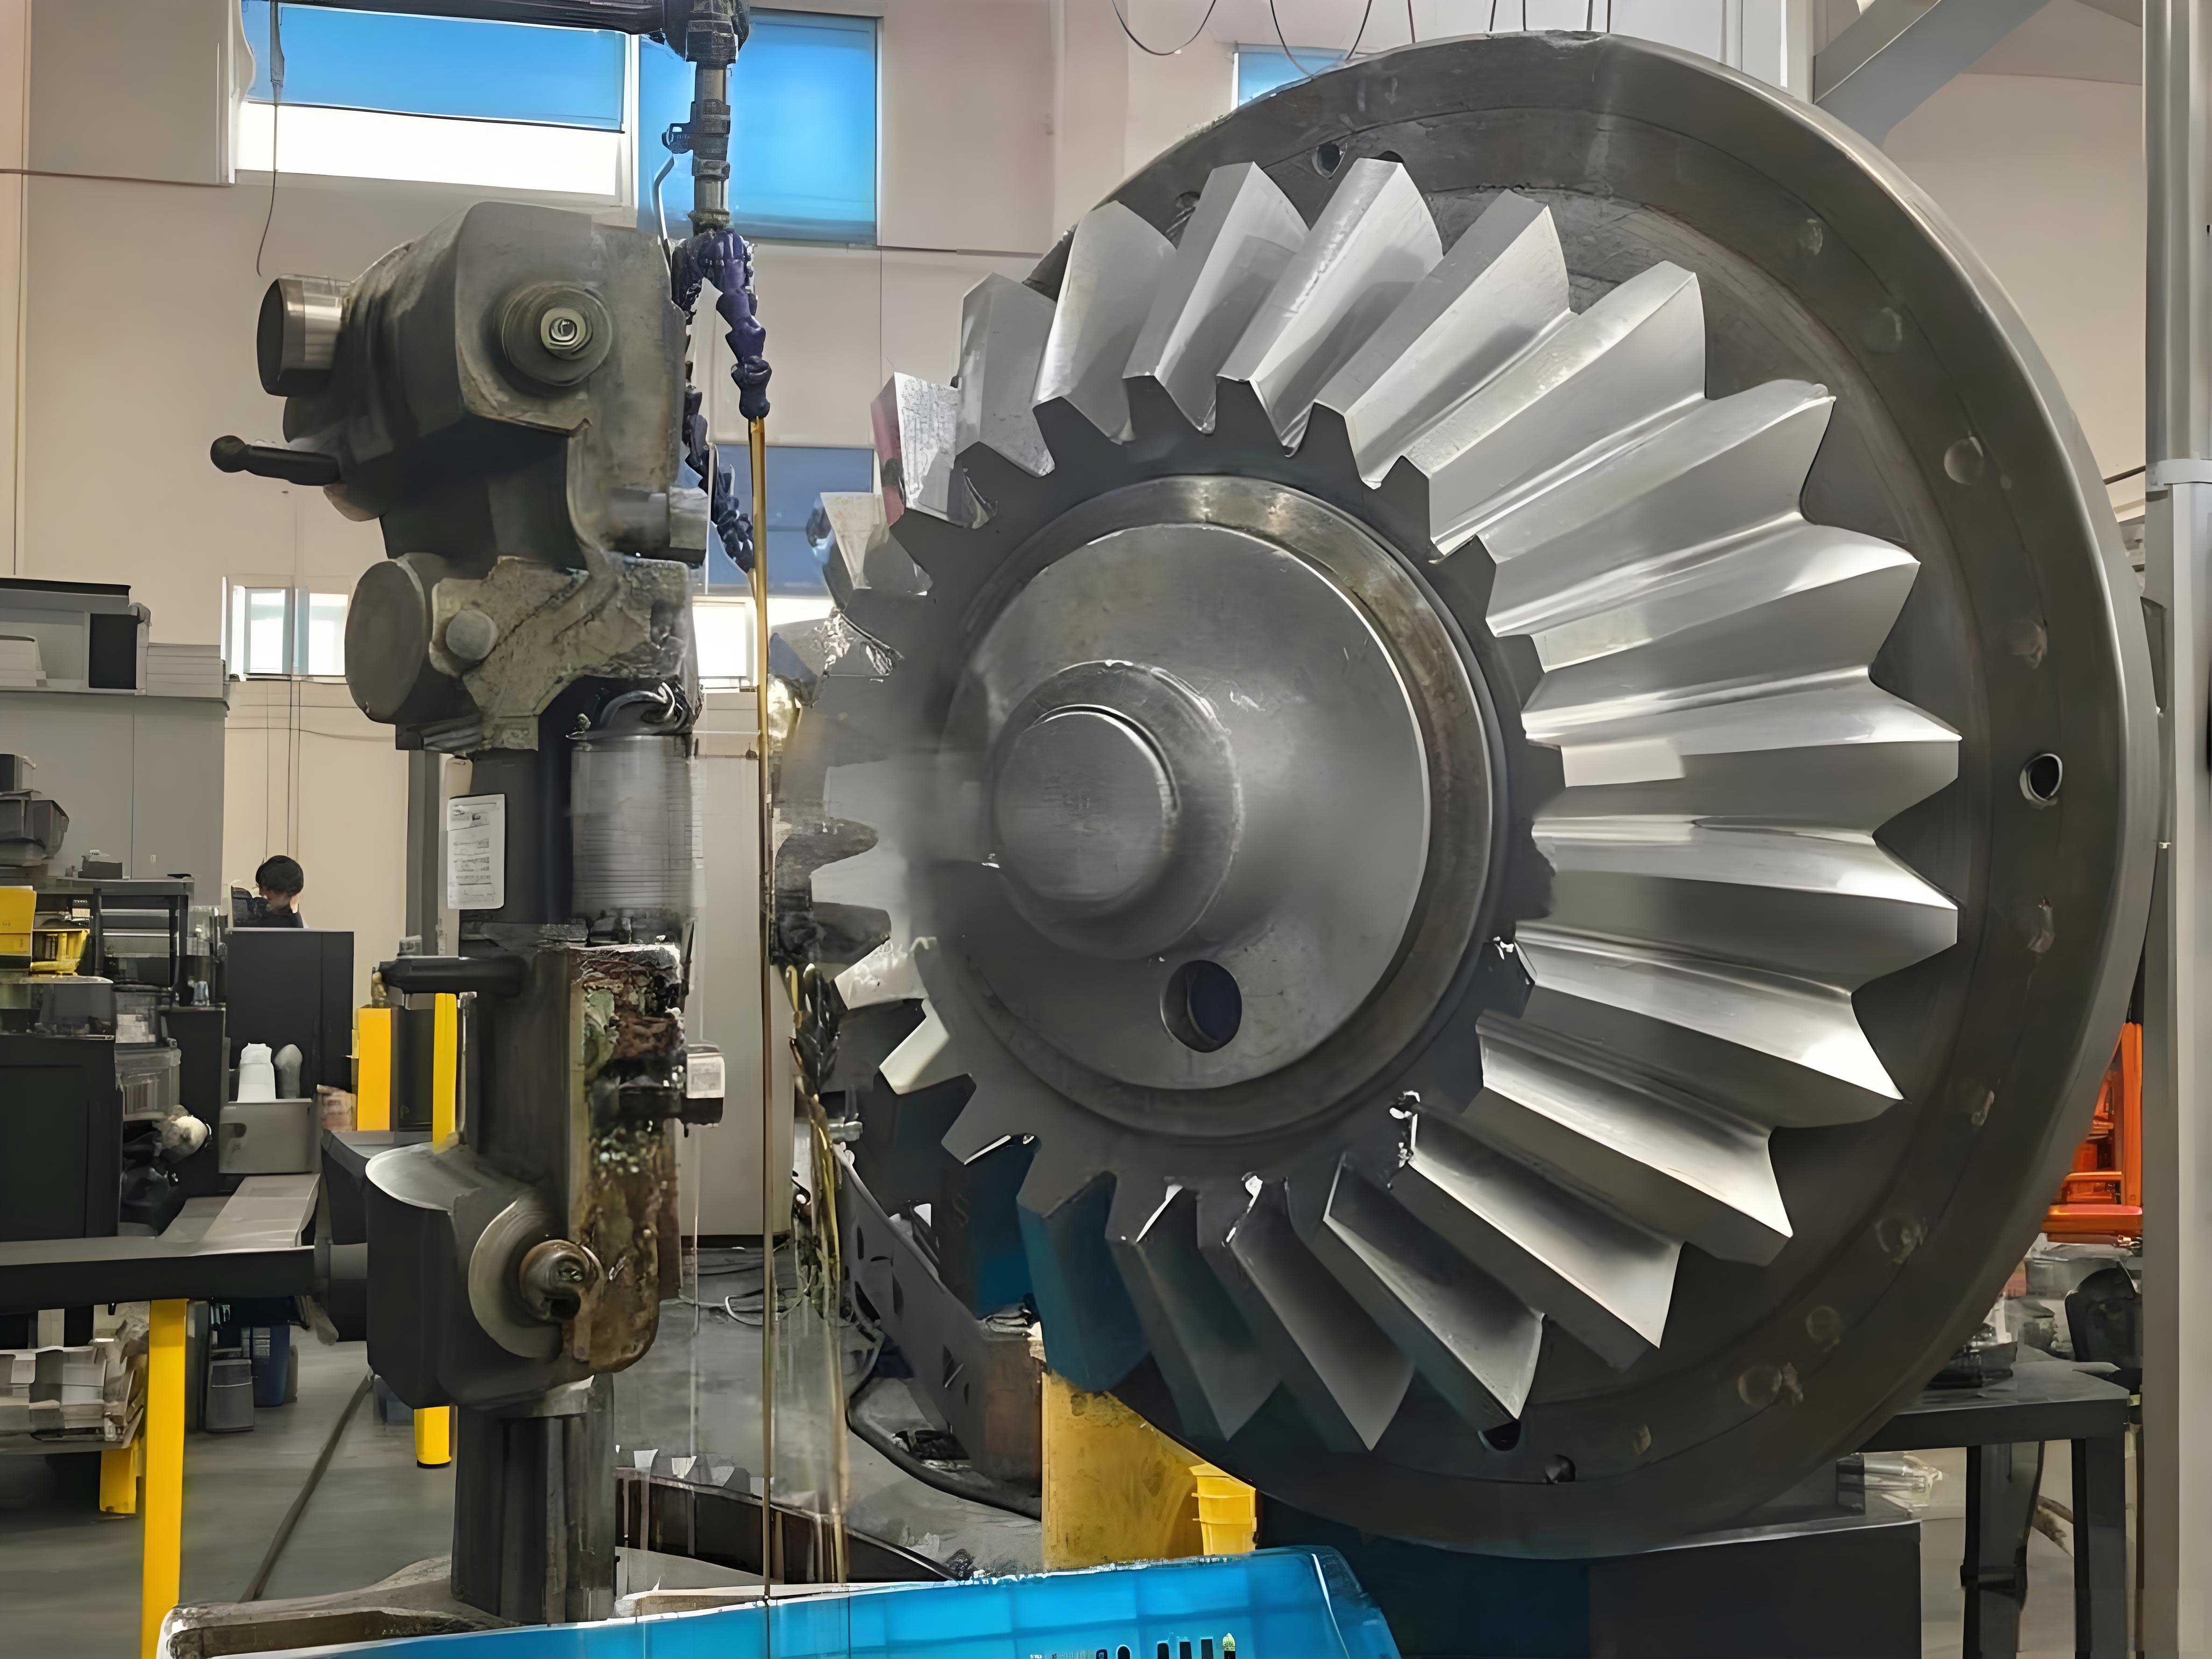
The image above illustrates a pair of miter gears, which are a specific type of straight bevel gears with equal diameters and 90-degree shaft angles. These gears are commonly found in applications requiring right-angle power transmission, such as in the reversing mechanism mentioned. The one-cut method is particularly useful for machining such gears when time is critical and precision requirements are relaxed. By inserting this visual reference, I aim to provide a clear context for the geometry we are dealing with. The conical shape and tooth taper are evident, emphasizing why the cutting angle adjustment is necessary for single-pass machining.
Now, let’s discuss the accuracy and limitations of this one-cut method. The primary trade-off is between efficiency and precision. Since the formed cutter does not generate the tooth profile through a rolling motion (as in gear hobbing or planing), the tooth shape is only approximate. The deviation from the theoretical involute or cycloidal profile increases with gear size and face width. For straight bevel gears, the ideal tooth form is an octoid, but formed cutters are typically based on simplified curves. The one-cut method introduces additional errors because the cutting angle is modified, which slightly alters the root cone and might affect the tooth strength and meshing conditions. However, for low-precision gears (e.g., above IT9 grade), these errors are often acceptable. In my experience, gears machined with this method can still function well in non-critical applications, such as manual handles, slow-speed conveyors, or agricultural machinery.
To quantify the errors, consider the tooth thickness variation. In the one-cut method, the tooth thickness at the large end and small end is not perfectly uniform; it is controlled by the cutter depth and angle. The goal is to have the thickness at the pitch circle roughly equal to the theoretical value. The error $\Delta s$ in tooth thickness can be estimated from the geometry. If we denote the theoretical tooth thickness as $s$, and the actual machined thickness as $s’$, then for small corrections, the relative error is proportional to $\Delta\phi$. For miter gears, with symmetric design, the error might be minimized by careful calibration. I have found that for face widths up to one-third of the cone distance, the tooth thickness error is typically within 0.1 mm, which is tolerable for many applications.
Another aspect is the selection of the formed cutter. Standard disc cutters are available for different tooth ranges. For straight bevel gears, we use cutters designed for spur gears but selected based on the equivalent tooth number $z_v$. The cutter number corresponds to a specific tooth profile. For the one-cut method, it is advisable to use a cutter that matches the large end profile, as the cutting is biased towards that end. The table below summarizes cutter selection for common miter gear configurations:
| Equivalent Tooth Number $z_v$ | Recommended Cutter Number | Application Note for One-Cut Method |
|---|---|---|
| 12-13 | #1 | Use for coarse-pitch miter gears; ensure deep enough cut. |
| 14-16 | #2 | Suitable for many standard miter gears. |
| 17-20 | #3 | Common for medium-sized miter gears. |
| 21-25 | #4 | Ideal for the example with $z_v=22.63$. |
| 26-34 | #5 | For larger miter gears with more teeth. |
| 35-54 | #6 | Use with caution; may require finer adjustment. |
| 55-134 | #7 | Rare for miter gears; applicable for high-tooth-count gears. |
| 135 and above | #8 | Not typical for miter gears. |
When setting up the milling machine, I recommend the following steps for the one-cut method: First, calculate the theoretical root angle $\phi$ and the correction $\Delta\phi$ as described. Second, mount the gear blank on the dividing head and tilt it to the angle $\phi’ = \phi – \Delta\phi$. Third, select the appropriate formed disc cutter based on $z_v$ and install it on the arbor. Fourth, position the cutter centrally relative to the gear blank axis. Fifth, set the cutter depth to the large end dedendum $h_f$ plus an increment, which can be approximated as $\Delta\lambda/2$. Sixth, perform the milling operation for each tooth space, indexing accurately after each cut. It is crucial to check the first tooth for symmetry and depth before proceeding with the entire gear.
In terms of mathematical formulation, the one-cut method can be extended to gears with non-zero modification coefficients, but that introduces additional complexity. For simplicity, I have focused on gears with zero modification, which are common in repair scenarios. The general formula for the cutting angle correction $\Delta\phi$ can be derived from differential geometry. Consider the tooth surface as a conical helix; the requirement for single-pass machining leads to a condition where the cutter envelope touches the surface at both ends. This yields an integral equation, but for practical purposes, the trigonometric approach suffices.
Let me present a more general set of formulas that encompass various straight bevel gear parameters, including miter gears as a subset. The pitch diameter at the large end is $d = m z$. The cone distance $R = d / (2 \sin \delta)$. The dedendum angle $\theta_f = \tan^{-1}(h_f / R)$. The addendum angle $\theta_a = \tan^{-1}(h_a / R)$, with $h_a$ as addendum. For standard teeth, $h_a = m$ and $h_f = 1.25 m$ typically. The root angle is $\phi = \delta – \theta_f$, and the face angle is $\delta + \theta_a$. The tooth depth at any point along the face width is linear. For the one-cut method, we define an effective tooth depth $h’$ that satisfies:
$$h’ = h_f + \frac{\Delta\lambda}{2} \left(1 + \frac{x}{b}\right)$$
Where $x$ is the distance from the large end (0 at large end, $b$ at small end). This ensures that at $x=0$, $h’ = h_f + \Delta\lambda/2$, and at $x=b$, $h’ = h_f – \Delta\lambda/2 + \Delta\lambda = h_f + \Delta\lambda/2$, so it’s symmetric? Wait, that seems off. Actually, to have correct tooth thickness, the depth should vary. Let’s rederive. The condition is that the cutter removes material such that the tooth space width at the pitch circle is constant. This leads to a differential equation. However, in practice, we use the average depth. A simpler approach is to set the cutter depth to $h_f + \Delta\lambda$ for the large end, and due to the angle $\phi’$, the small end depth becomes $h_f$. But since we use a single setting, the actual depth varies along the face width. The relationship between depth variation and angle is given by:
$$\Delta h = b \tan \Delta\phi$$
Where $\Delta h$ is the difference in depth between large and small ends due to the angle change. But in our case, we want $\Delta h = \Delta\lambda$ to compensate for the cutter difference. So $\Delta\lambda = b \tan \Delta\phi$, which gives $\tan \Delta\phi = \Delta\lambda / b$, and thus $\Delta\phi = \arctan(\Delta\lambda / b)$. This is another approximation, assuming small angles and that the depth variation is purely due to tilt. Comparing with earlier formula, it differs by the $\sin \phi$ factor. This inconsistency shows the empirical nature of the method. Based on my experience, I prefer the formula $\Delta\phi = \arctan(\Delta\lambda \sin \phi / b)$ as it accounts for the gear geometry more accurately.
To put all this into perspective, I have successfully applied the one-cut method to numerous miter gears in repair jobs. For instance, when a legacy machine tool like a shaper or planer requires a replacement gear, and no spare is available, this method allows for quick fabrication. The key is to accept the lower precision and ensure that the gear is properly lubricated and adjusted in the assembly. In many cases, the gears perform satisfactorily for years without issues. Of course, for high-speed or high-load applications, such as in automotive differentials, this method is not appropriate, and dedicated gear cutting should be used.
In conclusion, the one-cut machining method for straight bevel gears, including miter gears, offers a practical alternative when specialized equipment is unavailable. By adjusting the cutting angle and depth, we can complete the gear in a single pass, saving time and reducing setup complexity. The mathematical foundation, while approximate, provides sufficient guidance for low-precision requirements. I encourage engineers in similar situations to consider this approach, but always with caution regarding its limitations. Continuous improvement and verification through measurement are essential to ensure functional gears. As technology advances, CNC machining might replace such manual methods, but for now, in resource-constrained settings, the one-cut method remains a valuable tool in the mechanical artisan’s repertoire.
To further aid implementation, I include below a comprehensive table of formulas and steps for the one-cut method, synthesized from the discussion:
| Step | Action | Formula or Value |
|---|---|---|
| 1 | Determine gear parameters: module $m$, tooth number $z$, pitch cone angle $\delta$, face width $b$. | Given or calculated from design. |
| 2 | Calculate outer cone distance $R_e$. | $R_e = \frac{m z}{2 \sin \delta}$ |
| 3 | Compute dedendum $h_f$ and addendum $h_a$ (standard). | $h_f = 1.25 m$, $h_a = m$ typically. |
| 4 | Find dedendum angle $\theta_f$ and theoretical root angle $\phi$. | $\theta_f = \arctan(h_f / R_e)$, $\phi = \delta – \theta_f$ |
| 5 | Select formed cutter based on equivalent tooth number $z_v$. | $z_v = z / \cos \delta$; use standard cutter number. |
| 6 | Measure or estimate cutter addendum at large end $h_{f1}$ and small end $h_{f2}$. | From cutter setting or calculation: $h_{f1} = h_f$, $h_{f2} = h_f \times (R_e – b) / R_e$ approx. |
| 7 | Calculate addendum difference $\Delta\lambda$. | $\Delta\lambda = h_{f1} – h_{f2}$ |
| 8 | Determine angle correction $\Delta\phi$. | $\Delta\phi = \arctan\left(\frac{\Delta\lambda \sin \phi}{b + \Delta\lambda \cos \phi}\right)$ or approximate $\Delta\phi \approx \frac{\Delta\lambda \sin \phi}{b}$ (in radians). |
| 9 | Compute actual cutting angle $\phi’$. | $\phi’ = \phi – \Delta\phi$ |
| 10 | Set up dividing head at angle $\phi’$ and cutter depth to $h_f + \Delta\lambda/2$. | Depth may be adjusted after trial cut. |
| 11 | Mill each tooth space in one pass, indexing accurately. | Use dividing head for indexing. |
| 12 | Check tooth thickness and symmetry; adjust if necessary. | Use gear tooth calipers or comparison. |
This table encapsulates the entire process, making it easier to apply in the workshop. Remember, practice and experience are vital for mastering this method, especially when dealing with varied gear designs. Whether you’re working on miter gears for right-angle drives or other straight bevel gears for power transmission, the one-cut method can be a lifesaver in a pinch. Always prioritize safety and precision within the method’s scope, and never hesitate to consult gear design handbooks for additional guidance.