
In my extensive experience working with straight bevel gears, I have encountered numerous challenges in machining their internal bores. The grinding of the bore in straight bevel gears is a critical operation, as the geometric relationship between the pitch cone and the bore axis must be maintained with high precision. The requirement for minimal runout of the pitch cone relative to the bore axis presents a significant alignment difficulty during grinding operations on a universal grinding machine. Conventional methods, such as push broaching on a press, often fail to meet the stringent tolerances for high-performance applications involving straight bevel gears. After considerable practical experimentation, I successfully developed and implemented a specialized fixture for grinding the internal bore of straight bevel gears. This fixture has been used to grind over a thousand components, all of which passed quality inspection, demonstrating its robustness and reliability. In this article, I will detail the design principles, manufacturing process, and application methodology of this fixture, focusing on the key aspects that ensure precision for straight bevel gears.
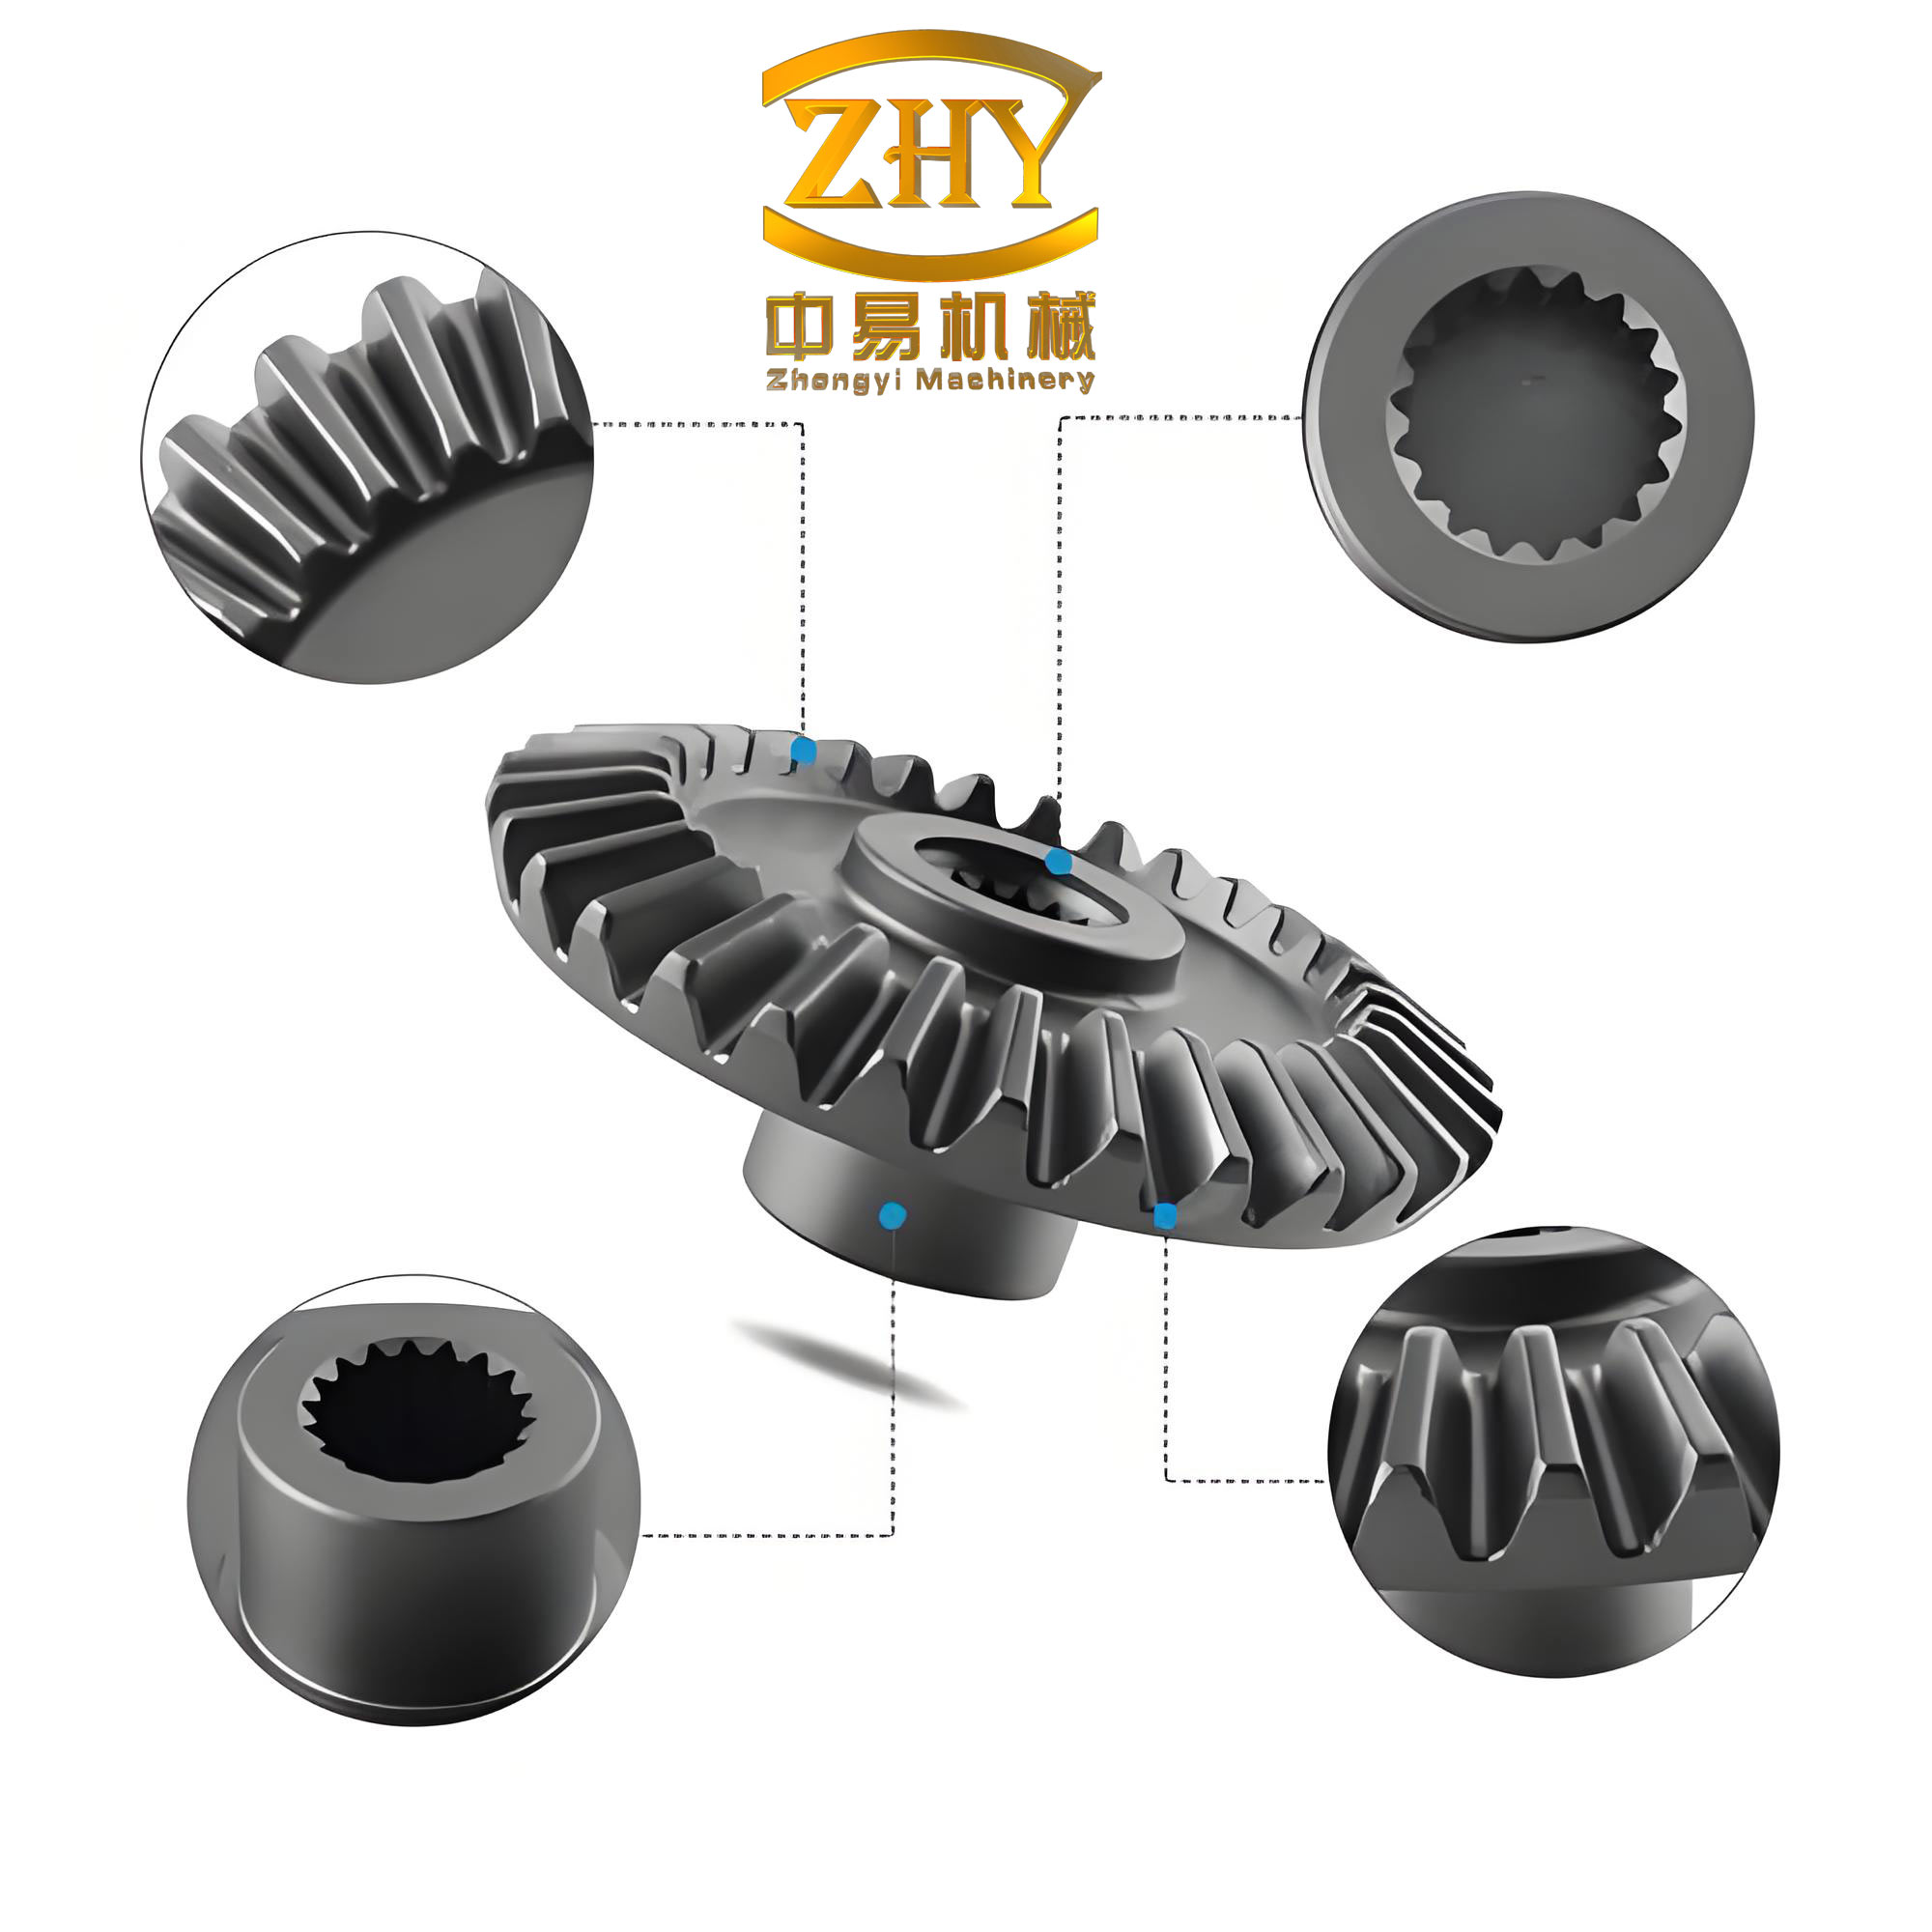
The core challenge in grinding bores for straight bevel gears stems from their conical geometry. Unlike cylindrical gears, the axis of the bore must be perfectly aligned with the theoretical apex of the pitch cone. Any angular deviation introduces runout, adversely affecting the meshing performance and load distribution when the straight bevel gears are assembled in a transmission system. My solution centers on a fixture that references the gear teeth themselves to establish the correct orientation, thereby eliminating the need for complex and time-consuming dial indicator alignment on the machine table. The fixture consists of three main sub-assemblies: the precision cylindrical pins, the pin retainer or “cage,” and the fixture body with a tapered bore. Each element is meticulously designed and manufactured to interact seamlessly with the tooth flanks of the straight bevel gear.
Determination of Cylindrical Pin Diameter
The first and most crucial step is selecting the correct diameter for the cylindrical pins that will contact the tooth spaces. These pins act as kinematic locators, transferring the gear’s pitch cone orientation to the fixture. The diameter must be chosen so that the pin sits securely in the tooth space, projecting above the tooth tips to allow contact with the fixture’s tapered bore. Two primary methods can be employed, both specific to the geometry of straight bevel gears.
Method 1: Empirical Reference Based on Gear Ends
By visually assessing the tooth space at both the heel and toe of the straight bevel gear, a suitable pin diameter can be chosen. The pin should contact the flanks near the mid-point of the active profile to minimize errors from potential tooth form deviations.
Method 2: Analytical Calculation Based on Tooth Space
A more precise approach involves calculating the space width at a reference circle. For straight bevel gears, the tooth profile is approximated on the back cone. The chordal tooth space width \( s \) at a given reference diameter \( d \) can be estimated. The pin diameter \( d_p \) should be slightly less than this space width to ensure point contact rather than line contact, which averages out minor irregularities. A practical formula derived for straight bevel gears is:
$$ d_p \approx m \cdot k $$
where \( m \) is the module of the straight bevel gear and \( k \) is an empirical coefficient. For most standard straight bevel gears, a value of \( k = 1.6 \) to \( 1.8 \) works well. This ensures \( d_p \) is approximately:
$$ d_p \approx 1.7m $$
The pin must protrude above the tooth crest. The required protrusion \( h_p \) can be related to the addendum \( h_a \) of the straight bevel gear:
$$ h_p > h_a = m $$
Typically, a protrusion of \( 1.2m \) to \( 1.5m \) is sufficient.
The length of the cylindrical pin is also important. It should be long enough to provide stable guidance but not so long as to cause flexure. A good rule is to set the pin length \( L_p \) to about 1.5 times the face width \( F \) of the straight bevel gear:
$$ L_p \approx 1.5F $$
For manufacturing, the pins are made from tool steel. After rough machining, a small center hole is drilled for subsequent grinding operations. They are then heat-treated to a hardness of 60-62 HRC to resist wear and finally precision ground to a tight diameter tolerance, typically within ±0.002 mm. The following table summarizes the key parameters for pin selection for different sizes of straight bevel gears.
| Gear Module (m) [mm] | Calculated Pin Diameter (d_p) [mm] | Recommended Pin Length (L_p) [mm] | Heat Treatment Hardness [HRC] |
|---|---|---|---|
| 2 | 3.4 | 15-20 | 60-62 |
| 3 | 5.1 | 20-30 | 60-62 |
| 4 | 6.8 | 25-35 | 60-62 |
| 5 | 8.5 | 30-40 | 60-62 |
| 6 | 10.2 | 35-45 | 60-62 |
Fabrication of the Pin Retaining Cage
To hold the three cylindrical pins in the correct spatial relationship, a cage analogous to a bearing separator is constructed. This cage, often called a retainer, ensures the pins are positioned at equal angular intervals corresponding to the tooth spaces of the straight bevel gear. The manufacturing process begins with machining a conical shell or “cap” that mimics the outer face cone of the specific straight bevel gear being processed. The apex angle of this cap must match the pitch angle of the gear. For a straight bevel gear with pitch angle \( \delta \), the cap’s included angle is \( 2\delta \).
On the conical surface of this cap, three axial slots are milled. These slots are equidistantly spaced at 120° intervals for a three-pin configuration, which provides optimal stability for straight bevel gears. The slot width is slightly larger than the pin diameter \( d_p \) to allow free insertion, typically with a clearance of 0.1 mm. The slot length exceeds the pin length \( L_p \) by about 5 mm to accommodate the wire binding method. After milling, the cap is hardened and ground to ensure dimensional stability.
The three precision-ground pins are placed into these slots. They are then secured using a thin, high-tensile steel wire that passes through the pre-drilled small center holes in the pins. This creates a rigid yet lightweight assembly where the pins can self-align slightly when pressed against the gear teeth. The cage assembly effectively averages any minor pitch errors across the three referenced tooth spaces of the straight bevel gear, leading to a highly accurate centering effect. The geometry of the cage is defined by the following parameters related to the straight bevel gear:
- Cone Apex Angle: \( 2\delta \)
- Slot Angular Spacing: \( \theta = 120^\circ \)
- Cage Base Diameter: \( D_c \approx D_a + 2h_p \), where \( D_a \) is the gear’s outer diameter.
Machining the Tapered Bore in the Fixture Body
The heart of the fixture is the main body, which features a precision tapered bore. This bore mates with the external conical surface formed by the three protruding pins seated in the gear. The angle of this taper is not arbitrarily chosen; it is directly derived from the geometry established by the pins sitting in the straight bevel gear’s tooth spaces. The process to determine this angle is critical.
First, the assembled cage with pins is placed onto the unmachined straight bevel gear. The pins nestle into three tooth spaces. Using a universal bevel protractor or a precision angle measurement instrument, the angle \( \alpha \) between the external母线 (generatrix) of the pins (the line connecting their outer contact points) and the gear’s axis is measured. This angle \( \alpha \) is complementary to the gear’s pitch angle when the pins are correctly seated. For a standard straight bevel gear, if the pins contact the flanks at the pitch line, this angle should equal the pitch cone angle \( \delta \). However, to account for variations, direct measurement is preferred. The relationship can be expressed as:
$$ \alpha = \arctan\left(\frac{D_p}{2 L_c}\right) $$
where \( D_p \) is the effective diameter formed by the three pins, and \( L_c \) is the axial distance from the gear’s back face to the pin contact plane. In practice, \( \alpha \) is measured directly.
This measured angle \( \alpha \) is then used as the included angle for machining the tapered bore in the fixture body. The fixture body, made from stabilized steel like 4140, is mounted on a lathe. The tapered bore is single-point cut to match angle \( \alpha \). The taper’s accuracy is verified using a precision taper gauge or via the blueing (prussian blue) check. A small amount of dye is applied to the taper; the cage assembly is inserted and rotated slightly. The contact pattern should show uniform coverage, indicating full surface contact and correct angle.
Furthermore, the axis of this tapered bore must be perfectly perpendicular to the fixture’s mounting face. This perpendicularity, typically within 0.002 mm over 50 mm, is essential because the fixture body itself will be aligned on the grinding machine’s magnetic chuck. Any error here would translate directly into bore axis tilt relative to the gear’s face. This perpendicularity is achieved by finish grinding the mounting face after the tapered bore is machined, using the bore axis itself as a datum. The key tolerances for the fixture body are summarized below.
| Feature | Tolerance Requirement | Measurement Method |
|---|---|---|
| Tapered Bore Angle (α) | ±0.01° | Precision Sine Bar or CMM |
| Bore Axis to Mounting Face Perpendicularity | 0.002 mm / 50 mm | Dial Indicator on Surface Plate |
| Bore Surface Finish | Ra ≤ 0.4 µm | Surface Profilometer |
To facilitate operation, a pressure plate or clamp is designed. Several small holes are drilled in this plate, allowing the use of a tommy bar or pin spanner to tighten it. Alternatively, knurling can be added to its outer circumference for manual gripping. This plate applies uniform axial force, pressing the straight bevel gear and the cage assembly firmly into the tapered bore of the fixture body.
Application and Use of the Fixture in Grinding Operations
The practical application of this fixture for grinding straight bevel gears is straightforward and highly repeatable. The process minimizes setup time and eliminates subjective alignment errors. Here is a step-by-step procedure developed through the processing of thousands of straight bevel gears.
- Fixture Setup on the Grinder: The fixture body is placed on the precisely ground magnetic chuck of an internal grinding machine. Using a dial indicator mounted on the machine spindle, the fixture’s mounting face is carefully adjusted until its runout is less than 0.001 mm. This ensures the axis of the tapered bore is parallel to the machine spindle axis. The fixture is then magnetically secured.
- Workpiece and Cage Assembly: The straight bevel gear to be processed is cleaned, and any burrs on the tooth flanks are removed. The pin cage assembly is placed onto the gear, ensuring the three pins seat properly into three evenly spaced tooth spaces. This assembly is then inserted into the tapered bore of the pre-aligned fixture body.
- Clamping: The pressure plate is placed over the back face of the straight bevel gear. A central clamping screw or a hydraulic drawbar is used to pull the assembly axially into the taper. The conical surface of the pins engages with the tapered bore, automatically centering the gear’s pitch cone axis with the fixture (and hence machine) axis. The small holes in the pressure plate allow it to be rotated slightly during final tightening to ensure even seating.
- Grinding Process: With the straight bevel gear now accurately located, the internal grinding wheel is dressed and the bore grinding cycle is initiated. Standard grinding parameters apply. Because the location is based on the teeth, the ground bore will inherently have its axis aligned to the pitch cone, satisfying the runout requirement. No further in-process checking of runout is needed for individual gears from the same batch, as the fixture is a master tool.
- Unloading and Verification: After grinding, the clamp is released, and the gear-cage assembly is removed. The final bore diameter and surface finish are measured. Statistical process control has shown that for straight bevel gears processed with this method, the pitch cone runout consistently falls within 0.005 mm to 0.01 mm, well within the typical specification of 0.02 mm for precision straight bevel gears.
The underlying principle can be analyzed through kinematics. The three pins contacting the tooth flanks define a hypothetical cone. The fixture’s tapered bore constrains this cone. The mathematical condition for perfect alignment is that the contact points between pins and gear flanks lie on a circle whose center lies on the desired bore axis. For a straight bevel gear with number of teeth \( z \), the angular position of the pins should ideally be spaced by \( 360^\circ / z \), but using three pins at 120° provides an averaging effect. The effective locating diameter \( D_{eff} \) is given by:
$$ D_{eff} = \frac{d_p}{\sin(\phi/2)} $$
where \( \phi \) is the pressure angle of the straight bevel gear. This diameter is used in the taper angle calculation mentioned earlier.
Technical Analysis and Advantages for Straight Bevel Gears
The success of this fixture lies in its ability to leverage the gear’s own functional geometry—the teeth—as the primary datum. This is particularly advantageous for straight bevel gears because their conical shape makes traditional chucking methods prone to error. Let’s delve deeper into the technical merits.
Error Averaging and Precision: By using three discrete contact points, the fixture averages out local tooth-to-tooth variations (pitch errors, profile errors) that are inevitable in even high-quality straight bevel gears. This means the fixture locates on the “average” pitch cone, which is exactly what matters for proper assembly and function. The statistical improvement in bore axis alignment can be modeled. If individual tooth space location error has a standard deviation \( \sigma_t \), the error in the established axis from three points has a reduced standard deviation \( \sigma_{axis} \):
$$ \sigma_{axis} = \frac{\sigma_t}{\sqrt{3}} $$
This directly translates to a reduction in measured runout for the straight bevel gears.
Rigidity and Dynamic Stability: During the grinding operation, cutting forces can cause vibration or deflection. The large conical interface between the pins and the fixture body provides excellent rigidity and damping. The clamping force \( F_c \) required to prevent slippage can be calculated based on the grinding torque \( T_g \):
$$ F_c > \frac{2 T_g}{\mu D_{eff}} $$
where \( \mu \) is the coefficient of friction between the pin material and the fixture bore (typically 0.1-0.15 for steel-on-steel with lubrication). For a typical straight bevel gear bore grinding operation with \( T_g = 5 \, \text{Nm} \) and \( D_{eff} = 50 \, \text{mm} \), the required clamping force is only around 1300 N, easily achieved with a manual screw.
Versatility and Adaptability: While the fixture is dedicated to a specific straight bevel gear design, the concept is adaptable. For a family of straight bevel gears with the same pitch angle but different face widths or number of teeth, only the pin cage needs to be changed. The main fixture body can sometimes be used for multiple gear sizes if a collet system or interchangeable taper inserts are incorporated. The following table compares this fixture method with traditional methods for straight bevel gears.
| Aspect | Traditional Dial Indicator Alignment | Push Broaching | Pin-Type Grinding Fixture |
|---|---|---|---|
| Setup Time | High (10-15 min/part) | Low (for batch) | Very Low (2-3 min/part) |
| Achievable Runout | 0.01-0.03 mm (operator dependent) | 0.02-0.05 mm | 0.005-0.015 mm (consistent) |
| Skill Dependency | High | Medium | Low |
| Tooling Cost | Low | Medium (broach cost) | Medium-High (initial fixture) |
| Batch Size Suitability | Prototype/Small batch | Large batch | Small to Large batch |
| Impact on Straight Bevel Gear Quality | Variable | Limited by broach wear | High and Consistent |
Thermal and Stress Considerations: Grinding generates heat, which can cause localized thermal expansion. The fixture design must account for this to maintain accuracy for straight bevel gears. Since the gear is clamped from the teeth and the bore is ground, any thermal growth is symmetrical about the axis, minimizing distortion. Furthermore, the pins have a small contact area, reducing heat transfer from the workpiece to the fixture, which helps maintain the fixture’s geometric stability.
Extended Applications and Future Developments
The principle of this fixture is not limited to simple straight bevel gears. It can be extended to other conical gear types, such as zerol bevel gears or even spiral bevel gears, with modifications to the pin profile or cage design. For spiral bevel gears, the contact points are curvilinear, requiring the use of spherical-ended pins or specially profiled inserts to match the tooth curvature. The mathematical modeling becomes more complex, involving the gear’s spiral angle \( \beta \). The effective locating geometry would be defined by equations from Gleason or Klingelnberg systems specific to spiral bevel gears.
For high-volume production of straight bevel gears, the manual fixture can be automated. Incorporating pneumatic or hydraulic clamping, along with automatic loading/unloading robots, can create a fully integrated grinding cell. The fixture body can be equipped with temperature sensors and feedback loops to compensate for thermal drift during extended runs, ensuring micron-level accuracy for every straight bevel gear produced.
Another development area is the use of advanced materials. The pins and fixture bore could be coated with wear-resistant materials like titanium nitride (TiN) or diamond-like carbon (DLC) to extend service life when grinding hardened straight bevel gears made from case-hardened steels like 8620 or 9310. The wear rate \( W \) of the pin can be modeled using Archard’s equation:
$$ W = k \frac{F_n L}{H} $$
where \( k \) is a wear coefficient, \( F_n \) is the normal contact force, \( L \) is the sliding distance, and \( H \) is the hardness of the softer material. Using a hard coating significantly increases \( H \), reducing \( W \) and maintaining accuracy over hundreds of thousands of cycles for straight bevel gears.
Furthermore, the integration of this fixture with in-process gauging systems can create a closed-loop manufacturing process. A probe can measure the bore diameter and runout immediately after grinding, and the data can be fed back to adjust the grinding wheel position or compensate for wheel wear, ensuring that every straight bevel gear meets specifications without post-process inspection.
Conclusion
Through the design, implementation, and refinement of this pin-based grinding fixture, I have established a reliable and highly accurate method for machining the internal bores of straight bevel gears. The fixture directly addresses the core challenge of aligning the bore axis with the pitch cone by using the gear teeth themselves as the intrinsic reference. This method eliminates the subjectivity and time consumption of traditional alignment techniques, leading to consistent, high-quality results. The success evidenced by over a thousand defect-free straight bevel gears validates the design’s efficacy. The principles discussed—from the precise calculation of pin diameter to the kinematic averaging of the cage assembly—provide a solid foundation for manufacturing professionals seeking to improve their processes for straight bevel gears. As demand for precision power transmission components grows, such dedicated, intelligent tooling will remain indispensable in the production of reliable straight bevel gears for automotive, aerospace, and industrial applications.