0 Introduction
As a key part in the mechanical transmission device, the arc bevel gear is difficult to realize the processing of the linear contact conjugate tooth face pair due to the characteristics of the gradual shrinkage of the tooth surface. It is mainly based on the “local conjugation principle” to realize the tooth surface
Mesh tooth face pairs of local point contact 90-93. However, in practical engineering application, the arc bevel gear transmission pair processed based on the “local conjugation principle” is prone to tooth surface fatigue and other damage due to the local point contact of the tooth surface, which limits the improvement of the bearing capacity and service life of the tooth surface.
Therefore, in recent years, with the goal of expanding the meshing contact area and improving the bearing capacity of the tooth surface, the author’s research group has carried out the research on the meshing transmission of the linear contact conjugate tooth surface pair with a larger contact area
There has been some progress; The proposed “cutterhead milling approximation machining method” 1624-1632 can accurately and efficiently process the conjugate tooth face pair of line contact by eliminating the geometric topological deviation between the machined tooth surface and the theoretical tooth surface of the line contact. However, the conjugate tooth pair pair error of line contact is relatively high For sensitivity, the tooth profile deviation, tooth pitch deviation and installation error of the conventional accuracy level are even larger than the load deformation of the tooth surface; The existence of errors will affect the contact state and meshing performance of the gear pair. Therefore, it is needed
The influence of error factors such as the manufacture and installation of gear pairs on the meshing transmission performance was analyzed. Based on the principle of local conjugation, the mathematical model of the tooth surface and the tooth surface contact trajectory model of the arc bevel gear were established, and the influence of installation error on the tooth surface contact characteristics was analyzed. Through Non-Uniform Rational B-Splines, NURBS) surface fitting method, the tooth surface of the hypoid gear was constructed, and the influence of various installation errors on the transmission error was analyzed by using finite element simulation software. Based on tooth contact analysis (Tooth
Contact Analysis (TCA) established a model of tooth surface contact trace and geometric transmission error of gear pairs, and analyzed the effects of cone point error and shaft intersection angle error on the contact characteristics of double arc arc bevel gear pairs. In this paper, a numerical loading tooth surface contact analysis method considering error was proposed, and the performance parameters such as contact stress, elastic deformation and transmission error after tooth surface loading were calculated, and the correctness of the method was verified. On the basis of finite element analysis, a numerical analysis method for determining the relative error in the supporting shaft of the surface gear transmission is proposed, which provides an accurate theoretical basis for the correction of the machining position of the gear shaping cutter. A geometric error compensation method based on six-axis CNC arc bevel gear grinding machine is proposed, and the forward and reverse kinematics are carried out by using the spiral theory modeling, error prediction and compensation. An adaptive data-driven modeling, prediction and optimal control method is proposed, which adopts the improved Error Tooth Contact Analysis (Error TCA, ETCA) and Numerical Loaded TCA NLTCA), which optimizes the error evaluation of the helical bevel gear drive system of the helicopter.
In order to be able to apply the conjugate tooth face pair with linear contact in practice, the influence of error factors on the contact of arc bevel gear transmission is studied. Firstly, based on the cutterhead approximation machining method, the contact arc teeth of the line are solved Mathematical model of the tooth surface of the bevel gear; Then, based on the mathematical model, a three-dimensional model of the gear pair and a finite element simulation model with pitch deviation and installation error were established. Finally, by comparing and analyzing the variation law of tooth surface contact stress and elastic deformation, the influence of installation error and tooth pitch deviation on the linear contact arc bevel gear transmission under different accuracy levels is obtained. The research results can provide a theoretical basis for the error control and modification design of linear contact arc bevel gear transmission.
1-line contact arc bevel gear machining flank modeling
The implementation method of 1-line contact conjugate tooth surface
1) Set the tooth surface of the large wheel as the definite tooth surface of priority processing, and determine the tooth surface equation of the large wheel milled by using the cutter head according to the principle of the forming wheel 90-110.
2) According to the principle of gear meshing, the theoretical tooth surface of the small wheel that is in contact with the tooth surface line of the large wheel processing is obtained.
3) Based on the theoretical tooth surface of the small wheel and the machined tooth surface of the small wheel machined according to the principle of the forming wheel, the geometric topological deviation model of the comparison between the machined tooth surface of the small wheel and the theoretical tooth surface was constructed.
4) With the goal of the small wheel machining tooth surface approaching its theoretical tooth surface, the required additional cutting motion and machining compensation parameters of the cutter head are obtained.
1.2 linear contact conjugate tooth plane equations
Based on paragraph 1. The machining method described in Section 1 is to model the linear contact conjugate tooth surface.
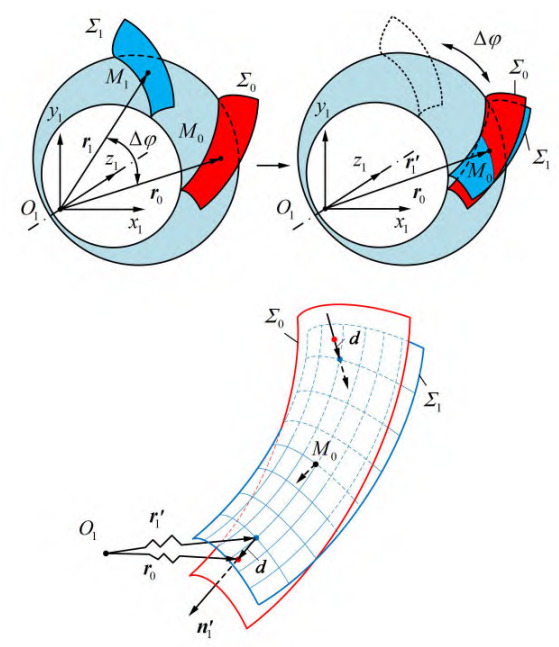
Fig. 1 Geometric topological deviation model of the comparison between
the pinion machining tooth flank and its theoretical tooth flank
1.3D modeling of 3-line contact arc bevel gear pairs
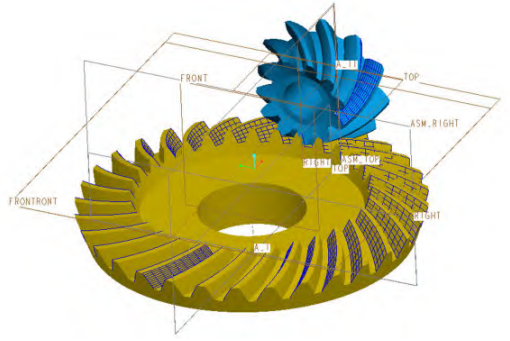
Taking a pair of arc bevel gears with a tooth ratio of 11/32 as an example, the working tooth face pair is set to be the convex surface of the large wheel and the concave surface of the small wheel, and the tooth surface model and the three-dimensional model of the gear pair are established.
Using the gear pair parameters and the adjustment parameters of the machine tool, the tooth surface equation of large wheel processing and the tooth surface equation of small wheel processing are solved. Then, the two tooth surfaces were discretized to obtain the coordinates of each grid point on the tooth surface. Import it into the modeling software to create a 3D model of the spiral bevel gear pair, as shown in Figure 2.
2 Finite element contact simulation
2.1 Finite element pre-processing
The 3D model is imported into the finite element software and the model is pre-processed, including simplifying the model, meshing, defining material properties, creating analysis steps, defining contact methods, and defining edges
boundary conditions and loads, etc.
1) Model simplification. In order to reduce the amount of computation, the model is simplified. Among them, the small wheel is not intercepted, and the large wheel retains part of the teeth.
2) Meshing. Set the element type to C3D10, which divides a relatively dense mesh on the tooth surface, and the rest of the mesh is relatively sparse; The number of model units for small wheels is 78 920 and the number of model units for large wheels is 67 548.
3) Material properties. 20Cr2Ni4A alloy steel was selected for the gear material, which has an elastic modulus of 206 GPa and a Poisson’s ratio of 0. 3. Density For 7. 85 × 10-9t/mm3。
4) Create an analysis step. Define analysis step 1 and analysis step 2, of type static generic, considering geometric nonlinearity; The time for analysis step 1 is 0. 01 s, the increment step is 0. 01 s; The time for analysis step 2 is 0. 6 s, The increment step is 0. 04 s。
5) Define contact pairs. Set the small tooth surface as the active surface, the large gear tooth surface as the driven surface, and the contact mode is “surface-to-surface contact”, tangential frictionless, and normal direction is hard contact.
2.2 Model validation
A resistance moment of 10 N·m is applied to the large wheel and 0. 5 rad/s angular velocity, the results of the tooth flank contact analysis are shown in Figure 3. As can be seen from Figure 3, during the meshing process, the large tooth surface and the small tooth surface are always in line contact, and the instantaneous contact line is continuous. Among them, the instantaneous contact line of the large tooth surface is meshed by the top of the large end tooth and the root of the small end tooth is meshed. The instantaneous contact line of the tooth surface of the small wheel is meshed by the root of the large end and the top of the small end tooth is meshed. The simulation results verify the correctness of the tooth surface model.
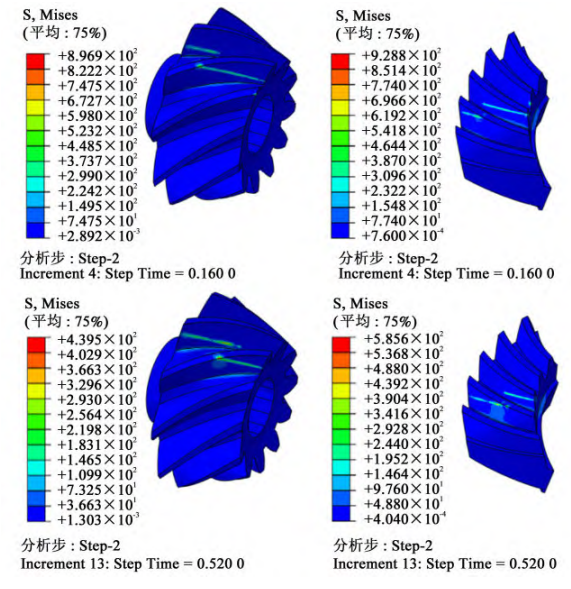
Fig. 3 Contact simulation analysis of the example model
3 The influence of error factors on transmission contact
A variety of errors exist in the actual gear transmission, including tooth shape error, installation error, etc. For arc bevel gears, the tooth shape error is mainly the tooth pitch deviation; The installation error includes the driving gear shown in Figure 4 The axial mounting error ΔP, the axial mounting error of the passive gear ΔG, the shaft spacing error ΔE of the gear pair, and the shaft intersection angle error of the gear pair ΔΣ.
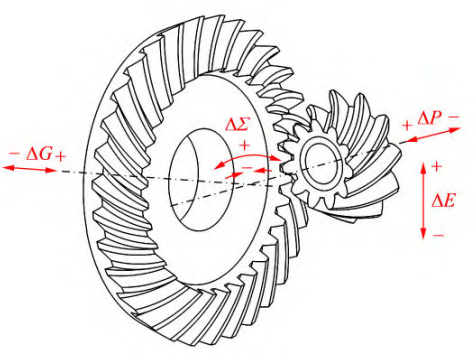
Fig. 4 Schematic diagram of installation errors of spiral bevel gears
During the analysis, a drag moment of 1 000 N·m was applied to the large wheel and 0. angular velocity of 5 rad/s; The method of controlling a single variable is adopted, that is, the value of only one error is changed at a time All other errors are in the correct position of the theory.
3.1 Finite element analysis of installation error
In the finite element pre-processing stage, the assembly model is preset for installation errors. The “Translation” option command sets the axis error ΔG for the large wheel, the axis error ΔP for the small wheel, and the shaft spacing error ΔE via the “Rotation
Turn command to set the shaft intersection angle error ΔΣ to obtain a finite element model of the linear contact arc bevel gear pair with mounting errors. The definition of the positive and negative directions of each installation error is shown in Figure 4. Among them, for the axis error ΔG of the large wheel and the axis error ΔP of the small wheel, the direction near the top of the cone is positive, and the direction away from the top of the cone is negative. The shaft spacing error ΔE defines that the direction of upward offset of the axis of the small wheel is positive, and the direction of downward offset is negative; For the axial intersection angle error ΔΣ, it is defined that the direction in which the angle increases is positive and the direction in which the angle decreases is negative. In the installation error, the axis error and shaft spacing error of large and small wheels are related to the accuracy level, and the error limit value of different accuracy levels is different. The error limit value of the axial intersection angle is the same as the minimum backlash type selected Correlation. Therefore, this section will be divided into two parts for installation error analysis: axis error and shaft spacing error analysis, and shaft intersection angle error analysis.
3.1. 2 Analysis of axis line error and axis spacing error
Fig. 5 and Fig. 6 show the contact stress and deformation of the tooth surface under the error limit value of the large wheel axis and the error limit value of the small wheel axis, respectively. As can be seen from Fig. 5 and Fig. 6, the contact stress and deformation under the forward axis error It is greater than the contact stress and deformation under the negative axis error. Analyzing the reason, the forward axis error makes the contact zone of the gear pair closer to the small end of the tooth, and the thickness of the small end tooth is thinner than the thickness of the large end tooth, so it will cause greater contact stress and deformation.
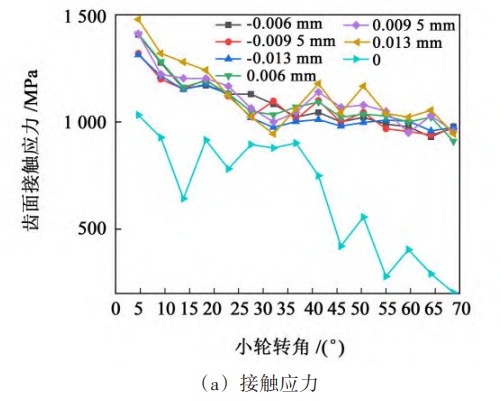
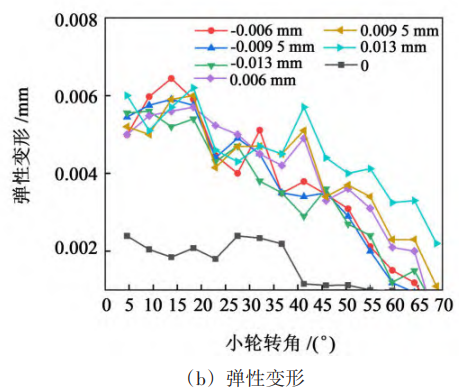
Fig. 5 Contact stress and deformation with limit values of gear axis error
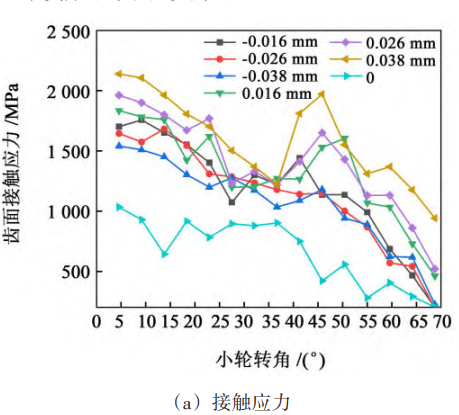
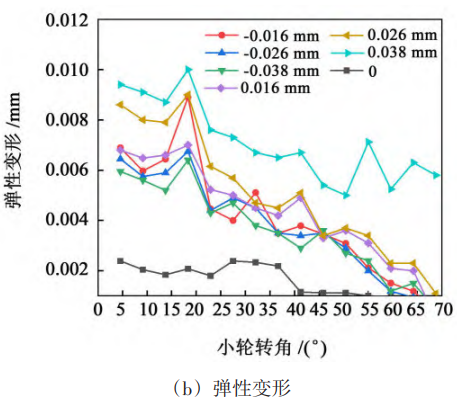
Fig. 6 Contact stress and deformation with limit values of pinion axis error
For the axis error of the large wheel, the maximum contact stress of the tooth surface under the 5th grade accuracy is 1 383 MPa, the 6th grade accuracy is 1 412 MPa, and the 7th grade accuracy is 1479 MPa. The maximum elastic deformation at the 5th grade accuracy is 0.005 mm, and the 6th grade accuracy is 0. 005 mm with 7 levels of accuracy of 0. 006 mm。 The data show that the contact stress and deformation of the tooth surface under different error accuracy levels The amount is about the same, and the influence of the large wheel axis error on the gear transmission contact has little relationship with the error accuracy level. For the axis error of the small wheel, the maximum tooth surface contact stress is 1 834 MPa under grade 5 accuracy, 1 962 MPa at grade 6 accuracy, and 1 962 MPa at grade 7 accuracy 2139 MPa; The maximum elastic deformation at class 5 accuracy is 0.007 mm, Level 6 accuracy is 0. 009 mm with 7 levels of accuracy of 0. 010 mm。 The data show that the influence of the axis error of the small wheel on the gear transmission contact is related to the error accuracy level, and the lower the error accuracy level, the greater the contact stress and elastic deformation of the tooth surface. Fig. 7 is a contour of tooth surface contact stress and elastic deformation with large wheel axis error. As can be seen from Fig. 7, the stress concentration of the tooth surface of the small wheel mainly occurs at the top of the tooth, and the stress concentration of the tooth surface of the large wheel mainly appears at the top of the tooth
and little-ende. In addition, the tooth surface contact stress and elastic deformation contours of the axial error, shaft spacing error and shaft intersection angle error of the small wheel are similar to those of the large wheel axis error, which will not be repeated in this article. Figure 8 shows the contact stress and deformation of the tooth surface at the limit value of the shaft spacing error. As can be seen in Figure 8, the maximum flank contact at a level 5 accuracy The stress is 1 425 MPa, the 6-level accuracy is 1517 MPa, and the 7-level accuracy is 1623 MPa; The maximum elastic deformation of the tooth surface under the 5th grade accuracy is 0.006 mm, Level 6 accuracy is 0. 007 mm with 7 levels of accuracy of 0. 007 mm。
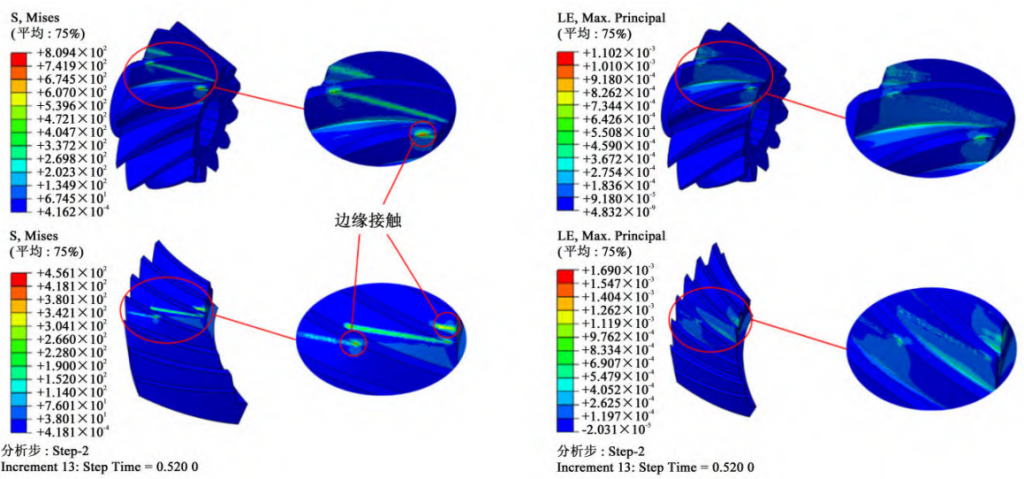
Fig. 7 Nephogram of contact stress and deformation with gear axis error
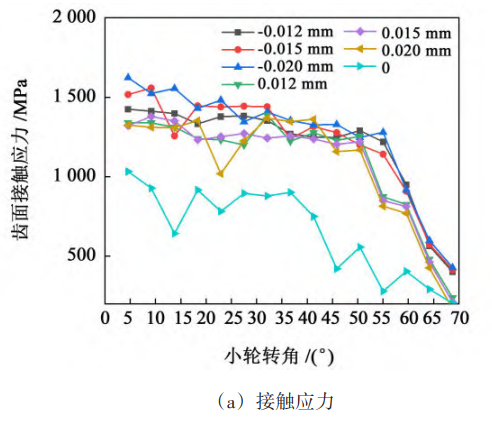
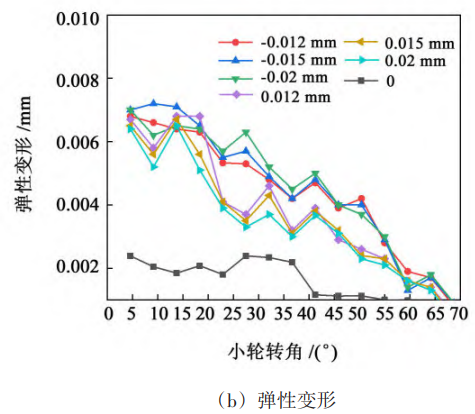
Fig. 8 Contact stress and deformation with the limit values of shaft spacing error
The data show that the lower the accuracy level, the greater the maximum tooth surface contact stress and elastic deformation, and the change range is less than that of the small wheel axis error and greater than the change range of the large wheel axis error. In addition, the negative shaft spacing
The influence of the error on the gear transmission contact is greater than that of the forward shaft spacing error. The reason for this is that the tooth surface under the error-free condition is just tangent contact state, the negative axis spacing error makes the tooth surface squeeze each other, and the forward axis spacing error makes the tooth surface out of the tangent state.
3.1. 3-axis intersection error analysis
The shaft angle error is related to the midpoint taper distance of the gear pair, the taper angle of the small wheel section and the type of minimum backlash. Among them, there are 6 types of minimum backlash, including A, B, C, D, E, and F, which decrease from A to F. In this paper, the axial intersection angle error of class A minimum backlash is selected for contact analysis, and the limit value of this type of axial intersection angle error is found to be 80 μm according to the “Mechanical Design Manual” 240, and the intermediate value of 40 μm is taken for comparative analysis. Figure 9 shows the contact stress and deformation of the tooth flank under the axial angle error. It can be seen from Fig. 9 that with the increase of the axial intersection angle error, the contact stress and elastic deformation of the tooth surface gradually decrease, and the variation amplitude is about the same as the influence of the shaft spacing error. When there is no error, the overall fluctuation of the elastic deformation of the tooth surface is small. When the axial intersection angle error is included, the tooth surface is in contact
The stress and deformation fluctuate greatly, indicating that the vibration and shock generated during the meshing process increase.
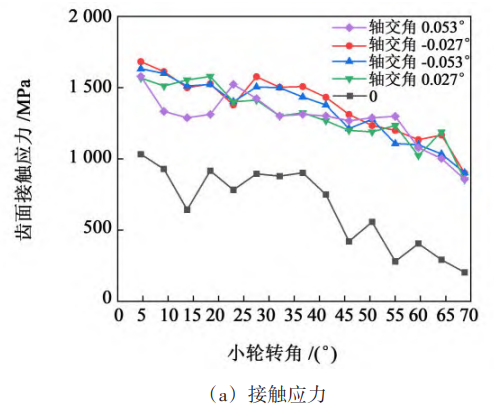
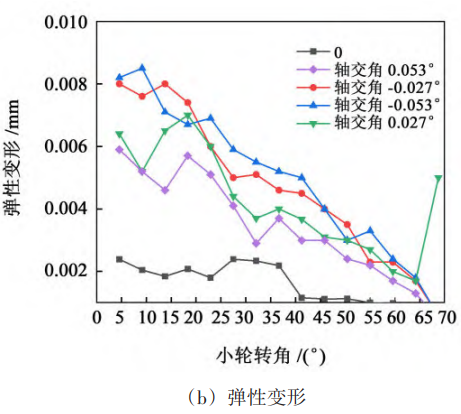
Fig. 9 Contact stress and deformation with shaft angle error
3.2 Finite element analysis of pitch deviation
Pitch deviation refers to the difference between the actual pitch on the midpoint indexing circle of the tooth surface and the nominal pitch. Due to the diversity of the cumulative deviation of the tooth pitch and the total deviation of the tooth pitch, only the influence of a single tooth pitch deviation on the meshing transmission contact is analyzed in this paper.
3.2. 1 Tooth flank modeling with pitch deviation
As shown in Fig. 10, in the stage of establishing the three-dimensional model of the tooth surface, according to the tooth pitch deviation value, the modeled tooth surface takes the center of the midpoint index circle as the rotation center, and rotates the corresponding angle around the gear axis to obtain the containment Tooth flank model under pitch deviation. It is defined that the tooth pitch deviation that causes the adjacent tooth pairs to enter the meshing in advance is the positive tooth pitch deviation, and the tooth pitch deviation that makes the adjacent tooth pairs lag into the meshing is the negative tooth pitch deviation.
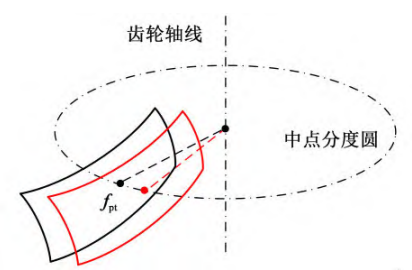
Fig. 10 Flank modeling process with pitch deviation
3.2. 2 Contact simulation analysis
The 3D model containing the tooth pitch deviation was imported into the finite element software for contact simulation analysis, and the contact stress of the tooth surface under the forward tooth pitch deviation was obtained, as shown in Figure 11. As can be seen from Figure 11, with the precision
With the decrease of the grade, the contact stress of the tooth surface increases, and its variation range is about the same as that of the axis error of the small wheel. In addition, the simulation results show that the contact stress of the negative pitch deviation is less than that of the positive pitch deviation.
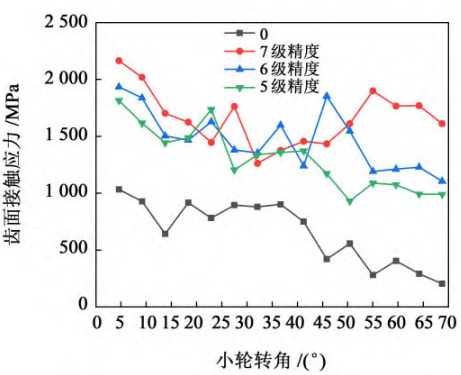
Fig. 11 Contact stress with positive pitch deviation
Fig. 12 shows the tooth surface contact stress contour with the positive pitch deviation. As can be seen from Figure 12, the tooth surface contact area changes from 3 teeth meshing to 1 tooth meshing without tooth pitch deviation. During the meshing process, the large tooth tops The parts are in contact first. This is due to the fact that when the tooth pitch deviation is positive, the deformation of the tooth pair compensates for the tooth spacing, resulting in the lag of the meshing state of the large wheel meshing.
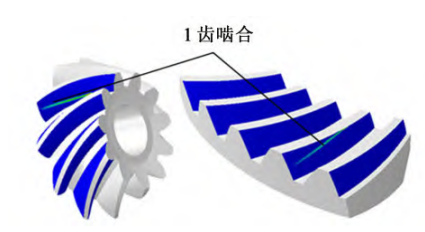
Fig. 12 Contact stress nephogram with positive pitch deviation
4 Conclusion
On the basis of establishing the mathematical model and three-dimensional solid model of the tooth surface of the linear contact arc bevel gear, the changes of the contact stress and elastic deformation of the tooth surface were compared and analyzed, and different accuracy levels were obtained
The effect of the installation error and the pitch deviation on the linear contact arc bevel gear transmission contact. The following conclusions were reached:
1) The linear contact arc bevel gear pair will produce local contact under the error of conventional accuracy level, and the contact stress of the tooth surface will increase significantly. However, the tooth surface as a whole still maintains the meshing state of line contact.
2) The influence of error on the edge effect of large gear tooth surface is mainly manifested in the tooth top and small end; The influence of error on the edge effect of the tooth surface of the small wheel is mainly manifested in the tooth top.
3) Among the various errors analyzed, the small wheel axis error and tooth pitch deviation have a greater impact on the gear pair transmission contact, followed by the shaft intersection angle error and shaft spacing error, and the large wheel axis error has the least impact. Therefore, in the error control, priority should be given to controlling the axis error and tooth pitch deviation of the small wheel.
