
In my years of experience working with gear manufacturing, I have often encountered the need to produce miter gears, also known as straight bevel gears, for various mechanical applications. Miter gears are crucial components used to transmit rotational motion between two intersecting shafts, typically at an angle of 90 degrees, although angles less than or greater than 90 degrees are also possible. While high-precision miter gears are usually machined on dedicated gear generators using the generating method, for gears with general accuracy requirements, I have found that they can be effectively produced on a standard milling machine using form milling cutters. This article delves into the detailed process, calculations, and techniques involved in milling miter gears, with a focus on practical insights and methodologies.
The design and calculation of miter gears are based on the large end, where the module is standardized. Understanding the various parts and their dimensions is fundamental. Below is a table summarizing the key nomenclature and basic dimension calculations for a standard miter gear.
| Name | Symbol | Calculation Formula |
|---|---|---|
| Pitch Cone Angle | $\delta$ | For pinion: $\delta_1 = \arctan(z_1 / z_2)$; For gear: $\delta_2 = 90^\circ – \delta_1$ (for 90° shaft angle) |
| Addendum Angle | $\theta_a$ | $\theta_a = \arctan(h_a / R)$ |
| Dedendum Angle | $\theta_f$ | $\theta_f = \arctan(h_f / R)$ |
| Face Cone Angle | $\delta_a$ | $\delta_a = \delta + \theta_a$ |
| Root Cone Angle | $\delta_f$ | $\delta_f = \delta – \theta_f$ |
| Outer Cone Distance | $R$ | $R = m z / (2 \sin \delta)$ |
| Pitch Diameter at Large End | $d$ | $d = m z$ |
| Addendum at Large End | $h_a$ | $h_a = m$ (for standard gears) |
| Dedendum at Large End | $h_f$ | $h_f = 1.25m$ (for standard gears) |
| Whole Depth | $h$ | $h = h_a + h_f = 2.25m$ |
| Tip Diameter at Large End | $d_a$ | $d_a = d + 2h_a \cos \delta$ |
| Chordal Thickness at Large End | $\bar{s}$ | $\bar{s} = d \sin(90^\circ / z_v)$ |
| Chordal Addendum at Large End | $\bar{h}_a$ | $\bar{h}_a = h_a + \frac{d}{2}[1 – \cos(90^\circ / z_v)]$ |
Here, $m$ is the module, $z$ is the number of teeth, $z_v$ is the virtual number of teeth (explained later), and $R$ is the outer cone distance. For a miter gear pair with a shaft angle $\Sigma = 90^\circ$, the pitch cone angles are complementary. For example, consider a miter gear pair with module $m = 4 \text{ mm}$, pinion teeth $z_1 = 20$, gear teeth $z_2 = 40$, and face width $b = 30 \text{ mm}$. The calculations for the pinion would be:
Pitch cone angle: $\delta_1 = \arctan(20/40) = \arctan(0.5) \approx 26.565^\circ$.
Outer cone distance: $R = m z_1 / (2 \sin \delta_1) = 4 \times 20 / (2 \sin 26.565^\circ) \approx 80 / (2 \times 0.4472) \approx 89.44 \text{ mm}$.
Addendum: $h_a = 4 \text{ mm}$.
Dedendum: $h_f = 1.25 \times 4 = 5 \text{ mm}$.
Whole depth: $h = 4 + 5 = 9 \text{ mm}$.
Tip diameter: $d_a = d + 2h_a \cos \delta_1 = (4 \times 20) + 2 \times 4 \times \cos 26.565^\circ \approx 80 + 8 \times 0.8944 \approx 87.155 \text{ mm}$.
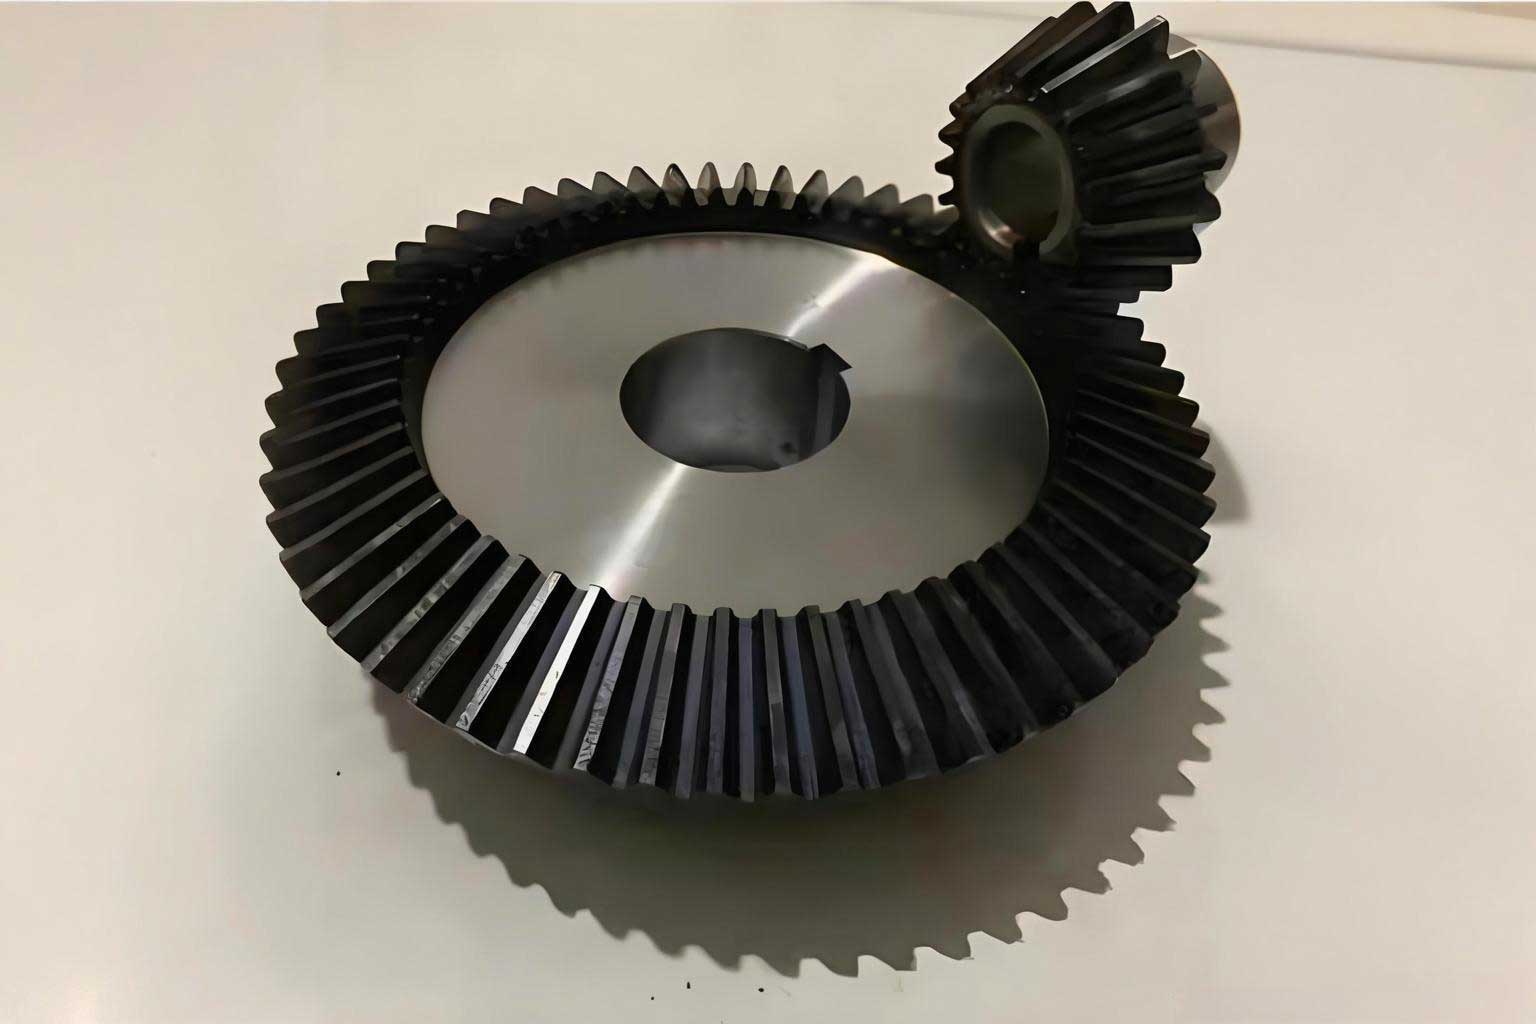
These calculations form the basis for setting up the milling operation. The geometry of a miter gear is complex, and visualizing it is essential. For reference, an image of a typical miter gear can be helpful:
When it comes to selecting the milling cutter for a miter gear, the standard straight bevel gear cutter is used. However, the cutter number is not chosen based on the actual number of teeth but on the virtual number of teeth $z_v$. This is because the tooth profile of a miter gear varies along its length, and the cutter must accommodate the smaller end. The formula for the virtual number of teeth is:
$$ z_v = \frac{z}{\cos \delta} $$
For instance, for a miter gear with $z = 20$ and $\delta = 30^\circ$, the virtual number of teeth is $z_v = 20 / \cos 30^\circ \approx 20 / 0.8660 \approx 23.09$. Rounding up, this corresponds to a cutter for 23 teeth. Standard cutter sets are available in 8 or 15 pieces, similar to spur gear cutters, but marked with “Bevel Gear” to indicate their thinner design suited for the tapered teeth of a miter gear. The cutter width is designed based on the small-end tooth space width for a ratio $R/b = 3$, making it suitable for most miter gears where $R/b \geq 3$.
The milling process for a miter gear involves several meticulous steps. First, the dividing head and workpiece must be installed. I mount the dividing head on the milling machine table, ensuring that its spindle is parallel to the longitudinal table surface and the plane of rotation of the cutter. Then, I insert a mandrel with a tapered shank into the dividing head spindle, tighten it with a drawbar, and mount the gear blank. The dividing head is then tilted to the cutting angle $\gamma$, which is the root cone angle $\delta_f$. For standard gears, $\gamma = \delta – \theta_f$. For example, if $\delta = 30^\circ$ and $\theta_f = 3^\circ$, then $\gamma = 27^\circ$. This tilt ensures that the cutter machines the tooth slots along the correct cone.
Next, I select and install the cutter based on the virtual number of teeth. After mounting the cutter on the arbor, I use center-finding methods like marking or trial cuts to align the cutter symmetrically with the gear blank. Once aligned, I set the cutting depth to the full depth $h = 2.25m$ at the large end and mill all tooth slots sequentially using the dividing head for indexing. This initial cut produces straight slots but leaves excess material at the large ends due to the taper.
To remove this excess and form the correct tooth profile, I mill the sides of the slots. This is done in two steps: first the left side, then the right side. For the left side, I shift the worktable laterally by a distance $s$, known as the transverse shift amount, calculated as:
$$ s = \frac{m b}{2R} $$
Where $b$ is the face width and $R$ is the outer cone distance. Simultaneously, I rotate the dividing head in the opposite direction to the table shift by a small amount, so the cutter’s left edge just grazes the small end of the left side of the slot. I then take a light cut and measure the chordal thickness at the large end using a gear tooth caliper. The initial thickness after slotting is approximately half the circular pitch minus some margin. I adjust the dividing head rotation iteratively until the measured thickness matches the required value, typically the standard chordal thickness $\bar{s}$. For the right side, I reverse the shift and rotation directions by twice the values used for the left side. This two-step process ensures that both sides of each tooth are machined accurately, resulting in a properly formed miter gear tooth.
Measurement is critical in miter gear machining. I primarily measure the chordal thickness at the large end on the back cone, as this reflects the functional accuracy of the gear. The formulas for chordal thickness and chordal addendum are as given in the table. For higher precision, I also measure the small-end thickness. The small-end module $m_s$ is smaller and can be calculated as:
$$ m_s = m \left(1 – \frac{b}{R}\right) $$
Then, using the virtual number of teeth for the small end (though often approximated), I compute or look up the chordal dimensions. For example, for a miter gear with $m = 4 \text{ mm}$, $R = 89.44 \text{ mm}$, $b = 30 \text{ mm}$, the small-end module is $m_s = 4 \times (1 – 30/89.44) \approx 4 \times 0.664 \approx 2.656 \text{ mm}$. The chordal thickness at the small end is then derived similarly using $m_s$ and the corresponding virtual tooth count.
In addition to the traditional three-cut method, I have developed and frequently use a one-cut forming method for milling miter gears. This approach reduces setup time and can yield satisfactory results for general-purpose gears. The key difference lies in adjusting the cutting angle $\gamma’$ to account for a deeper cut at both ends, allowing a single pass to form the tooth profile. The formula for $\gamma’$ is:
$$ \gamma’ = \gamma – \Delta \theta_f $$
Where $\Delta \theta_f$ is an adjustment derived from the difference in depth between the large and small ends. Specifically, $\Delta \theta_f = \arctan(\Delta h / b)$, with $\Delta h$ being the additional depth required. In practice, I use:
$$ \gamma’ = \delta – \theta_f – \Delta \theta_f $$
Where $\Delta \theta_f \approx \frac{m}{2R}$ for typical gears. For instance, with $\delta = 30^\circ$, $\theta_f = 3^\circ$, $m = 4 \text{ mm}$, $R = 89.44 \text{ mm}$, I calculate $\Delta \theta_f \approx \arctan(4 / (2 \times 89.44)) \approx \arctan(0.0224) \approx 1.28^\circ$. Thus, $\gamma’ = 30 – 3 – 1.28 = 25.72^\circ$. By setting the dividing head to this angle and cutting to a depth slightly greater than $2.25m$ (say, $2.3m$), I can machine the entire tooth profile in one pass. This method is efficient and maintains tooth strength and form, though it requires careful calculation and verification.
The one-cut method for miter gears is particularly useful in small-batch production or repair work. I have applied it to numerous projects involving miter gears for machinery drives, automotive differentials, and industrial equipment. The essence is to balance the cut so that the cutter removes material uniformly from both ends, compensating for the taper. This technique underscores the adaptability of milling machines for gear manufacturing when precision gear generators are unavailable.
Throughout the process, attention to detail is paramount. For example, when indexing, I ensure the dividing head is accurately set to avoid cumulative errors. Lubrication and cutter maintenance are also vital to achieve a good surface finish and prolong tool life. Moreover, for miter gears with shaft angles other than 90°, the calculations for pitch cone angles become $\delta_1 = \arctan(\sin \Sigma / (z_2/z_1 + \cos \Sigma))$ and $\delta_2 = \Sigma – \delta_1$. This adds complexity but follows the same principles.
To summarize the key formulas in one place for a standard miter gear with shaft angle $\Sigma = 90^\circ$:
| Parameter | Formula |
|---|---|
| Pitch Cone Angle (Pinion) | $\delta_1 = \arctan(z_1 / z_2)$ |
| Pitch Cone Angle (Gear) | $\delta_2 = 90^\circ – \delta_1$ |
| Virtual Number of Teeth | $z_v = z / \cos \delta$ |
| Outer Cone Distance | $R = m z / (2 \sin \delta)$ |
| Cutting Angle (Three-cut) | $\gamma = \delta – \theta_f$ with $\theta_f = \arctan(h_f / R)$ |
| Transverse Shift | $s = m b / (2R)$ |
| One-cut Cutting Angle | $\gamma’ = \gamma – \arctan(m / (2R))$ |
In conclusion, milling miter gears on a standard milling machine is a viable and cost-effective method for producing gears with moderate accuracy. By mastering the calculations for dimensions, cutter selection based on virtual teeth, and the nuances of the milling and measurement processes, one can achieve reliable results. The one-cut method further enhances efficiency without compromising quality. As I reflect on my experiences, the versatility of the milling machine in gear machining continues to impress, especially for custom or low-volume applications involving miter gears. Whether for prototyping, maintenance, or small-scale production, these techniques empower machinists to tackle bevel gear manufacturing with confidence. Always remember to verify dimensions through measurement and adjust parameters based on specific gear geometry and requirements. With practice, the process becomes intuitive, and the satisfaction of producing a perfectly meshing miter gear pair is unparalleled in mechanical craftsmanship.