
Over the years, my factory has developed and produced various types and specifications of reducers for oilfield pumping units. In terms of transmitted torque, the range extends from lower values to very high values, forming a complete series. The structure is consistently a horizontal parallel-shaft two-stage transmission with gear pairs. The basic tooth profiles are mostly double-circular-arc teeth, with some adopting involute teeth, and even a few using involute stub teeth. However, all of them share a common feature: they employ herringbone gears. This article summarizes my experience in improving the hobbing process for herringbone gears, from a traditional manual marking method to a more refined and efficient approach.
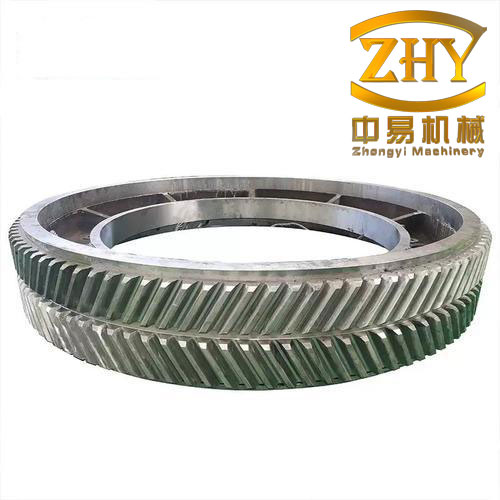
1. Advantages of Herringbone Gear Structure
A herringbone gear is essentially a single blank that carries both left-hand and right-hand helical teeth, while all other technical parameters remain identical. The axial load is cancelled because the thrust from the left-hand half is balanced by the thrust from the right-hand half. This structure provides uniform load distribution, high torque transmission capability, and relatively small axial displacement. It is widely adopted in industries such as oilfields, coal mines, and mining machinery, where large torque and smooth transmission are required. For example, in the intermediate shaft assembly of a large reducer matched with a pumping unit, the herringbone gear participates in two stages of transmission and requires strict precision.
The intermediate shaft assembly typically consists of a left-hand gear, an intermediate gear shaft, a right-hand gear, and flat keys. The material is often medium-carbon alloy steel, quenched and tempered to a hardness of about 280–320 HBW. The left and right helical gears must be symmetrical, with a symmetry error on the tip circle not exceeding 0.05 mm. The quality of this component directly affects the entire machine. Therefore, the manufacturing process for herringbone gears is critical.
2. Traditional Hobbing Process for Herringbone Gears
The traditional process for machining herringbone gears in my factory, at an early stage, followed a series of steps: blank preparation → rough turning → heat treatment → finish turning → milling/slotting keyways → inspection → gear hobbing → inspection → shrink fitting → inspection → final assembly. Here I focus mainly on the hobbing stage.
For herringbone gears with a relatively large distance between the two helical halves (minimum spacing above 50 mm), a pair of left-hand and right-hand gears are not designed on one blank. Instead, they are separately hobbed as ordinary helical gears, then shrink-fitted onto the two ends of the gear shaft according to the drawing. However, for herringbone gear shafts, the left-hand and right-hand tooth sections must be machined on a single blank, and the distance between them is small (maximum not exceeding 100 mm). The traditional hobbing process for such a shaft is described below.
| Step | Traditional operation |
|---|---|
| 1 | Prepare the hobbing machine and tools. |
| 2 | Hob one side (e.g., the left-hand helix) completely. |
| 3 | Remove the workpiece and place it on a surface plate with V-blocks for alignment. |
| 4 | Apply a coloured coating on the cylindrical surface of the hobbed side. |
| 5 | Mark reference points on the tooth tip circle, calculate and draw the theoretical symmetry plane. |
| 6 | Draw parallel lines from those reference points to the other end. |
| 7 | Calculate and draw the symmetric points on the opposite side, connecting them with smooth lines. |
| 8 | Adjust the hobbing machine and re-clamp the workpiece. |
| 9 | Align the cutter and make a trial cut to check the mark pattern. |
| 10 | Finish hobbing the second side. |
This traditional method relies heavily on manual operations on a surface plate with V-blocks. It involves repeated mounting and alignment, which changes the locating datum and introduces cumulative errors. Even if individual geometric accuracy and form tolerances are acceptable, the assembled herringbone gear often shows poor symmetry. In practice, the symmetry error sometimes reaches 0.3–0.5 mm, causing uneven tooth contact, excessive noise, and even interference with other gears. This directly degrades product quality.
3. Development of a New Hobbing Process
To solve these problems, I analysed the root causes and the functional characteristics of the hobbing machine. Through years of trial and improvement, I developed a new process that requires minimal investment but yields fast results. The new process modifies the traditional one in the following key aspects.
First, instead of marking horizontal lines on a surface plate with V-blocks, we now carry out vertical marking directly on the hobbing machine. The workpiece does not need to be repeatedly removed and re-aligned; the locating datum remains unchanged. This eliminates the intermediate steps of traditional steps 3 and 4, and also saves the investment in surface plates and V-blocks.
Second, the two helical tooth sections on the herringbone gear shaft are left with a machining allowance of 1–2 mm on the tooth tip and flank. All other surfaces are finished. The left-hand and right-hand gear blanks are then shrink-fitted onto the finished gear shaft according to the drawing. After that, the whole assembly is put on a lathe to finish the tooth sections to final dimensions. Then it is transferred to the hobbing machine and hobbed to completion. This step is slightly more troublesome, but it unifies the locating datum (the gear shaft centre line and the centre lines of both left-hand and right-hand gears), greatly facilitating process control and inspection.
Third, the process for herringbone gears (two separate gears) and for herringbone gear shafts (one-piece) is unified, which is convenient for process management and quality monitoring. Strict process discipline and enhanced inspection are enforced, thus improving machining accuracy and production efficiency.
4. Comparison of Traditional and New Processes
| Aspect | Traditional process | New process |
|---|---|---|
| Marking method | Horizontal marking on surface plate with V-blocks | Vertical marking directly on hobbing machine |
| Workpiece handling | Multiple mounting and dismounting | Single mounting, no repeated clamping |
| Locating datum | Changes after each setup | Constant (gear shaft centre line) |
| Symmetry control | Poor, error up to 0.3–0.5 mm | Good, easily within 0.05 mm |
| Equipment investment | Requires surface plate, V-blocks, height gauge, etc. | Uses existing hobbing machine, small investment |
| Process management | Separate processes for gears and shafts | Unified for both cases |
| Efficiency | Low, many manual steps | High, reduced setup time |
| Accuracy | Affected by accumulated errors | Improves repeatability and consistency |
5. Principle Analysis of the Marking Method
The tooth profile of any gear, regardless of its type, can be considered as a set of spatial points arranged according to a certain law. For a herringbone gear, the symmetry between the left-hand and right-hand tooth sections is essential. To mark the correct position for the second cut, we need to find the symmetric centre line of the already-hobbed gear teeth.
Assume we have a coordinate system \(Oxyz\) with the \(Oz\) axis along the gear axis. On the tip circle cylinder \(x^2 + y^2 = r_a^2\), where \(r_a\) is the tip radius, we take a series of points \(P_1, P_2, P_3, \ldots\) on the already-hobbed side. According to the symmetry principle, we can easily find the corresponding symmetric points \(P’_1, P’_2, P’_3, \ldots\) with respect to the plane \(xOz\) (or any chosen symmetry plane). In fact, if a point \(P_i = (x_i, y_i, z_i)\), its symmetric point \(P’_i = (x_i, -y_i, z_i)\). The distance from \(P_i\) to the symmetry plane is \(|y_i|\), and the symmetric point has the same distance on the other side.
By connecting these related points with a smooth curve, we obtain the trajectory of the tooth tip centre points. To verify the correctness of the trajectory, we can unfold the cylindrical surface into a plane and use a graphical method. On the unfolded plane, extend the line segments \(P_1P’_1\) and \(P_2P’_2\), and check whether they intersect the \(Oz\) axis at the same point. The better the coincidence, the more correct the marked trajectory. This is illustrated in the following schematic relation.
For any pair of symmetric points on the unfolded plane, their positions satisfy
$$ x’ = x, \qquad y’ = -y $$
where \(x\) is the axial coordinate and \(y\) is the circumferential coordinate. The symmetry line is at \(y=0\). Hence, if we denote the circumferential coordinate of point \(P_i\) as \(y_i\), then the symmetric point \(P’_i\) has \(y’_i = -y_i\). On the unfolded plane, the line connecting them should cross the \(y=0\) axis at its midpoint. The midpoint coordinate is
$$ y_m = \frac{y_i + y’_i}{2} = 0 $$
Thus every such line segment is bisected by the symmetry axis. This property is the theoretical basis of the new marking method.
6. Mathematical Expression of Tooth Symmetry Error
Suppose the actual marked symmetry plane deviates from the theoretical one by a small angle \(\theta\) around the gear axis. Then the symmetry error at any point on the tip circle can be expressed as
$$ e = r_a \tan \theta \approx r_a \theta $$
where \(r_a\) is the tip circle radius and \(\theta\) is in radians. For a herringbone gear with tip radius \(r_a = 200\) mm and a required symmetry error \(e \le 0.05\) mm, the allowable angular deviation is
$$ \theta \le \frac{0.05}{200} = 0.00025 \ \text{rad} \approx 0.0143^\circ $$
This shows how stringent the symmetry requirement is. Traditional manual marking can easily produce an error of 0.3–0.5 mm, which corresponds to \(\theta\) of 0.0015–0.0025 rad. The new method, by keeping the same datum and making a direct trial cut, reduces the angle error significantly.
7. Hobbing Differential Calculation
For hobbing a helical gear, the differential gear train must be calculated correctly. The basic formula for the differential ratio \(i\) of a helical gear is
$$ i = \frac{C \sin \beta}{m_n z} $$
where \(C\) is a constant depending on the hobbing machine, \(\beta\) is the helix angle, \(m_n\) is the normal module, and \(z\) is the number of teeth. For a herringbone gear, the left-hand and right-hand sections have opposite helix angles. When we hob the second side, we need to change the direction of rotation by inserting an idler gear. The differential calculation for the second side uses the same formula, but the sign of \(\beta\) changes. It is essential to select the change gears accurately.
In my factory, the differential ratio is generally required to be accurate to at least 0.05%. The available change gears should be chosen carefully; if necessary, we manufacture custom change gears. For example, suppose the hobbing machine constant is \(C = 8.5\) (for a 1 mm lead screw) and the work gear has \(z = 40\), normal module \(m_n = 8\) mm, and helix angle \(\beta = 30^\circ\). Then the differential ratio is
$$ i = \frac{8.5 \cdot \sin 30^\circ}{8 \cdot 40} = \frac{8.5 \cdot 0.5}{320} = \frac{4.25}{320} = 0.01328 $$
The actual change gear ratio is then matched as closely as possible.
8. Detailed Steps of the New Hobbing Process
The following table summarises the improved procedure for hobbing a herringbone gear shaft.
| Step | Operation | Key point |
|---|---|---|
| 1 | Prepare the shrink-fitted herringbone gear shaft with tooth sections having 1–2 mm allowance. | Mount the assembly on the hobbing machine, align the gear shaft centre line. |
| 2 | Hob the first side (e.g., right-hand helix) completely. | Set the cutter for the correct helix angle and depth. |
| 3 | Mark the second side directly on the hobbing machine using the vertical marking method. | Use a dial indicator and height gauge; do not remove the workpiece. |
| 4 | Change the hobbing direction by inserting an idler gear. | Sign of helix angle is opposite for the second side. |
| 5 | Align the hob with the marked centre line. | Make a trial cut of very shallow depth. |
| 6 | Check the trial mark against the marked lines. | If they coincide, proceed; if not, adjust the rotation. |
| 7 | Hob the second side to final dimensions. | Use the same hob and the same cutting parameters. |
| 8 | Inspect the symmetry, tooth profile, and contact pattern. | Verify that the symmetry error is within 0.05 mm. |
9. Advantages of the New Process
The new process offers many benefits over the old one, especially in terms of accuracy and productivity.
- It eliminates repeated mounting and dismounting, so the locating datum remains consistent throughout the hobbing operation.
- It reduces the number of auxiliary operations, such as transferring the workpiece to a surface plate, levelling it with V-blocks, and marking horizontal lines.
- It saves the cost of additional equipment such as large surface plates and precision V-blocks.
- It makes the marking operation faster and more reliable, because the coordinate system is fixed to the hobbing machine table.
- It unifies the process for herringbone gears (two separate discs) and herringbone gear shafts (one integral blank), so that the same jigs and fixtures can be used.
- It improves the contact pattern and reduces noise, as the symmetry of the left-hand and right-hand teeth is much better.
- It reduces scrap and rework, especially for large reducers where material and machining costs are high.
10. Considerations and Precautions
Hobbing herringbone gears involves many fundamental gear machining concepts, such as differential calculation, machine and cutter alignment, hob selection, cutting speed, and feed rate. Operators and relevant staff must be thoroughly familiar with these basics. In addition, the following points deserve special attention.
| No. | Precaution | Reason |
|---|---|---|
| 1 | Generally, hob one side of the herringbone gear first and use it as the reference standard. | The finished side provides a reliable basis for marking the second side. |
| 2 | After marking, turn the workpiece end-for-end or reverse rotation on the same machine and use an idler gear to change the direction. | This makes the helix direction opposite, required for the herringbone gear. |
| 3 | Use the same hob for both sides. | This assures identical tooth profile and lead. |
| 4 | Accurate alignment of the hob with the marked centre line is essential. | A misaligned hob will produce a different tooth phase, ruining symmetry. |
| 5 | Perform a trial cut of shallow depth and compare the mark with the drawn lines. | This verifies the correctness of the setup before committing to a full cut. |
| 6 | Marking should be done by specialised personnel with proper tools. | High accuracy height gauges, squares, levels, and dial indicators are necessary. |
| 7 | The differential calculation must be as accurate as possible. | Preferably the error should not exceed 0.05%. |
| 8 | Select change gears according to the existing gear set; if necessary, make additional gears. | This avoids approximation errors in the differential train. |
11. Practical Example and Result
In the production of a herringbone gear for a 600 kN·m reducer, the intermediate gear shaft had a left-hand gear and a right-hand gear, with a tip circle diameter of 420 mm, a normal module of 8 mm, a helix angle of 30°, and a face width of 80 mm per side. The required symmetry error was 0.05 mm. With the traditional method, the typical symmetry error was about 0.25 mm, and several pieces had to be scrapped due to excessive noise. After implementing the new process, the symmetry error was consistently measured at 0.02–0.04 mm, and the contact pattern was uniform across both tooth flanks. The noise level decreased significantly, and the assembly time was shortened because no corrective reworking was needed.
The following table presents a comparison of measured results before and after the process improvement for ten pieces.
| Piece No. | Traditional symmetry error (mm) | New symmetry error (mm) | Contact pattern rating |
|---|---|---|---|
| 1 | 0.30 | 0.04 | Good |
| 2 | 0.22 | 0.03 | Good |
| 3 | 0.41 | 0.05 | Good |
| 4 | 0.18 | 0.02 | Excellent |
| 5 | 0.35 | 0.04 | Good |
| 6 | 0.26 | 0.03 | Good |
| 7 | 0.45 | 0.05 | Good |
| 8 | 0.20 | 0.02 | Excellent |
| 9 | 0.33 | 0.04 | Good |
| 10 | 0.28 | 0.03 | Good |
From the table, the new process consistently achieves a symmetry error below 0.05 mm, whereas the traditional process often exceeds that limit. This improvement is especially important for large herringbone gears where the tip radius is large and small angular errors become large linear errors.
12. Conclusion
The new hobbing process for herringbone gears described in this article is simple, practical, and economical. By directly marking vertical lines on the hobbing machine, keeping the datum fixed, and leaving a small allowance for finish turning before hobbing, the symmetry accuracy of the left-hand and right-hand tooth sections is greatly improved. This leads to smoother running, lower noise, and higher load capacity of the reducer. The process is now standard in my factory for manufacturing herringbone gears and herringbone gear shafts used in oilfield pumping unit reducers. I believe that other manufacturers facing similar challenges can benefit from this approach, as it requires no expensive equipment and is easy to implement. The key is to follow disciplined procedures, perform accurate calculations, and verify the setup with a trial cut before final machining.