1 Mathematical model of modified tooth surface
Large cutterhead milling processing hyperbolic circular arc tooth line cylindrical gear through cutterhead rotation, cutterhead translation, blank rotation and blank indexing motion close cooperation to complete the processing, the forming principle has been given in the research of Ma et al. and Zhao Fei et al., will not be repeated. In order to improve the bearing capacity of the gear and improve the dynamic characteristics, the cutterhead tilt milling process is proposed in the direction of the tooth line to change the hyperbolic arc tooth line cylinder Gear modification method. Fig. 1( a) shows a large inclined cutterhead with an angle of α ± γ between the inner and outer blades and the axis of rotation. In order to ensure that the cutting edge line is tangent to the blank index circle during standard installation, the rotating cutterhead is tilted at an angle, as shown in Figure 1( b). The cutterhead rotates around the axis m’d n’d, the cutterhead translational reciprocating motion is horizontal, and the tooth thickness point such as the node line to the rotation axis m’ The distance d n’d is RT, and the radius of rotation of the inner and outer blades around m’d n’d on the node line is

Where: The subscript n is the inner edge; The subscript w is the outer edge. In the tooth profile, the forming edge uses a parabolic curve z = ax2n, as shown in Figure 2. Changing the value of the parameter n(n = 1,2,3,…) yields a quadratic, quadruple or higher parabolic curve. Figure 2: Δt and Δr respectively
It is the amount of tooth top modification and the amount of tooth root modification; ODP is the vertex position of the modified curve; a is the parabolic coefficient; u0 is the distance from the vertex of the modified curve to the cutting edge line of the unmodified line. In OdfXdfYdfZdf, the blade modification curve expression is In the formula, the upper symbol of is the outer blade, and the lower symbol is the inner blade.

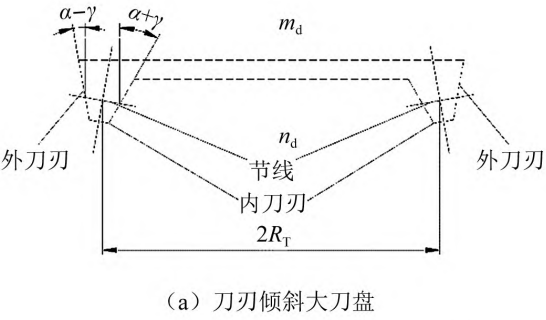
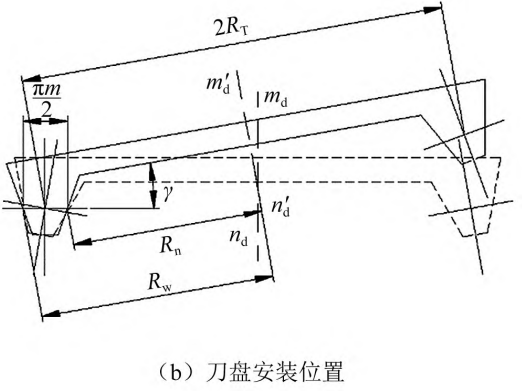
Fig. 1 Large cutterhead for tilt milling
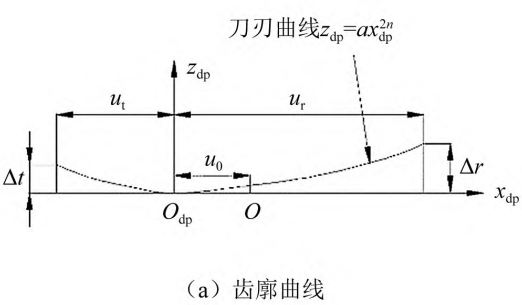
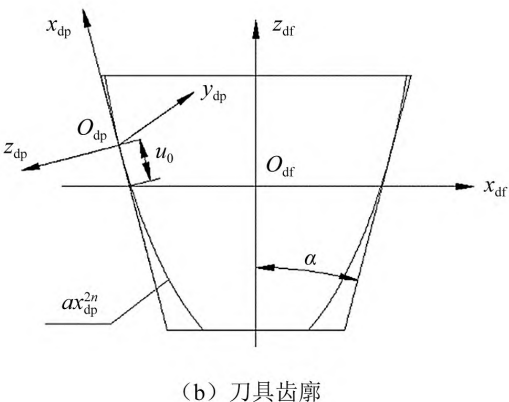
Fig.2. Contoured cutting edge curve
Figure 3 shows the tooth surface modification design forming coordinate system, where Figure 3( b) shows the cutterhead position and geometric parameters. O1X1Y1Z1 is the moving coordinate system of the tooth blank; Od0Xd0Yd0 Zd0 is a cutterhead moving system; OdXdYdZd is the cutterhead static coordinate system; OfXfYfZf is the static coordinate system of the tooth blank; OXYZ is the auxiliary coordinate System; m is the modulus; R1 is the radius of the index circle; b is tooth width; ω is the knife circling Rotation speed; ω1 is the blank rotation speed; φ1 is the billet spreading angle; θd is the cutterhead Showhorn.
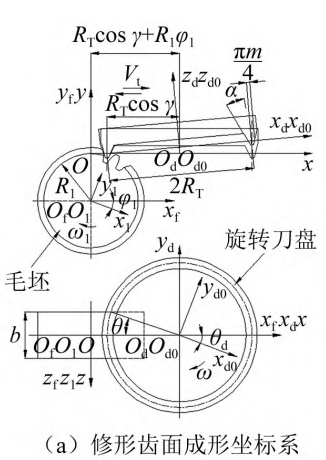
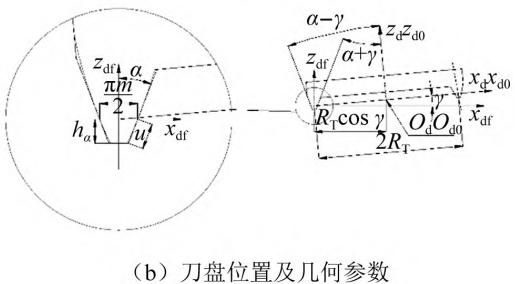
Figure 3 Tooth surface modification design shape coordinate system
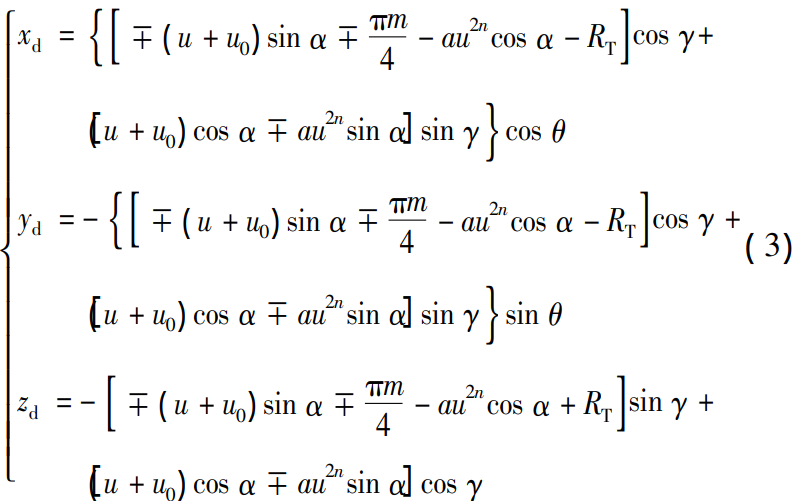
According to Equation ( 2) and Figure 3, the expression of the tilted cutterhead cutting edge in OdXdYdZd is
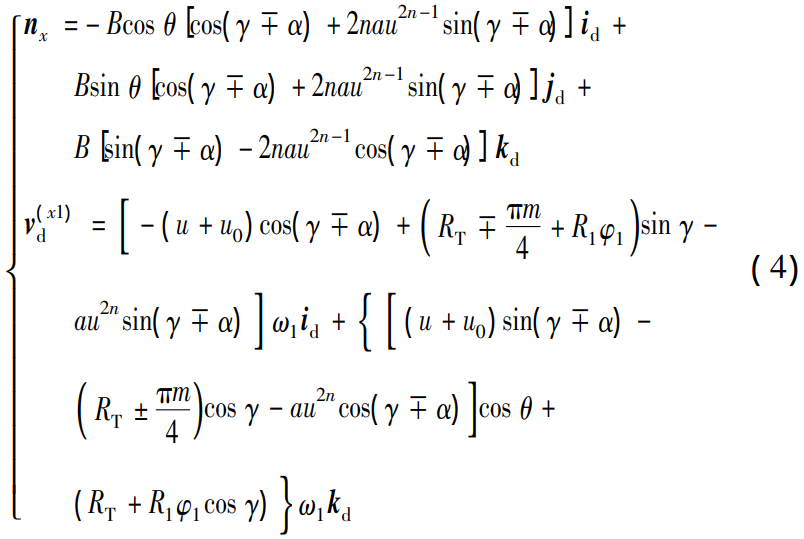
According to the gear meshing principle [24], the normal vector nx and relative velocity v (x1) of the trimmed tooth surface cutting edge and the blank contact point The vector product of d is zero, i.e. nx · v( x1)d = 0。 Equation ( 4 ) is a normal vector and an expression of relative velocity.

According to nx·v( x1 ) d = 0 , the equation for u ( 5 ) is calculated and solved ( 5 ) yields the solution of u
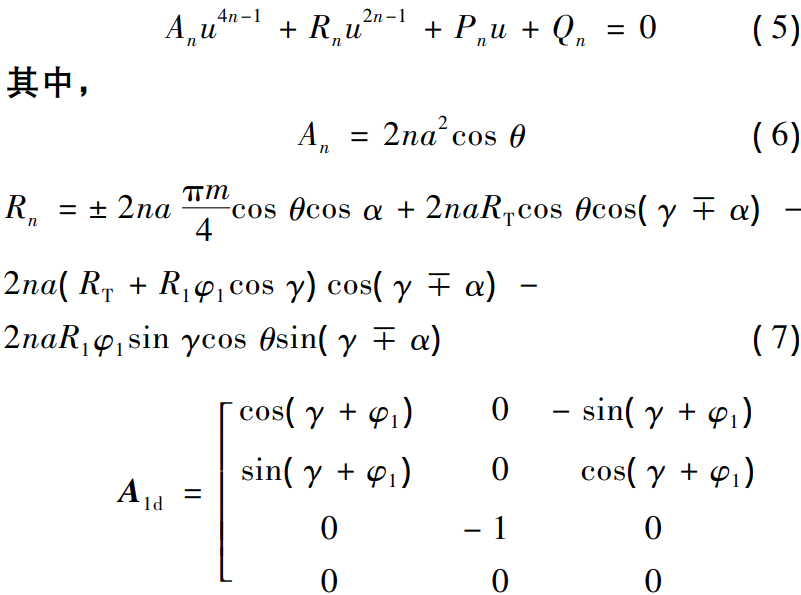

MATLAB numerical calculation, equation ( 5) has 4n -2 imaginary roots and 1 real root, combined with the actual physical meaning of the gear, take the real root as the u value. The modified tooth surface equation is further obtained and the tool swivel surface equation in OdXdYdZd is transformed into the gear coordinate system O1X1Y1Z1. Based on the geometric position relationship for each coordinate system in Figure 3, the transformation matrix from OdXdYdZd ~O1X1Y1Z1 is A1d

Then the mathematical model of the modified tooth surface is
where n takes integers such as 1, 2, 3, etc., which are parabolics of order 2, 4 and 6, respectively
Line modification tooth surface equation.

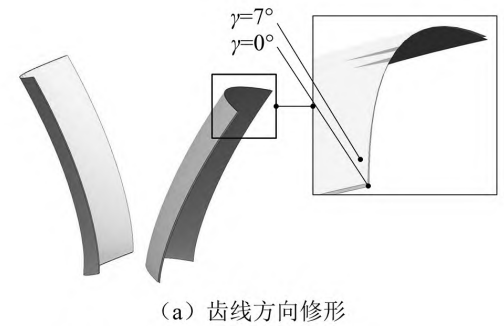
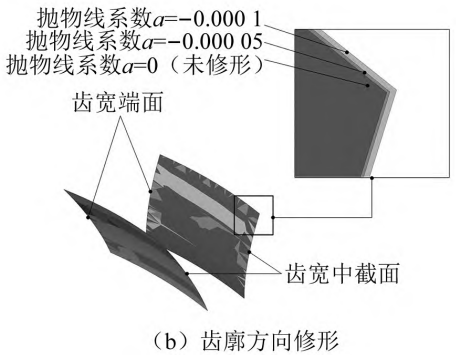
Figure 4 Modified tooth surfaces
Number of teeth z = 29, tooth width b = 80 mm, pressure angle α = 20°, die
With the number m = 8 mm and the tooth line radius RT = 200 mm, flank reconstruction is achieved using software MATLAB and UG, as shown in Figure 4. As shown in Figure 4( a) is a comparison diagram before and after the modification of the tooth line direction, it can be seen that the inclination angle of the cutterhead mainly affects the degree of arc bending of the gear teeth; Figure 4( b) shows the comparison diagram before and after tooth profile modification, which shows that the tooth profile modification mainly changes the tooth surface structure characteristics of the tooth top and root area.
2 Geometric contact model of gear system
The gear pair meshing transmission coordinate system shown in Figure 5 only modifies the tooth flank of the driven gear considering the design efficiency and processing economy. In Fig. 5: ΣI. is the active tooth flank; ΣII. is the tooth surface of the driven wheel; M is the tooth surface contact point; NC is the common normal of the point of contact; ψ1 is the active wheel meshing angle; ψ2 is
The driven wheel meshes the corner. The tooth surface geometric contact analysis needs to represent the tooth surface and normal vector of the active wheel and the driven wheel in a fixed coordinate system, and the OgXgYgZg coordinate system is taken as the fixed coordinate system, and the concave surface of the active wheel and the convex surface of the driven wheel are analyzed.
According to the meshing principle, when the tooth flanks of the active and driven gear are in contact at point M, the M point of the tooth flank of the main driven gear has the same position vector and unit normal vector in the same coordinate system, but there are only 5 independent scalar equations, that is, the following relationship exists
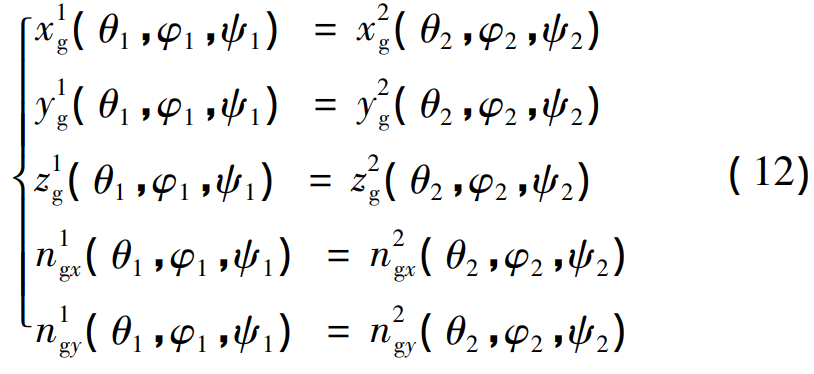
There are 6 unknown variables in the contact model, such as θ1, φ1, ψ1, θ2, φ2, ψ2, etc
quantity, take the active rotation angle ψ1 as the input quantity, and solve the geometric contact model, that is θ1 (ψ1) , φ1 (ψ1) , θ2 (ψ1) , φ2 (ψ1), ψ2 (ψ2) can be obtained.
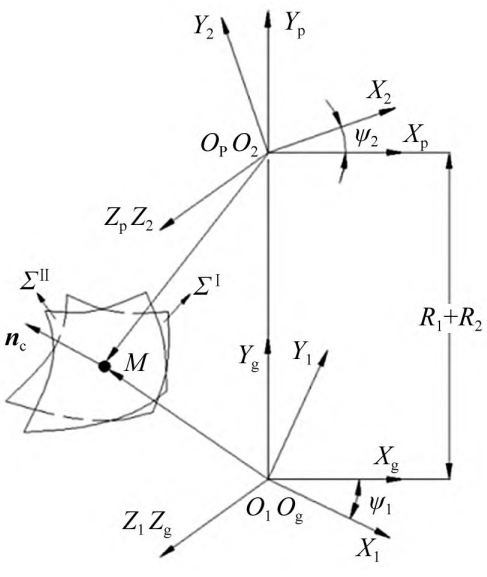
Figure 5 Drive pair meshing drive coordinate system
3 Load the contact analysis model
3.1 Gear loading contact model establishment
Figure 6 shows the gear-bearing contact deformation model, Figure 6( a) single tooth pair contact deformation, Figure 6 ( b) double tooth pair contact deformation. In fig. 6: ∑ 1 is the active tooth flank; ∑2 is the tooth surface of the driven wheel; The solid line is the deformed front tooth surface; The dotted line is the tooth surface after deformation; Point M is the tooth surface contact point, and after loading is the contact line contact of the previous series of points; j and j’ are any discrete points on the instantaneous contact line; wj is the normal clearance of the tooth surface at that point; Fj and Fj’ are normal loads, and the contact deformation under load P is uj and uj’. Assuming that the pinion is fixed, the normal displacement of the large gear under external load is sz. According to Fang Zongde’s For study, the equation for the coordination of deformations at scatter j is

where dj is the remaining clearance of the tooth surface, if the tooth surface is touched at the discrete point j, then dj = 0, Fj > 0; If the tooth surfaces do not touch at the discrete point j, then dj >0 and Fj = 0; FJK and FJ’K are the main driven gear flexibility factors. If there are n discrete contact points on the tooth surface and multiple pairs of teeth are considered for contact, the total deformation coordination equation is written as a matrix

where [S] is the tooth surface contact point flexibility matrix; [F] is the tooth surface contact point load matrix; [w] is the initial clearance matrix of the deformed front tooth surface; [d] is the remaining gap matrix at the contact point of the tooth surface after deformation; m is the number of contact tooth pairs. The tooth surface flexibility matrix is one of the key technologies for gear bearing contact analysis
One. Based on the software ABAQUS using Python language for secondary development, this paper establishes a finite element model, calculates the flexibility coefficient after tooth surface loading, obtains the tooth surface node flexibility matrix, and then uses binary interpolation to calculate the flexibility matrix of contact discrete points in the direction of the instantaneous contact ellipse long axis, Figure 7(a) is the nodal load loading, and Fig. 7( b) is the tooth surface node deformation.
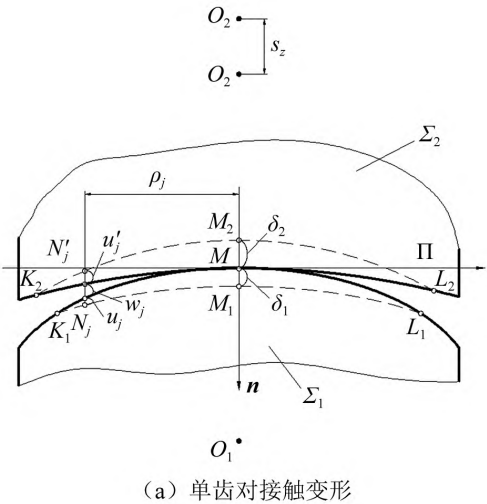
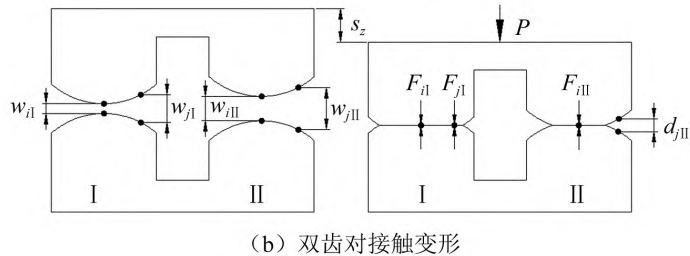
Figure 6 Load-bearing contact deformation model
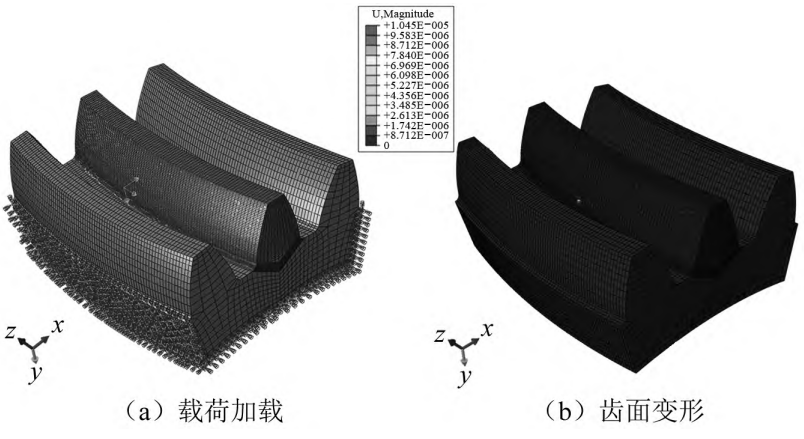
Figure 3 Tooth surface modification design shape coordinate system
3.2 Initial contact clearance calculation
Figure 8: The M0 point is the center of the instantaneous contact ellipse; M0A is the direction of contact ellipse major axis; n( M0 ) g is the unit normal vector for the point. Suppose point M is any contact point in the direction of the major axis of the instantaneous contact ellipse, and point M is parallel to the common normal n( M0) The straight-line equation for g is L. Let the coordinates M1 and M2 of the intersection of the line L and the master-driven tooth surface be (xM1, yM1, z, respectively
M1) and (xM2, yM2, zM 2) , the M1 coordinate is the parametric equation for θ1 and φ1, and the M2 coordinate is the parametric equation for θ2 and φ2. The normal clearance bM at point M is

Fang Zongde’s research shows that the interdental clearance depends on the geometric transmission error, and Figure 9 shows the geometric transmission error, which is converted into the normal direction displacement of the tooth surface according to the geometric relationship of the gear pair, that is, the interdental clearance δ. Formula (16) The gear pair is geometrically transmitted error.

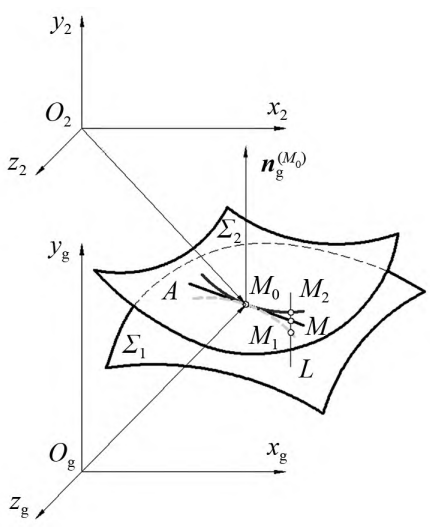
Figure 8 Normal clearance of the tooth flank
Where: Δφ2 is the geometric transmission error; φ10 is the initial angular displacement of the active wheel;φ2 (φ10) is the initial angular displacement of the driven wheel; φ1 is the angle of the active wheel at a certain timeShift; φ2 ( φ1 ) is the angular displacement of the driven wheel at a certain time.
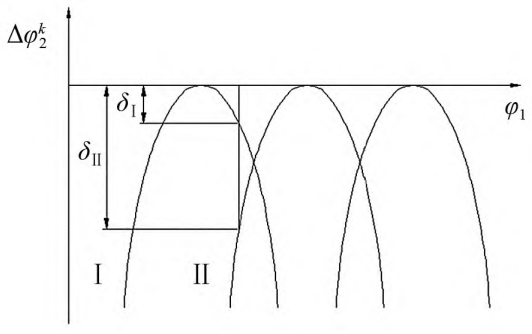
Figure 9 Interdental clearance
Then the gear loading deformation before the tooth surface clearance is

3.3 Gear tooth loading contact nonlinear programming model
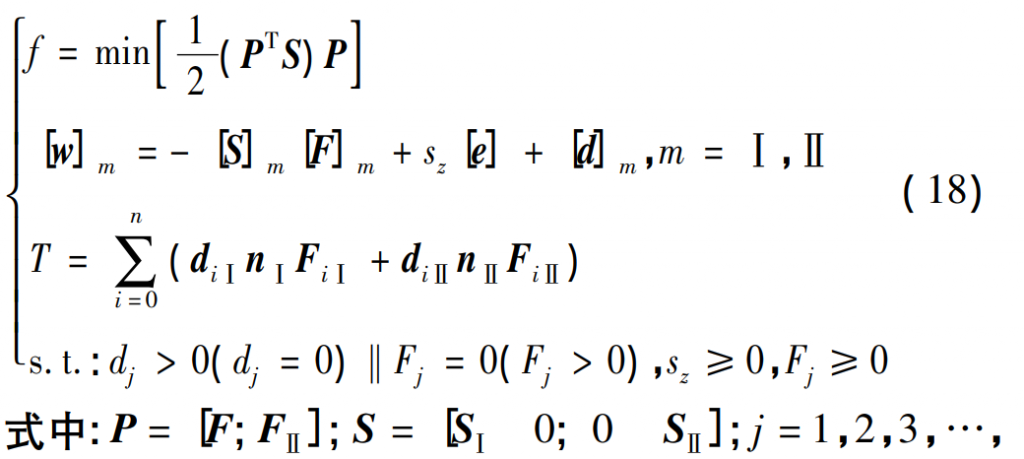
The objective function of this nonlinear programming is the smallest deformation energy of the drivetrain, the known parameters are S, W, T, D and n, etc., and the parameters to be found are P, sz and d. Solving the gear tooth loading contact nonlinear programming model, and converting the normal displacement sz of the big gear under external load into the driven wheel corner displacement Δe, the bearing transmission error Δφ of the transmission system is calculated as follows

4 Analysis of load distribution of modified tooth surface
4.1 Effect of cutterhead inclination on load distribution
Figure 10 shows the influence of cutterhead inclination on the load distribution of the modified tooth surface, where the cutterhead inclination angle γ is taken as 0° (unmodified), 3°, 5° and 7°, respectively, the tooth profile direction is unmodified, and the load is taken as 1 000 N·m. It can be seen from Figure 10 that with the increase of cutterhead inclination, the width of the contact area gradually increases, the load of the modified tooth surface gradually decreases, and the cutterhead inclination angle alternates the single-tooth meshing and double-tooth meshing alternating zone
Sudden changes in domain loads have no effect. Among them, the reasons for the change of load distribution of modified tooth surface are: cutterhead inclination angle increases, the radius of curvature of the tooth line direction of the modified tooth surface increases, the gap between tooth surfaces decreases, the width of the contact area increases after loading, and the load on the tooth surface decreases.

Fig. 10 Effect of cutterhead inclination on tooth surface load distribution
4.2 Effect of parabolic coefficient on load distribution
Figure 11 shows the influence of parabolic coefficient on the load distribution of modified tooth surface, where the parabolic coefficient is 0(unmodified) and – 0. 000 05,- 0. 000 10 and – 0. 000 50, parabolic vertex position u0 is 0, cutterhead inclination γ is 5°, load taken 1 000 N·m. It can be seen from Figure 11 that after remodeling, the tooth surface load of a pair of gear teeth gradually increases in the double-tooth meshing area that begins to mesh, the tooth surface load in the double-tooth meshing area at the exit of the meshing stage gradually decreases, and the tooth surface load in the alternating area of single-tooth meshing and double-tooth meshing is improved. However, with the increase of the parabolic coefficient, the tooth surface load gradually decreases at the beginning or demeshing moment, and even the phenomenon that the tooth surface does not actually touch, that is, the tooth surface load is 0 at this time, the reason is: With the increase of the parabolic coefficient, when the meshing begins and exits the meshing, the tooth top is sum
The amount of tooth root modification increases, resulting in excessive interdental gap between the tooth top and the tooth root, and there is still a certain gap between the tooth surfaces after the tooth surface is deformed by load, that is, there is no contact.

Fig. 11 Effect of parabolic coefficient on tooth surface load distribution
4.3 Effect of parabolic vertex position on load distribution
Figure 12 shows the influence of the parabolic vertex position of the cutting edge on the load distribution of the modified tooth surface, where the parabolic vertex position is taken – 3. 0 mm,- 1. 5 mm,0,1. 5 mm and 3. 0 mm, parabolic line system a is - 0. 000 05, cutterhead inclination angle γ is 5°, load taken 1 000 N·m. composed Figure 12 shows that the parabolic vertex position has a large influence on the size of the tooth surface load Ring, tooth surface loading when the parabolic vertex position changes from 3 ~ – 3 mm Gradually smaller, especially when the parabolic vertex position is taken – 3 mm, in the teeth Full tooth width contact is achieved near the wheel pitch circle, and the maximum load of the tooth surface node is 114. 464 7 N, the maximum value at 3 mm compared to the parabolic vertex position
927 8 N, a decrease of about 77. 33%, and the sudden change characteristics of tooth surface loading are effectively improved. However, due to the small stiffness of the tooth width end face, the full tooth is wide
The end face load is large during contact.
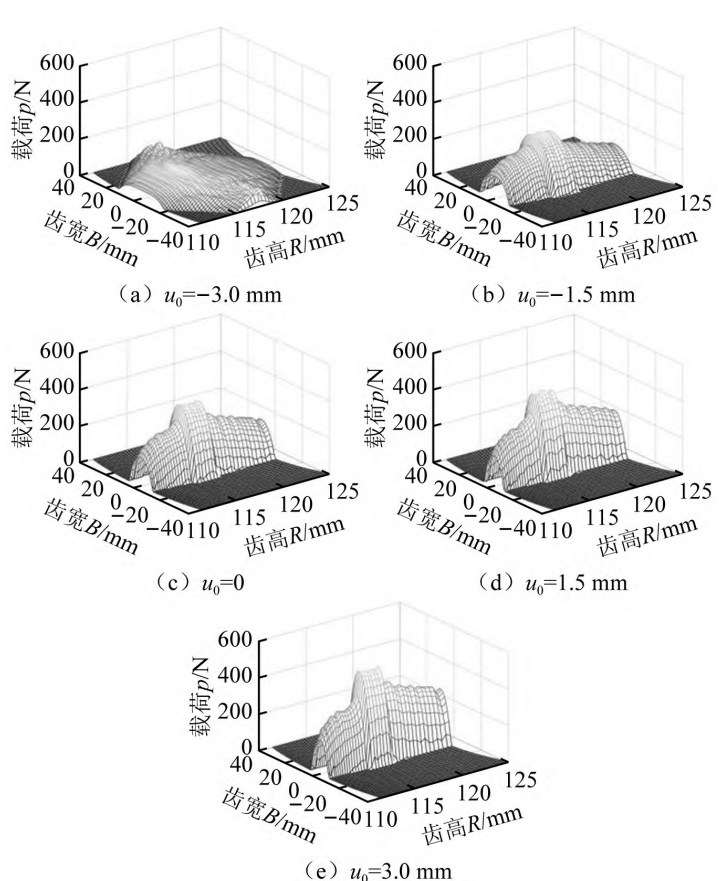
Fig. 12 Influence of parabolic vertex position on tooth surface load distribution
5 Modified gear bearing transmission error
5.1 Influence of cutterhead inclination angle on load-bearing transmission
Figure 13 shows the influence of cutterhead inclination on the bearing contact transmission error of modified gear, and the selected parameters are consistent with the analysis parameters of the influence of cutterhead inclination angle on the load distribution of the tooth surface.
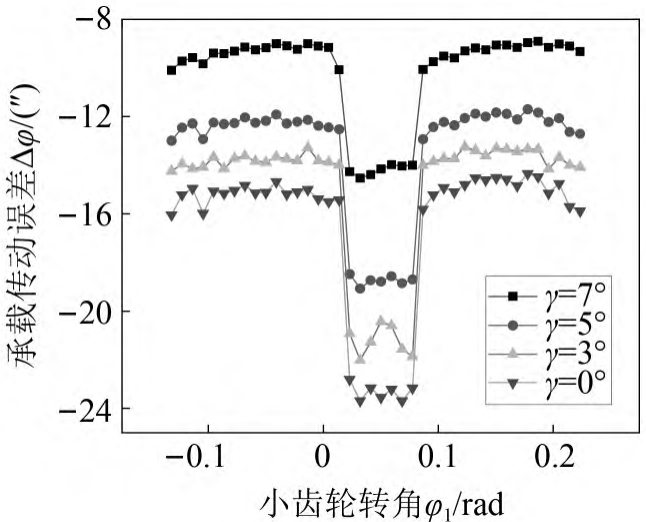
Fig.13 Influence of cutterhead inclination angle on load-bearing transmission error
It can be seen from Figure 13 that the bearing transmission error of the single-tooth meshing area is large, the load-bearing transmission error of the double-tooth meshing area is small, and the transmission error change law is rectangular shape; The amplitude and amplitude of the load bearing transmission error decrease with the increase of the inclination angle of the cutterhead, for example, when γ = 7°, the maximum value of the load bearing transmission error is -53″, minimum value is – 8. 90″, when γ = 0°, the load transmission error is the most Large value is – 23. 69″, minimum value is – 14. 35″, the range of change is respectively 63″ and 9. 34″。 The main change of bearing transmission error with the inclination angle of the cutterhead The reasons are: the inclination angle of the cutterhead increases, the contact area increases, the ability to resist deformation increases, the bearing contact deformation of the system decreases, so the bearing transmission error decreases Small.
5.2 Influence of parabolic coefficient on load-bearing transmission
14 shows the influence of parabolic coefficient on the bearing contact transmission error, and the selected parameters are consistent with the analysis parameters of the influence of parabolic coefficient on tooth surface load distribution. As can be seen from Figure 14: Increase the parabola within a certain range Coefficient, the abrupt amplitude of the bearing transmission error at the alternation of single-tooth meshing and double-tooth meshing decreases, and the change of the bearing transmission error amplitude also decreases, but the amplitude of the bearing transmission error at the entering meshing and exiting meshing increases, as a take 0,- 0. 000 05,- 0. 000 10 corresponds to the mutation of the load transmission error 95″,4. 85″ and 3. 83″; The amplitude of the load bearing transmission error is 7. 37″,5. 29″ and 7. 74″; The load transmission error at the entry or exit time is – 12. 99″,- 18. 245″ and – 22. 96″。 However, when the parabolic coefficient is large, the system bearing contact error deteriorates sharply, Figure 14 The medium parabolic coefficient takes 0. 000 5 The maximum value of gear bearing transmission error for – 57. 21″。 According to the influence of the parabolic coefficient on the load of the tooth surface, The parabolic coefficient is different, and the amount of modification of the tooth profile curve is different. And because of the teeth The wheel contact bearing transmission error changes by the geometric transmission error and the system after loading The sum of transmission errors caused by shape. After numerical calculation, the results show that: repair The parabolic coefficient of the shape parameter increases the tooth surface clearance, so that the system increases The system geometric transmission error, which in turn affects the system bearing transmission error, Figure 15
The effect of parabolic coefficients on geometric transmission errors is shown.
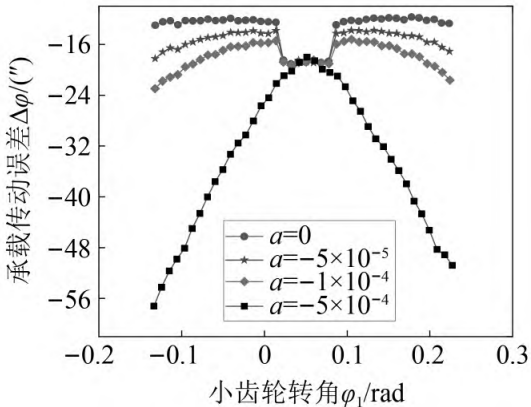
Figure 14 Effect of parabolic coefficient on load-bearing transmission error
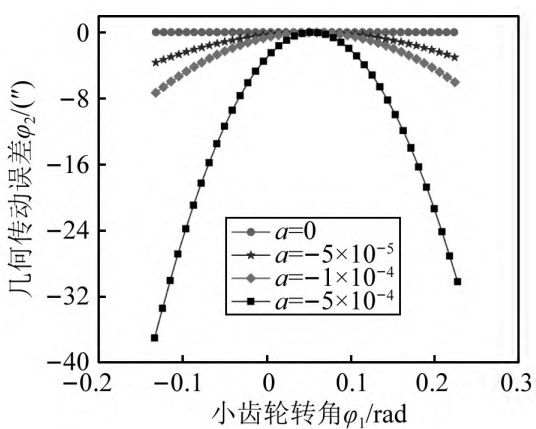
Figure 15 Effect of parabolic coefficients on geometric transmission errors
5.3 Influence of parabolic vertex position on load-bearing transmission
16 shows the influence of parabolic vertex position on bearing contact transmission error, and the selected parameters are consistent with the analysis parameters of the influence of parabolic vertex position on tooth surface load distribution. As can be seen from Figure 16: When the parabolic vertex is located
When the value is greater than zero, the increase of the parabolic vertex position has little effect on the bearing transmission error of the double-tooth meshing area entering the meshing, and the bearing transmission error of the double-tooth meshing area exiting the meshing increases, and the amplitude change of the amplitude of the bearing transmission error and the mutation of the bearing transmission error at the alternating time of single and double teeth increase with the increase of the parabolic vertex position. When the value of the parabolic vertex position is less than zero, the bearing transmission error of the double-tooth meshing area entering and exiting the meshing and the alternating time of the single and double teeth carrying transmission error decrease with the increase of the parabolic vertex position, but the amplitude of the bearing transmission error increases slightly. Figure 17 shows the variation law of the corresponding geometric transmission error of each parabolic vertex position, and the change of parabolic vertex position will change the geometric transmission error of the system.
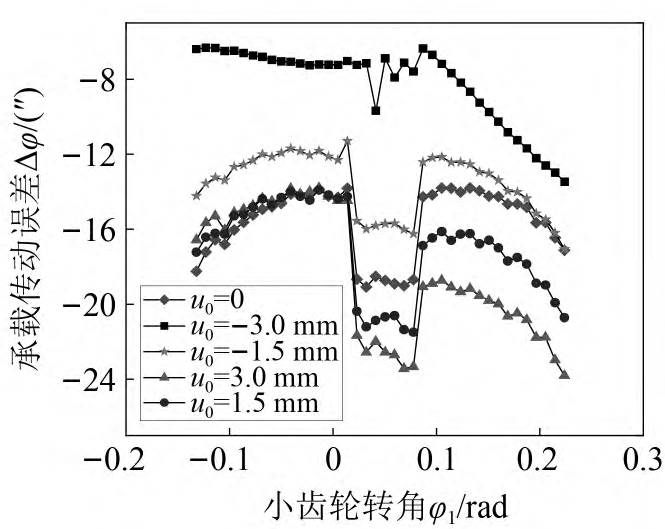
Fig. 16 Influence of parabolic vertex position on load-bearing transmission error
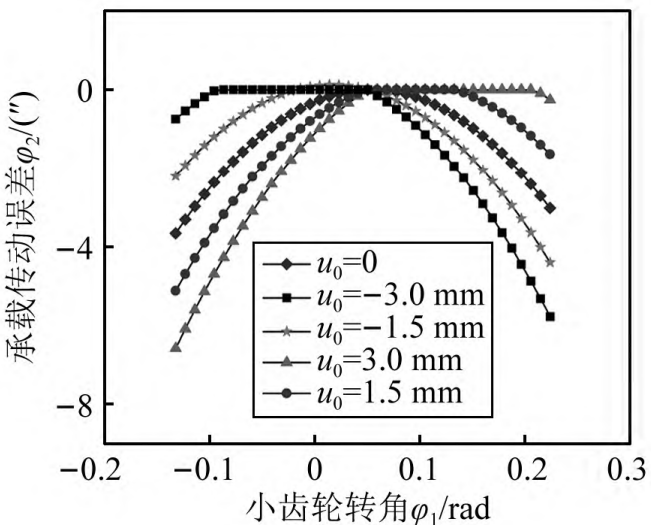
Figure 17: Effect of parabolic vertex position on geometric transmission error
5.4 Influence of load on gear bearing transmission error
Figure 18 shows the effect of load on the load-bearing transmission error, and the parabolic coefficient a of the modified parameter is – 0. 000 05, parabolic vertex position is – 1. 5 mm, cutterhead inclination of 5°, load 400 N · m,700 N·m,1 000 N·m,1 500 N·m,1 800 N·m。 As can be seen from Figure 18, the larger the load, the greater the system bearing transmission error and fluctuations The greater the amplitude. The reasons for this: increased load and integration of gear systems Increased elastic deformation.
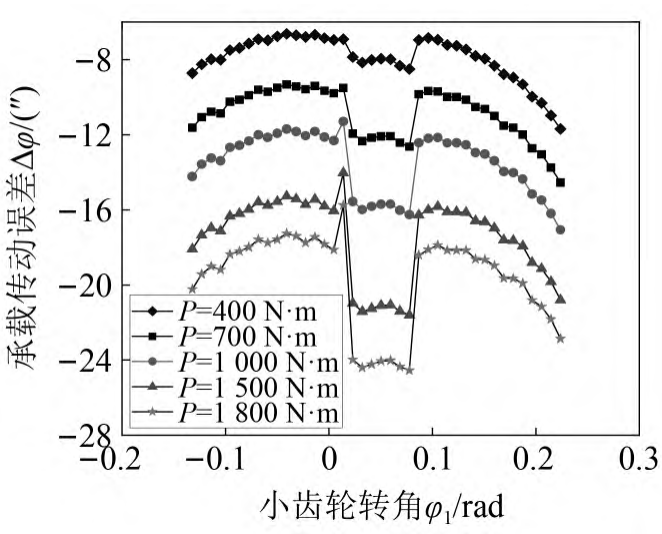
Fig. 18 Effect of load on load-bearing transmission error
6 Conclusion
In this paper, a design method for modifying the tooth surface of cylindrical gear of variable hyperbolic arc tooth line is proposed, the equation of the modified tooth surface is derived, a three-dimensional model is established, the bearing contact characteristics of the gear are obtained based on geometric contact analysis, finite element and bearing contact analysis, and the modified parameters are analyzed for the load on the tooth surface and the bearing transmission error of the system
Impact. The main conclusions are as follows:
( 1) The tooth surface load gradually decreases with the increase of cutterhead inclination, and the cutterhead inclination angle has no effect on the sudden change of load at the alternation of single and double teeth; The parabolic coefficient increases, and the load mutation at the alternation of single and double teeth is improved, but when the parabolic coefficient is too large, the tooth surface does not actually contact when entering or exiting meshing. Parabolic vertices
When the position changes from 3 ~ – 3 mm, the tooth surface load gradually decreases.
( 2) The amplitude and change amplitude of the bearing transmission error decrease with the large inclination angle of the cutterhead; The parabolic coefficient increased, and the transmission error and the error abrupt range at the alternation of single and double teeth decreased, but the parabolic coefficient was too large, and the transmission error deteriorated sharply. For parabolic vertex positions, the parabolic vertex position overall The smaller the u0, the smaller the transmission error amplitude; The larger the load, the greater the transmission error,And the greater the fluctuation.
