0 Preface
The reducer for construction lift belongs to the heavy-duty hard tooth surface reducer, the heavy load hard tooth surface running volume is small, and the gear tooth deformation is large, coupled with the deformation of the shaft and processing and installation errors and other factors, it is easy to have uneven distribution of tooth surface load. Gear eccentricity will affect the transmission accuracy and operation of the gear The smoothness of the line and the service life of the gear, and the best way to reduce the uneven distribution of the load on the tooth surface is gear modification. To this end, a large number of scholars at home and abroad have studied the method of gear repair, including the shape curve, the amount of repair, and the way of repair. Zhao Min et al. proposed a diagonal approximation
Alternative method, replacing the diagonal modification slope change with a microscopic modification quantity approximation and simulating it in ROMAX; Shen Xingquan and others carried out parametric tooth profile and helix joint modification for a certain working condition, and simulated it in the finite element in HyperMesh and Workbench to obtain the gear meshing characteristics of different modification conditions. Shen Hao and Xiong Hegen used ROMAX software to use the tooth direction modification method to perform different degrees of tooth drum shape modification and tooth oblique modification simulation of planetary gears. GHOSH and CHAKRABORTY PROPOSED TO MODIFY THE TOOTH PROFILE OF SPUR GEAR PAIR USING THE GRAPHICAL METHOD AND SEMI-ANALYTICAL METHOD OF CONTOUR DIAGRAM, AND THE RESULTS SHOWED THAT THE VIBRATION CAUSED BY GEOMETRIC ERRORS SUCH AS TOOTH PROFILE AND PITCH ERROR CAN BE REDUCED. SÁNCHEZ ET AL. STUDIED THE CONTACT OF THE TRIMMED GEAR TEETH UNDER LOAD The influence of the number, length and shape of the modified gear teeth on the load distribution and transmission error is discussed. LIN and HE established the coupling dynamic model of the bending and torsional shaft of the transmission system based on the concentrated mass method, and calculated the dynamic transmission error of the gear transmission system, which is the vibration and noise of the gear system Analysis and control provides error stimulus data. PLEGUEZUELOS ET AL. STUDIED THE EFFECT OF SYMMETRICAL LONG TOOTH PROFILE MODIFICATION ON QUASI-STATIC TRANSMISSION ERROR OF HIGH COINCIDENCE SPUR GEAR. However, in these research methods, most of them determine the approximate modification amount through theoretical calculations, or empirically through simulation soft pieces enter parameters several times to obtain the modification curve. The author of this article comprehensively considers the rod
According to the influence of tooth surface load distribution, this paper proposes to determine the modification range by theoretical calculation, and based on ROAMX’s method of using the full factor method to optimize the shape of the output shaft helical gear pair with the tooth load distribution coefficient and the root bending strength load distribution coefficient as the target, and each modification quantity as the variable factor The combination of the optimal modification amount is achieved, so as to achieve the purpose of uniform distribution of the tooth surface load.
1 Build a parametric model
Three stages for the SC200 construction hoist with ROMAXdesign
The parametric model shown in Figure 1 is established for the circular bevel gear drive system, where the helical gear shaft has a power of 18 kW, a maximum speed of 382 r/min, a helical gear material of 40CrMnMo, a case hardening treatment, a gear accuracy class of 8, and a lubricant of ISOVG680. The macro parameters of the helical gear pair at its output are shown in Table 1.

Figure 1 Parametric model of SC200 construction hoist three-stage reducer
Tab. 1 Macro parameters of output end helical gear pair
| Macro parameters | Small helical gears | Output shaft helical gear |
| 齿数 | 22 | 73 |
| 模数/mm | 2.5 | 2.5 |
| 法向压力角/( °) | 20 | 20 |
| 变位系数 | 0.29 | 0.17 |
| 螺旋角 β /( °) | 16.523 | 16.523 |
| 齿宽 b /mm | 64 | 60 |
| 中心距/mm | 125 | 125 |
| 分度圆直径/mm | 57.3 | 190.2 |
| 齿顶高系数 | 1.0 | 1.0 |
| 顶隙系数 | 0.25 | 0.25 |
| 旋向 | dextrorotation | levorotation |
2 Maximum modification of tooth direction and profile
2.1 Tooth trimming amount
2.1. 1 The amount of toothed drum shape under comprehensive factors
After the gear is subjected to load, the gear body and shaft will undergo elastic deformation such as bending and torsion, and at the same time, the manufacturing error of the gear, the deformation of the box body, and the manufacturing error of the bearing hole seat will cause uneven contact of the gear tooth direction, bring stress concentration, and reduce the bearing capacity of the gear. Since the speed of the gear is not high, the centrifugal force deformation and thermal deformation of the gear are not considered, and the relative rigidity of the helical gear of the output shaft is large, and the influence of the manufacturing and installation error and force deformation of the small helical gear and shaft on the load distribution of the tooth surface is mainly considered. The meshing tooth direction error Fβy is a factor that directly affects the load distribution of the tooth surface. The meshing tooth direction error is a combination of original error, elastic deformation and wear
As a result, the errors generated by manufacturing and assembly make the gear have uneven contact of the tooth surface when it is unloaded, due to the small running-in deformation of the hard tooth surface gear, when the gear teeth still cannot reach the full tooth width contact under load, that is, the elastic deformation is not enough to compensate for the gap in the non-contact area; Through the opposite tooth flank Drum shape modification is performed to compensate for the influence of comprehensive meshing tooth direction error. Meshing tooth direction error after running:
Fβy = 0.85( 1.33 fsh + fma ) ( 1)
Where: fsh is the meshing tooth direction error caused by the comprehensive deformation of the part, fsh = ( Fm / b) fsh0, and the meshing tooth direction error fsh0 = 0 under unit load. 012γ, where γ is calculated by lookup table 1. 09; FMA is the meshing tooth direction error generated by manufacturing and installation, FMA = 0. 5 Fβ8, Fβ8 is the allowable value for the total deviation of the spiral at the accuracy class 8, which can be obtained as 28 μm. At the same time, considering the original meshing tooth direction error and contact deformation, the maximum drum shape modification quantity Ca:

Formula: Ca is a drum-shaped quantity; Fβy is the meshing tooth error; Ft is the tangential force on the indexing circle; C is the meshing stiffness; b is for small helical gears
tooth width; KA is the usage coefficient and KV is the dynamic load factor. The meshing stiffness C is averaged here, and the finite element calculation [12] yields a meshing stiffness of 19. 48 GPa。 From equation ( 1) — ( 3) to solve the maximum drum volume Ca = 20. 75 μm。 The modification principle is shown in Figure 2. The midpoint of the drum shape modification is selected at the midpoint of the tooth width, and the amount of deformation is removed at tooth end I. and tooth end II, respectively
The same value of the material, the whole tooth direction in the shape of a drum, in order to eliminate the edge effect of the gear teeth in contact, so that the tooth surface load distribution uniformly, if the gear in the meshing process of each error compensation each other, there is no need to modify, so the lower limit of the tooth direction modification is 0 μm.
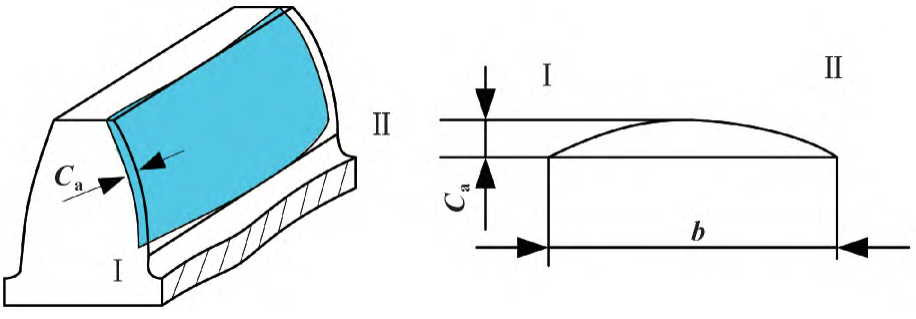
Figure 2 Tooth orientation modification principle
2.1. 2 Spiral trimming amount
Helical angle error may occur when helical gears are transmitted, and the helix angle error is divided into overall helix angle error and local helix angle error: The overall helix angle error is caused by the helix angle processing error, the inclination of the bearing bore, and the different centricity of the inner and outer rings of the bearing; The local helix angle error is caused by the bending and torsion deformation of the gear shaft and the thermal deformation caused by the uneven temperature of the gear tooth teeth. In order to make the gear teeth in the theoretical position when loaded, the helix modification is used to obtain the helix error compensation amount. The maximum linear velocity at the helical gear circle of the output shaft is 1. 16 m/min, so deformation caused by centrifugal force is not taken into account
and the effect of thermal deformation on gears; Since the output shaft helical gear speed ratio i is 3. 1, at this time, the stiffness of the big gear is very large, here the spiral error caused by the bending torsion deformation of the pinion shaft is mainly considered. Pinion The bending torsional deformation of the shaft is calculated, and its maximum bending deformation σb is calculated according to the following formula:

Where: ω is the unit tooth width load; E is the modulus of elasticity; L is the span of the shaft. Maximum torsional deformation in the tooth width:

where : G is the modulus of shear elasticity.
The bending and torsion combination deformation is calculated from equations ( 4 ) — ( 5) as shown in Figure 3, and the helix modification is the specular curve of the comprehensive deformation curve. From the comprehensive deformation curve, the maximum deformation σ of the torque input can be seen
is 47 μm, and its theoretical maximum modification is the maximum deformation, and the minimum deformation is 20 μm. The modification principle is shown in Figure 4, the tooth surface between the tooth end I and the tooth end II is uniformly removed according to the modification curve, so that the helix is in the correct position when the gear is subjected to load meshing, where the CHB of the tooth end II is the maximum modification amount.
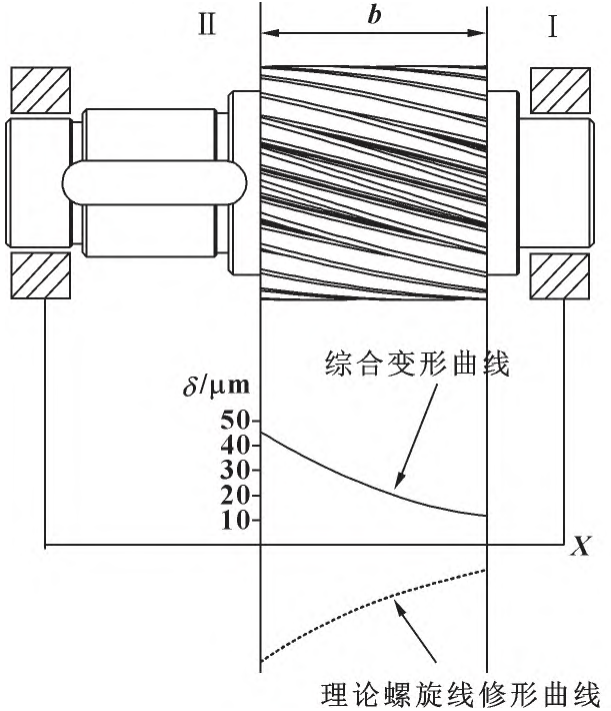
Fig. 3 Comprehensive deformation of the small helical gear shaft
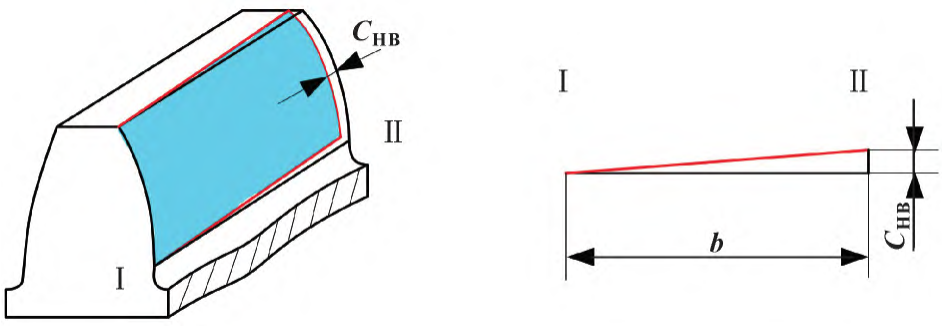
Figure 4 Spiral modification principle
2.2 Involute tooth profile modification
The gear pair is elastically deformed due to the load of the gear teeth during the meshing process, and the coincidence degree of the gear is not an integer, and single tooth meshing and double tooth meshing will occur in the gear meshing process. Due to the elastic deformation of the load
In addition, thermal deformation and machining errors will interfere at alternating points, and the stiffness of the gear will also change, even under ideal conditions where the power source and workload do not fluctuate, the internal load will change. Alternately meshing of single and double tooth pairs and gear joint error are the leading causes of meshing and meshing These two factors directly affect the vibration and noise of the gear and smooth operation Sex. The gear pair meshing principle is shown in Figure 5.
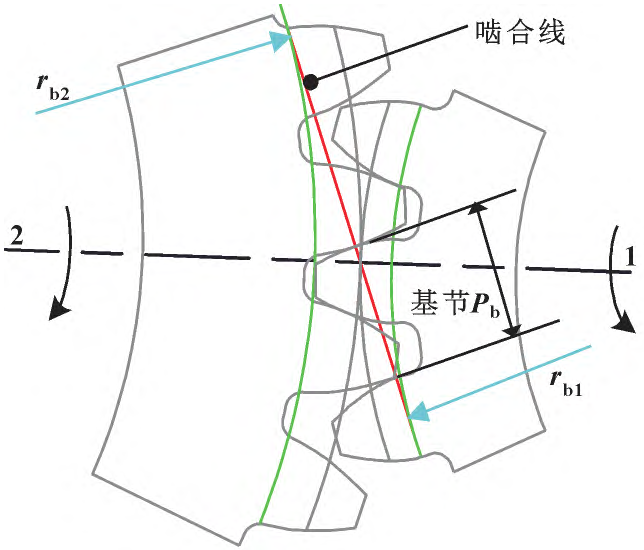
Figure 5 Gear pair meshing principle
Pb is the actual base joint when the gear meshes, when the actual base section of the drive wheel 1 is larger than the actual base joint of the driven wheel 2, a meshing impact will occur, and the top edge of the driven wheel will scrape the tooth surface oil film and even the teeth of the active wheel
Face. Conversely, when the actual base section of driven wheel 2 is greater than the actual base section of drive wheel 1, the gear will produce a meshing impact. Tooth profile modification is to cut off part of the interfering part of the gear teeth of the gear teeth of the phase meshing, and the load on the meshing line will change from sudden change to gradient after the tooth top is trimmed, so that the meshing and meshing impact can be eliminated, improve the stability of operation, and help to compensate for the eccentricity load at the tooth top and the tooth root of the phase meshing gear, improve the bearing capacity, protect the lubricating oil film from being damaged, and improve the anti-gluing ability under heavy load. Since the gear teeth of the helical gear of the output shaft enter the meshing from the tooth root at one end and exit the meshing by the tooth top of the other tooth end, in order to ensure the bending strength of the tooth root, the tooth top of the two helical gears is trimmed at the same time, and the tooth root is not trimmed. The elastic deformation caused by the contact deformation, shear deformation, bending deformation, tooth root deformation and other elastic deformation caused by the load of the gear tooth is related to the load of the gear tooth and the meshing stiffness of the gear tooth, which can be determined by The following equation calculates the tooth profile deformation δa …

The amount of deformation caused by base joint error and tooth profile deviation is Δm:

Where: Base section error fpb = 16. 83 μm, tooth profile shape deviation
ff = 19 μm。 If the base joint error and tooth profile deviation are superimposed on each other, the maximum modification amount:

From equation ( 6) ( 7) ( 8), the maximum amount of modification is 28. 78 μm。 The tooth profile modification curve is shown in Figure 6, where L is the trim length, the helix angle of the output shaft helical gear pair is small, the trim length adopts short trimming, the trimming curve is parabola, the maximum trimming amount is δmax, if the base joint error and tooth profile deviation and deformation can be completely offset then no trimming is required, so the lower limit of tooth profile trimming is 0 μm.
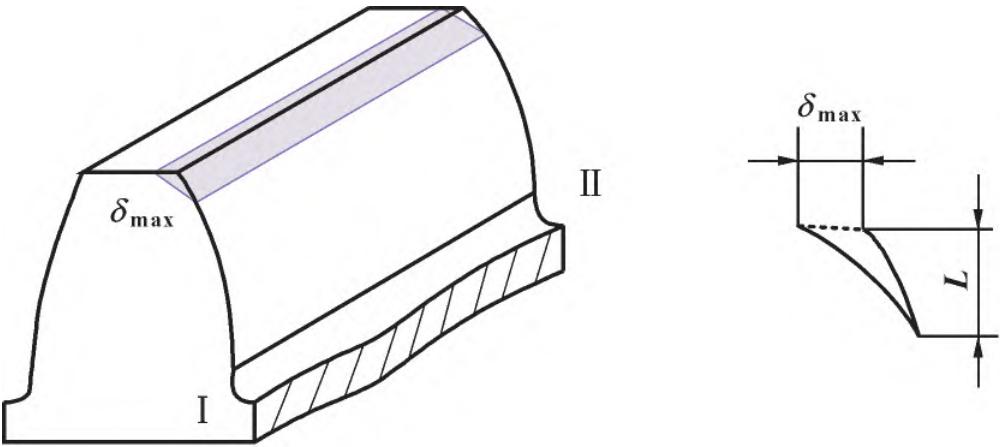
Figure 6 Tooth profile modification curve
3 Design optimization
Take the calculated maximum amount of shape modification as the optimization parameter, by ROMAX
The full factorial method was used for parameter optimization to select the optimal amount of shape modification.
Full-factor design optimization allows all combinations of all levels of all factors to be calculated at once, so that all the interactions of the order can be estimated. The design factors are the drum shape modification amount, spiral line modification amount and tooth top trimming amount of the left tooth surface of the small helical gear, according to the above theoretical calculation
The range of these three factors can be calculated as shown in Table 2.
Table 2 Theoretical modification range

The number of levels for each factor is 15, for a total of 153 modification combinations. In the ISO standard, the tooth surface load distribution coefficient KHβ is used to describe the tooth direction load distribution problem, and the root bending strength load distribution coefficient KFβ is used to evaluate the influence of the tooth width load distribution on the tooth root bending stress. Over here
The tooth load distribution coefficient KHβ and the root bending strength load distribution coefficient KFβ under the reverse working condition were used as the optimization targets, and the target range made the tooth load distribution coefficient KHβ ∈ ( 1. 10,1. 20) and the flexural strength load distribution coefficient KFβ∈ ( 1. 10,1. 20). Optimization scenarios were calculated to produce 3 375 options, and the top 10 best options were selected based on weight values, as shown in Table 3. It can be seen that the optimization target value of these 10 scenarios is almost one
Shape. By comparing these 10 schemes, the optimal modification parameters are obtained as shown in Table 4 by comparing each modification quantity to the integer proximity principle.
Table 3 10 Candidate Schemes for Forming
| 候选 方案 | 齿向斜 度/μm | 齿向鼓形 量/μm | 齿顶修缘 量/μm | KHβ | KFβ |
| 1 371 | 36.43 | 6.07 | 5.36 | 1.1 | 1.089 |
| 549 | 32.14 | 11.43 | 3.57 | 1.1 | 1.089 |
| 2 562 | 41.79 | 10.36 | 11.79 | 1.1 | 1.089 |
| 285 | 31.07 | 8.21 | 22 | 1.1 | 1.089 |
| 292 | 31.07 | 9.29 | 6.43 | 1.1 | 1.089 |
| 328 | 31.07 | 11.43 | 3.26 | 1.1 | 1.089 |
| 1 672 | 37.5 | 11.43 | 6.43 | 1.101 | 1.089 |
| 1 898 | 38.57 | 11.43 | 7.5 | 1.101 | 1.089 |
| 2 352 | 40.71 | 11.43 | 11.79 | 1.101 | 1.089 |
| 2 561 | 41.79 | 10.36 | 10.71 | 1.101 | 1.09 |
Table 4 Optimal reshaping schemes

The shape curve is generated according to the best shape parameters obtained, and the comprehensive shape curve of the tooth direction is shown in Figure 8. It can be seen that the maximum modification amount is 0 mm at the left end of the width of the small helical gear tooth, that is, at the tooth end II of the small helical gear, and the maximum modification value is 49 μm, which is the spiral modification amount and tooth direction The superposition of the drum shape modification amount shows that the curve of the actual tooth direction modification and the theoretical spiral modification curve are roughly the same. The actual shape modification curve of the tooth profile is shown in Figure 9, the actual maximum modification amount of the tooth profile is located at the rolling angle of 40°, that is, at the top of the left tooth surface of the small helical gear, and its modification parameter is 3μm, while the theoretical maximum modification amount is 28 μm, because the tooth profile deformation may have error compensation for the base joint error and the tooth profile shape deviation, so that the actual modification amount is less than the theoretical maximum modification amount.

Figure 8 Tooth direction comprehensive modification curve

Figure 9 Tooth profile modification curve
4 Comparison before and after revision
Microgeometric contact analysis was performed on the gear before remodeling, and the stress distribution of gear roots before reshaping is shown in Figure 10. It can be seen that the root stress of the comprehensive rolling tooth before modification is concentrated at the tooth width 0 ~ 20 mm. Simulation application of the best modification results, the stress division of the tooth root after modification
The cloth is shown in Figure 11: The root stress after modification is dispersed over the entire tooth width, and the maximum principal force is 362. 1 MPa down to 204. 3MPa, indicating that the tooth top trimming also improves the stress of the tooth root of the meshing gear. The distribution of tooth surface load before modification is shown in Figure 12, which can be seen: The tooth surface load is mainly distributed at the tooth width 0 ~ 30 mm, and the maximum load per unit length when the gear just enters meshing, reaching 522N/mm, and the entire tooth surface has serious eccentric load phenomenon. The modified tooth surface contact spot is shown in Figure 13, and it can be seen that: The tooth surface load is evenly distributed over the entire tooth surface, the maximum unit length load is 218 N/mm, located at the midpoint of the tooth width, and the load at both the meshing and meshing sites is small.

Figure 10 Root stress before reshaping
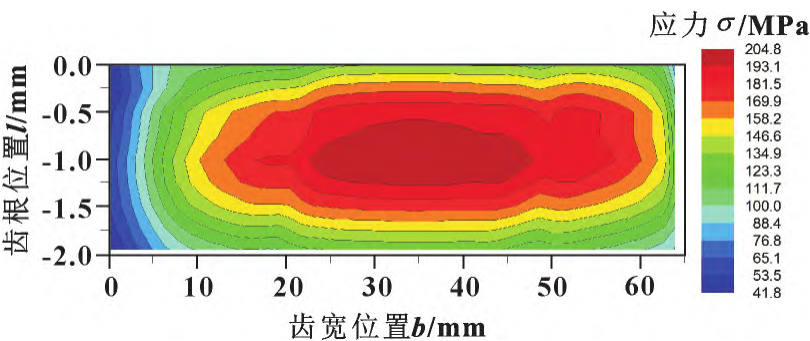
Figure 11 Tooth root stress diagram after modification

Figure 12 Load spot before remodeling

Figure 13 Load spot after modification
The transmission error on the rolling angle before and after shaping is shown in Figure 14: The transmission error before shaping is 1. 43 μm, the transmission error after modification is 0. 35 μm。 The reduction of transmission error indicates that the mechanical excitation of the gear will be reduced, so that the vibration performance of the reducer can be improved to a certain extent.
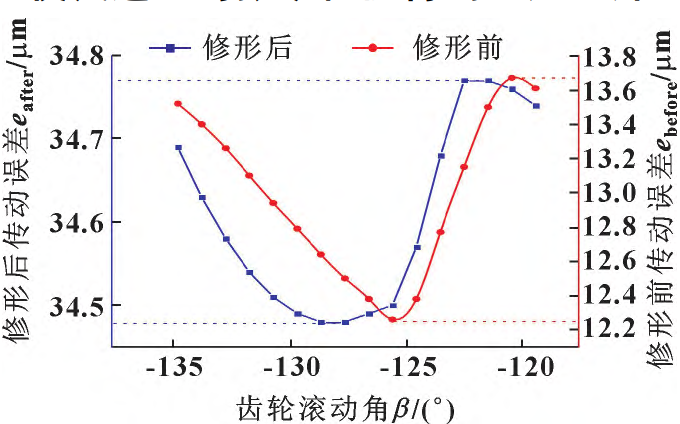
Figure 14 Transmission error at rolling angles before and after remodeling
A virtual sensor is arranged on the surface of the box, and the extracted transmission error excitation is applied to the box, and the acceleration response of the box surface can be obtained. Under the full load reversal condition, the acceleration before and after modification is measured from the different speeds of the helical gear shaft is shown in Figure 15: When the helical gear shaft speed is 0~ 240 r/min, the vibration response of gear excitation to the box is not large, and the improvement of the vibration response of gear modification is not obvious; When the rotational speed From 240 r/min to a maximum speed of 382 r/min, it is fully modified The rear gearbox surface acceleration response is significantly improved at the highest At a speed of 382 r/min, the surface acceleration of the box before modification is 0. 045 m/s2, the surface acceleration of the box after modification is 0. 024 m/s2。
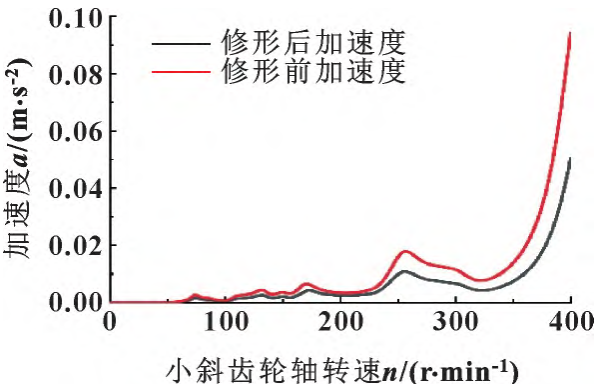
Figure 15 Acceleration response at different rotational speeds before and after remodeling
5 Conclusion
After comprehensively considering the factors affecting gear meshing, the combination of determining the range of modification quantity through theoretical calculation and optimizing the design by full factor method can quickly determine the combination of optimal modification quantity. The gear transmission difference after comprehensive modification is 0. 35 μm, 75 μm lower than before contouring. 5%;
After optimization, the maximum acceleration response of the box surface is 0. 024 m/s2, phase
47% lower than before optimization. 8%; The optimized maximum load per unit length of the tooth surface is 218 N/mm, which is 58 lower than before. 2%, indicating that the gear tooth surface load distribution after comprehensive modification is more uniform, and the mechanical excitation generated by gear meshing is smaller, which can effectively improve the dynamic characteristics of the gear and have a certain reference role in reducing the uneven distribution of the tooth surface load and improving the stability of the transmission.
