
In my professional practice of designing power transmission systems, I frequently encounter the need for reliable, compact, and high-ratio speed reducers. Among the various types, the worm gear reducer, or more precisely, the screw gear drive, holds a special place for its unique capabilities. The distinct geometry of screw gears provides unmatched speed reduction ratios in a single stage and inherent self-locking characteristics under certain conditions. However, the design process for these components is intricate, governed by complex geometric interdependencies. Traditionally, modifying a single design parameter necessitated laborious manual recalculations and redrawing, a process prone to error and inefficiency. To overcome this, I have developed and refined a hybrid parametric design workflow that leverages the complementary strengths of two industry-standard software packages: SolidWorks for three-dimensional parametric modeling and assembly simulation, and AutoCAD for the meticulous detailing and finalization of two-dimensional manufacturing drawings. This methodology not only accelerates the design cycle but also enforces consistency and enables rapid design iteration, which is crucial for customizing screw gears for specific applications.
1. Theoretical Foundations of Screw Gears
The design of a worm and worm wheel, collectively known as screw gears, is rooted in their specialized geometry. Unlike parallel-axis gears, screw gears operate on non-intersecting, typically perpendicular, axes. The worm is essentially a screw thread, and the worm wheel is a gear designed to mesh with it. The key to their successful operation lies in the precise definition of several interrelated parameters.
The primary geometric parameters defining a worm include the axial module (\(m_x\)), the number of threads or starts (\(z_1\)), the pitch diameter (\(d_1\)), and the lead angle (\(\gamma\)). The lead angle is critical as it determines the efficiency and potential for self-locking. It is calculated from the lead (\(L\)), which is the axial distance the worm thread advances in one complete revolution:
$$
L = \pi \cdot m_x \cdot z_1
$$
$$
\gamma = \arctan\left(\frac{L}{\pi \cdot d_1}\right) = \arctan\left(\frac{m_x \cdot z_1}{d_1}\right)
$$
The worm wheel, with its number of teeth (\(z_2\)), must be generated using a hob cutter that is virtually identical to the mating worm. Its pitch diameter (\(d_2\)) is given by:
$$
d_2 = m_x \cdot z_2
$$
The center distance (\(a\)), a fundamental housing dimension, is then:
$$
a = \frac{d_1 + d_2}{2}
$$
The transmission ratio (\(i\)) is simply the ratio of the number of teeth on the worm wheel to the number of threads on the worm, offering a simple way to achieve high reductions:
$$
i = \frac{z_2}{z_1}
$$
These formulas are not isolated; changing the module (\(m_x\)) affects the pitch diameters, center distance, and tooth strength. Adjusting the number of worm threads (\(z_1\)) alters the lead angle, efficiency, and transmission ratio. A parametric model must encapsulate these relationships so that a change in one driving parameter automatically propagates through the entire assembly. The table below summarizes the core interdependent parameters for a set of screw gears.
| Parameter | Symbol | Relationship / Formula | Primary Influence |
|---|---|---|---|
| Axial Module | \(m_x\) | Fundamental scaling factor | Tooth size, strength, center distance |
| Number of Worm Threads | \(z_1\) | Driver for ratio and lead angle | Transmission ratio (\(i\)), efficiency, lead (\(L\)) |
| Number of Wheel Teeth | \(z_2\) | \(z_2 = i \cdot z_1\) | Transmission ratio, wheel size |
| Worm Pitch Diameter | \(d_1\) | Often chosen from empirical ratios (\(q = d_1 / m_x\)) | Stiffness, lead angle (\(\gamma\)), center distance |
| Wheel Pitch Diameter | \(d_2\) | \(d_2 = m_x \cdot z_2\) | Center distance, overall reducer size |
| Lead Angle | \(\gamma\) | \(\gamma = \arctan(m_x \cdot z_1 / d_1)\) | Mesh efficiency, self-locking tendency |
| Center Distance | \(a\) | \(a = (d_1 + d_2) / 2\) | Housing size, shaft positioning |
2. Three-Dimensional Parametric Modeling in SolidWorks
The first and most dynamic phase of my workflow takes place entirely within SolidWorks. The power of this environment lies in its feature-based, parametric modeling engine, which allows me to define geometry through dimensions and logical relations rather than static shapes.
2.1 Establishing the Parametric Framework
Before sketching a single circle, I define the global parameters. This is typically done using the Equations feature in SolidWorks. I create a list of named variables for all critical dimensions derived from the theoretical calculations. For a screw gear set, this list includes: `Module_mx`, `Worm_Threads_Z1`, `Wheel_Teeth_Z2`, `Worm_Pitch_Dia_d1`, `Center_Distance_a`, and so on. Crucially, I input the formulas linking these parameters directly into the Equations manager. For example, I would define `Wheel_Pitch_Dia_d2` as `= “Module_mx” * “Wheel_Teeth_Z2″`. Similarly, I might define the housing bore locations as functions of the `Center_Distance_a`. This setup ensures that the entire assembly is driven from a master parameter set—changing the module or the number of threads triggers a cascade of updates throughout every related part.
2.2 Feature-Based Modeling of Components
With the parameters defined, I begin constructing the individual parts. The process for each major component follows a logical sequence of features.
Worm Shaft Modeling: I start the worm with a sketch for the shaft core, extruding it. The helical thread is the critical feature. I create a profile sketch of the tooth shape (trapezoidal for an Acme thread, involute-based for a more optimized tooth form) on a plane perpendicular to the axis. Then, I use the Helix and Spiral feature to define the path. The key here is to parametrically control the helix pitch, which is equal to the lead \(L = \pi \cdot m_x \cdot z_1\). I set the pitch value by linking it to the global equation `= pi * “Module_mx” * “Worm_Threads_Z1″`. Finally, a Sweep feature combines the profile and the helix to create the solid thread. This approach guarantees that any change to `Module_mx` or `Worm_Threads_Z1` will correctly regenerate the worm’s geometry.
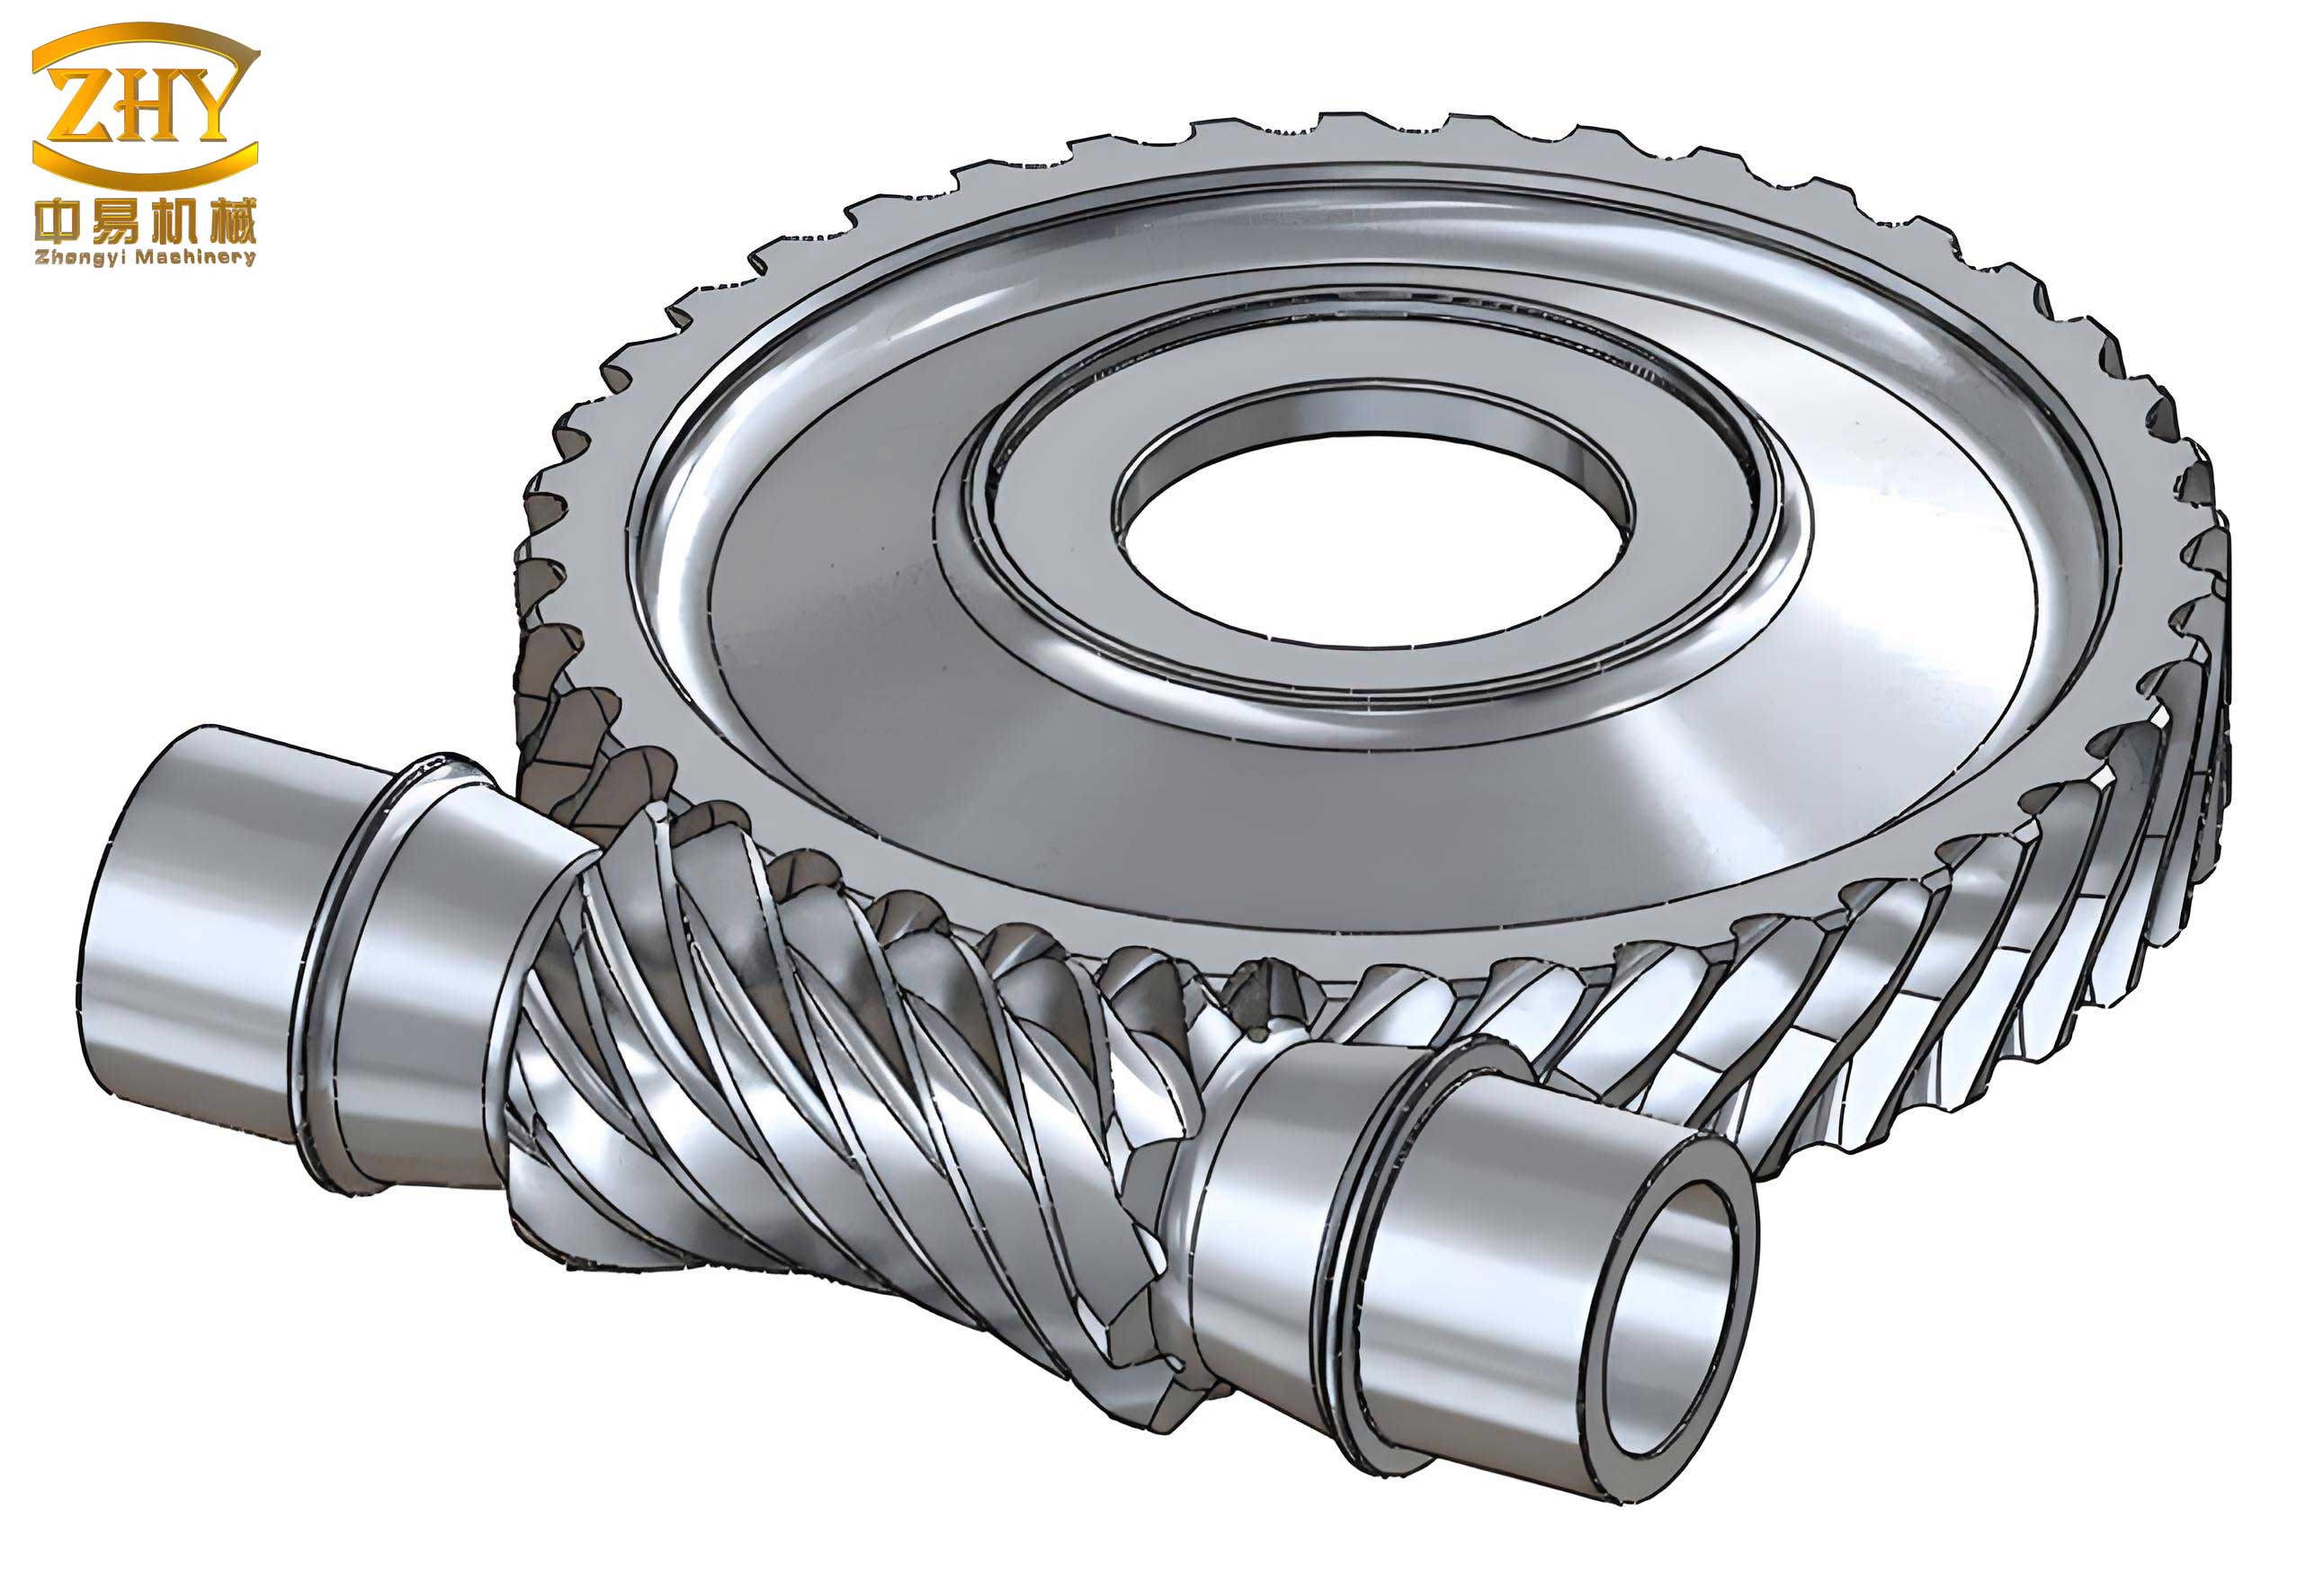
Worm Wheel Modeling: Modeling the worm wheel realistically requires simulating the gear generation process. I first create a blank wheel body with a bore and web. For the tooth geometry, I use a specialized approach. One effective method is to create a worm-shaped “tool body” (a negative of the worm thread) using the same parametric helix and sweep, but configured as a cutter. I then position this tool body correctly relative to the wheel blank, oriented at the proper shaft angle, and use the Combine feature with the Subtract operation to cut the tooth spaces into the blank. While this is computationally intensive, it creates a highly accurate geometric representation of the enveloping action characteristic of screw gears. For simpler models, a swept cut using a profile along a circular path can suffice, though it is less accurate.
Housing (Upper and Lower Casing) Modeling: The housing is built around the gearset. I begin with the lower casing. Key sketches are driven by the global parameters: the distance between bearing bore centers is linked to the `Center_Distance_a`, and the bore diameters are linked to the bearing seat dimensions (which themselves depend on shaft sizes). I use a series of Extrude (both boss and cut), Fillet, Rib, and Shell features to create the hollow, reinforced structure. The mating flanges, bolt patterns, and sealing grooves are added using Extruded Cuts and Circular Patterns. The upper casing is often modeled in the context of the assembly by deriving it from the lower casing to ensure perfect alignment of all features.
2.3 Virtual Assembly and Interference Analysis
Once the major components are modeled, I create a new SolidWorks Assembly document. I insert the lower housing as the first component, which is fixed in space. I then insert the worm shaft assembly (worm shaft, bearings, seals) and the worm wheel assembly. The power of parametric modeling shines here. I apply standard Mates (concentric, coincident, distance) to position the shafts correctly within their bearing bores. The most important mate for functionality is the Gear Mate. I apply this advanced mate between the worm and the worm wheel, defining the gear ratio as the ratio of teeth (\(z_2 : z_1\)). This mate does not physically enforce tooth contact geometry but establishes the correct rotational kinematic relationship for simulation purposes.
With the assembly fully constrained, I can use the Interference Detection tool to check for any unintended clashes between components—a vital step before committing to manufacturing. Furthermore, I can create an Exploded View to visually document the assembly sequence and generate parts lists automatically. This virtual prototyping eliminates costly physical assembly errors.
2.4 Dynamic Simulation and Basic Analysis
While not a full replacement for dedicated FEA software, SolidWorks offers basic motion analysis capabilities. Using the Motion Study tab, I can apply a rotary motor to the worm shaft and simulate the rotation of the entire screw gear drive. This allows me to visually verify the smoothness of the mesh (checking for jerky motion that might indicate modeling errors) and to graph output speed vs. input speed to confirm the reduction ratio. For stress analysis, I can use the integrated Simulation module to apply approximate loads to the housing or shafts, providing a first-pass check on the structural adequacy of the design, though detailed tooth contact stress analysis requires more specialized tools.
3. Two-Dimensional Drawing Detailing in AutoCAD
While SolidWorks excels at 3D creation and associative drafting, the final, deliverable manufacturing drawings often require a level of graphical control, detailing, and annotation style that is more efficiently achieved in AutoCAD. This is the second stage of my hybrid workflow.
3.1 Exporting Views from SolidWorks
Within SolidWorks, I generate a standard drawing file (.SLDDRW) for each critical part and for the overall assembly. I place the necessary views: front, top, side, detailed sections, and isometric. I also add parametric dimensions that are driven from the model—these will carry over. For the assembly, I include a Bill of Materials (BOM) table and balloon annotations. Once the basic views are laid out, I save this drawing file and then export it. The most reliable format for transfer to AutoCAD is the DWG format. During export, I carefully map SolidWorks layers, line styles, and fonts to their closest AutoCAD equivalents.
3.2 The Power of AutoCAD for Final Detailing
Opening the exported DWG file in AutoCAD reveals the transferred views, but they often require refinement. This is where AutoCAD’s unparalleled precision and editing tools become indispensable.
- Geometry Cleanup: Exported views can contain duplicate lines, broken tangencies, or overlapping geometry. I use commands like OVERKILL, TRIM, EXTEND, and PEDIT to clean up the geometry, ensuring lines are continuous and views are unambiguous for the machinist.
- Annotation Standardization: I enforce company or international drafting standards. I create and apply specific Dimension Styles (DIMSTYLE) for tolerances, surface finish symbols, and geometric dimensioning and tolerancing (GD&T). Adding feature control frames for critical datums on the worm shaft or wheel bore is straightforward in AutoCAD.
- Detailing and Sectioning: Creating complex, non-associative detail views or broken-out sections to highlight specific features (e.g., the tooth profile root fillet, or a lubrication channel) is often faster and more flexible in AutoCAD’s 2D environment.
- Sheet Layout and Title Block Management: I set up layout space (paper space) with multiple viewports, controlling scale independently for each. I insert a standardized title block with attributes, revision tables, and notes. Managing multi-sheet drawing sets for a complete reducer package is more streamlined in AutoCAD.
The table below contrasts the roles of SolidWorks and AutoCAD in the final drawing production stage.
| Task | SolidWorks (Drawing Module) | AutoCAD (Post-Processing) | Rationale for AutoCAD Use |
|---|---|---|---|
| View Generation | Primary: Creates base associative views from 3D model. | Secondary: Can create detail/custom views from imported geometry. | SolidWorks is optimal for initial, accurate view projection. |
| Dimensioning | Adds parametric, model-driven dimensions. | Edits, adds non-associative dims, applies standard styles & GD&T. | AutoCAD offers superior control over annotation appearance and standards compliance. |
| Geometry Editing | Limited; requires model change. | Extensive: Cleanup, simplification, 2D embellishment. | Direct 2D manipulation is faster for minor drawing adjustments unrelated to model integrity. |
| Sheet & Layout Management | Basic sheet formats and BOM. | Advanced: Multi-sheet sets, viewport control, title block libraries. | AutoCAD’s layout/paper space system is more mature for complex, multi-page drawing sets. |
4. Advanced Parametric Applications and Scripting
To push the efficiency of designing screw gears further, I incorporate advanced parametric techniques and automation.
4.1 Design Tables and Configurations
For creating families of similar reducers (e.g., a series with different center distances or ratios), I use SolidWorks Design Tables. An Excel spreadsheet is embedded into the part or assembly file, with columns for key parameters (`Module_mx`, `z1`, `z2`, `Housing_Length`, etc.). Each row in the table represents a unique configuration of the reducer. By switching rows, I instantly generate a new, valid variant of the entire assembly. This is incredibly powerful for standard product lines based on a common screw gear platform.
4.2 Macro and API Scripting
For highly repetitive tasks, I utilize SolidWorks API (Application Programming Interface) via VBA macros or standalone scripts. A macro could automate the entire process: prompting the user for input parameters (module, ratio, center distance), performing the underlying calculations, generating the worm and wheel parts, assembling them into a housing, and even initiating the export to DWG. Similarly, in AutoCAD, AutoLISP scripts can automate the drawing cleanup, layer management, and standard annotation placement. This level of automation transforms the parametric model into a true design generator for screw gears.
5. Conclusion
The hybrid parametric design methodology, synergizing SolidWorks and AutoCAD, has fundamentally transformed my approach to engineering worm gear reducers. SolidWorks provides the essential, intelligent 3D parametric foundation where the complex, interdependent geometry of screw gears is captured and managed logically. It enables robust virtual prototyping, interference checking, and dynamic simulation. AutoCAD then serves as the high-precision finishing workshop for the 2D documentation, where draughting standards are enforced, geometry is perfected, and professional manufacturing drawings are produced. This workflow is not a compromise but a strategic integration of best-in-class tools. It dramatically reduces development time, minimizes errors from manual translation, and provides the flexibility needed to quickly adapt designs to new requirements. For any engineer serious about the efficient and reliable design of screw gear systems, mastering this parametric bridge between 3D modeling and 2D detailing is an invaluable competency.