
In the field of mechanical transmission, worm gears are widely recognized for their ability to transmit motion and power between non-intersecting, perpendicular shafts. The distinct advantages of worm gears—such as high single-stage reduction ratios, smooth and quiet operation, compact structural design, and self-locking capability—make them indispensable in numerous industrial applications, including elevators, conveyor systems, hoists, and precision machinery. However, the traditional manual design process for worm gears is labor-intensive, error-prone, and time-consuming, especially when multiple iterations of calculation and verification are required. To address these limitations, I have developed a parametric design system for worm gears using SolidWorks as the modeling platform and Visual Basic (VB) as the programming tool for secondary development. This system automates the design, verification, and three-dimensional (3D) modeling of worm gears, significantly improving efficiency and accuracy while reducing the product development cycle.
1. Determination of System Parameters and Material Selection
The design of a worm gear transmission begins with the identification of essential input parameters that uniquely define the final geometric dimensions of the system. These parameters are not arbitrary; they must be selected based on the specific operating conditions and material properties. The key input parameters include:
- Load condition (uniform, moderate shock, heavy shock)
- Transmission type (open or closed)
- Input power (kW)
- Worm rotational speed (rpm)
- Transmission ratio
- Expected efficiency and service life
Material selection for worm gears is critical to ensure wear resistance, anti-galling properties, and sufficient fatigue strength. Typically, the worm is made from hardened steel (carburized, through-hardened, or nitrided) while the worm wheel uses bronze or cast iron to form a compatible friction pair. Table 1 summarizes common materials for worm and worm wheel.
| Component | Material | Heat Treatment | Typical Application |
|---|---|---|---|
| Worm | Alloy steel (e.g., 20CrMnTi, 40Cr) | Carburizing & quenching / Nitriding | High-speed, heavy-load transmissions |
| Worm | Carbon steel (e.g., 45 steel) | Surface hardening or tempering | Moderate-load, moderate-speed applications |
| Worm wheel | Cast tin bronze (e.g., ZCuSn10P1) | — | High sliding speed, continuous duty |
| Worm wheel | Cast aluminum-iron bronze (e.g., ZCuAl10Fe3) | — | Low-speed, heavy-load, lower cost |
| Worm wheel | Gray cast iron (e.g., HT250) | — | Light-load, intermittent operation |
The failure modes of worm gears differ from those of spur or helical gears due to the high sliding velocity between the worm thread and wheel tooth. The primary failure modes are:
- Pitting fatigue
- Scoring and wear
- Tooth breakage (especially on the worm wheel)
- Thermal failure (scuffing)
Because the worm wheel is usually the weaker element, the design process focuses on preventing failure on the wheel side. For closed transmissions (lubricated enclosures), the governing failure modes are pitting and scoring; therefore, the design is based on contact fatigue strength of the worm wheel tooth flank, followed by a check on bending fatigue strength and worm shaft rigidity. For open transmissions (dry or poorly lubricated), wear and tooth breakage are dominant, so bending strength of the worm wheel tooth is used as the primary criterion, with contact stress and shaft rigidity as secondary verifications.
2. Design Procedure and Calculation Formulas
The parametric design flow for closed worm gear transmissions is illustrated in the following steps (the accompanying figure is inserted below). The design process integrates iterative calculation of geometric parameters, strength verification, and final output of dimensions.
The key parameters to be determined include:
- Center distance \( a \)
- Module \( m \)
- Pitch circle diameter of worm \( d_1 \) and worm wheel \( d_2 \)
- Number of threads on worm \( z_1 \) and number of teeth on worm wheel \( z_2 \)
- Pressure angle \( \alpha \) (typically 20°)
- Lead angle \( \gamma \)
- Face width of worm wheel \( b_2 \)
- Length of worm threaded portion \( L \)
2.1 Contact Fatigue Strength Design (Closed Transmissions)
The initial center distance \( a \) is estimated using the Hertz contact stress formula for worm gears:
$$ a \geq \left( \frac{Z_E Z_\rho}{\sigma_{H\text{lim}}} \right)^2 \frac{KT_2}{a} $$
where:
- \( Z_E \) = elastic coefficient (depends on materials)
- \( Z_\rho \) = contact geometry factor (function of lead angle and pressure angle)
- \( \sigma_{H\text{lim}} \) = allowable contact stress for worm wheel material (MPa)
- \( K \) = load factor (includes overload, dynamic, distribution factors)
- \( T_2 \) = torque on worm wheel (N·mm)
After determining the center distance \( a \), the module \( m \) and worm pitch diameter \( d_1 \) are selected from standard values listed in Table 2.
| Module \( m \) | 2.5 | 3.15 | 4 | 5 | 6.3 | 8 | 10 |
|---|---|---|---|---|---|---|---|
| \( d_1 \) | 28, 31.5, 35.5 | 35.5, 40, 45 | 45, 50, 56 | 56, 63, 71 | 71, 80, 90 | 90, 100, 112 | 112, 125, 140 |
From the selected \( m \) and \( d_1 \), the lead angle \( \gamma \) is computed as:
$$ \tan \gamma = \frac{z_1 m}{d_1} $$
where \( z_1 \) is the number of worm threads (usually 1, 2, or 4 for high reduction). The worm wheel number of teeth is \( z_2 = i \cdot z_1 \) where \( i \) is the transmission ratio.
2.2 Geometry of Worm and Worm Wheel
The key geometric dimensions for an Archimedean (ZA) worm are:
- Addendum circle diameter: \( d_{a1} = d_1 + 2 m \)
- Dedendum circle diameter: \( d_{f1} = d_1 – 2.4 m \)
- Length of threaded portion: \( L \approx (11 + 0.06 z_2) m \) for \( z_1=1 \) or \( 2 \); for \( z_1=4 \), \( L \approx (12.5 + 0.09 z_2) m \)
For the worm wheel:
- Pitch circle diameter: \( d_2 = m z_2 \)
- Addendum circle diameter: \( d_{a2} = d_2 + 2 m \)
- Dedendum circle diameter: \( d_{f2} = d_2 – 2.4 m \)
- Throat diameter (largest diameter of wheel): \( d_{a2} + 2m \) (approximately)
2.3 Strength Verification
After the preliminary dimensions are obtained, the system performs a bending strength check for the worm wheel tooth root:
$$ \sigma_F = \frac{2 K T_2 Y_{Fa} Y_{Sa}}{b_2 m^2 z_2} \leq [\sigma_F] $$
where \( Y_{Fa} \) and \( Y_{Sa} \) are tooth form and stress correction factors, and \( b_2 \) is the wheel face width (approximately \( 0.75 d_{a1} \)).
Additionally, the worm shaft rigidity must be verified to prevent excessive deflection that could cause misalignment. The maximum deflection \( \delta \) at the midpoint of the worm shaft is:
$$ \delta = \frac{F_t L^3}{48 E I} \leq 0.01 m $$
where \( F_t \) is the tangential force on the worm, \( E \) is the modulus of elasticity, and \( I \) is the moment of inertia of the worm shaft cross-section.
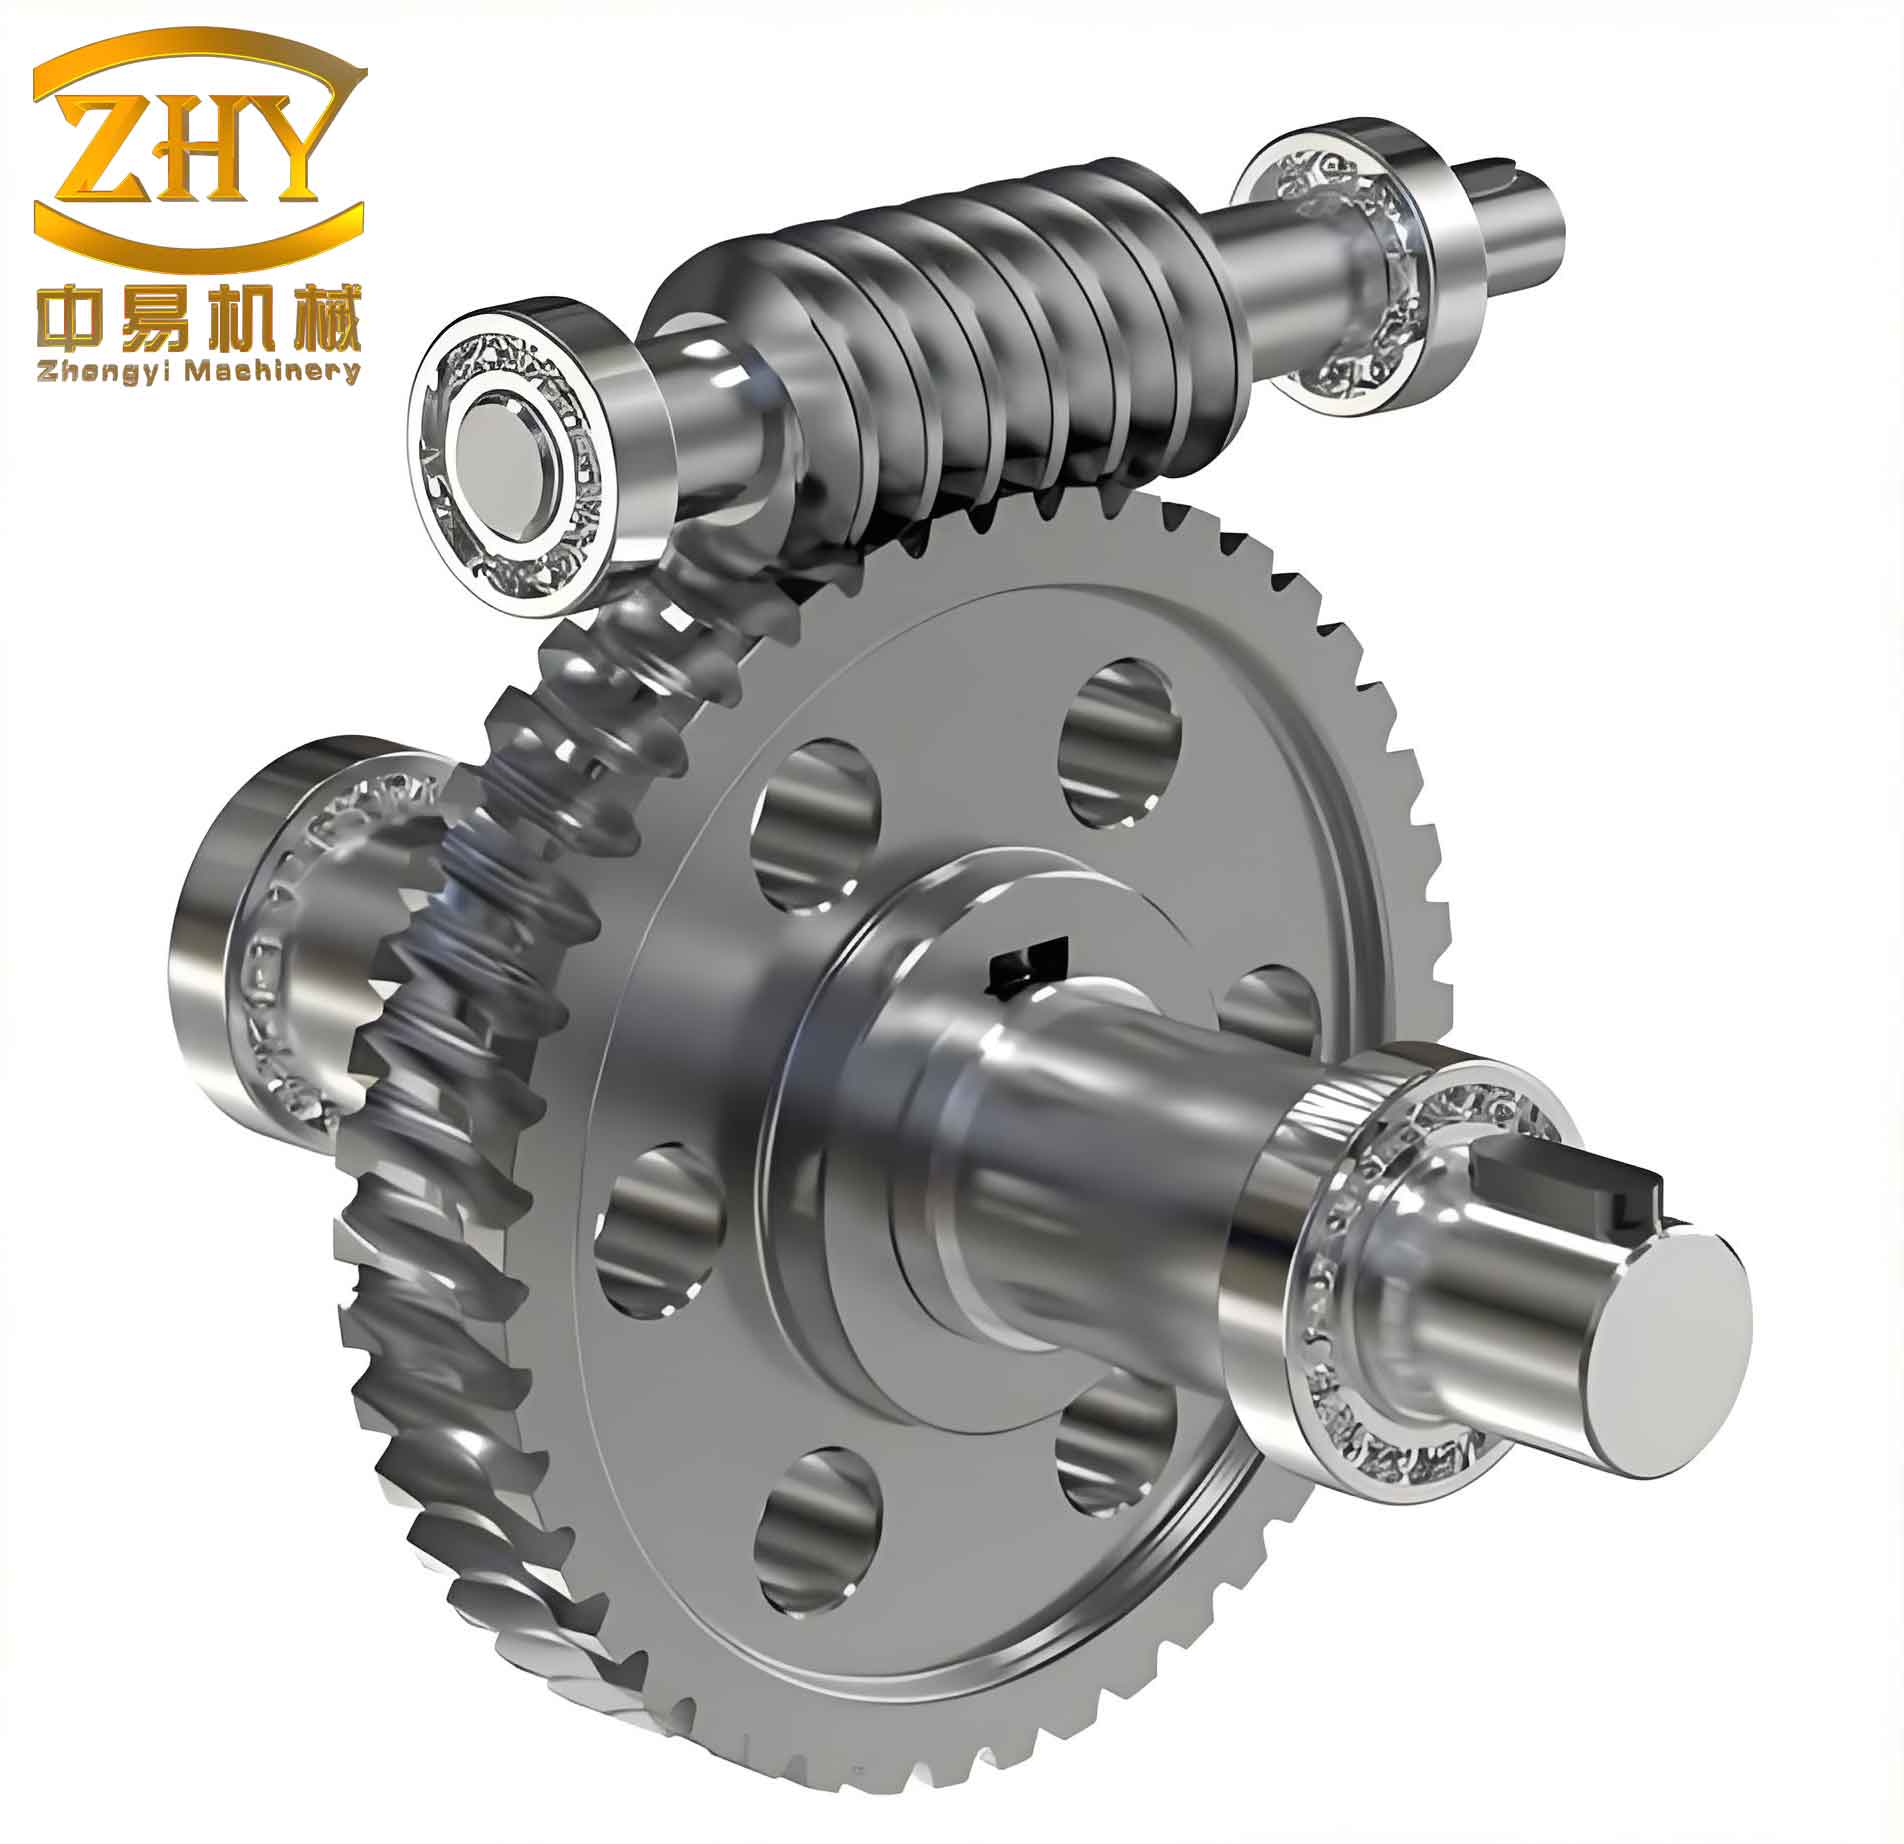
3. Parametric Modeling of Worm Gears Using SolidWorks API
To automate the 3D modeling of worm gears, I developed a VB program that interfaces with SolidWorks via its API (Application Programming Interface). The program reads the verified geometric parameters and generates the worm and worm wheel models step by step using feature-based modeling commands.
3.1 Worm Parameterized Modeling
The Archimedean worm thread is formed by sweeping a trapezoidal tooth profile along a helical path. The cross-section of the tooth groove is defined by four points as shown in the mathematical model (coordinates relative to the axial plane):
| Point | X coordinate | Y coordinate |
|---|---|---|
| 1 (tooth tip – left) | \( -p_x/4 + (d_{a1} – d_1)\tan\alpha \) | \( d_{a1}/2 \) |
| 2 (tooth root – left) | \( -p_x/4 + (d_{f1} – d_1)\tan\alpha \) | \( d_{f1}/2 \) |
| 3 (tooth root – right) | \( p_x/4 – (d_{f1} – d_1)\tan\alpha \) | \( -d_{f1}/2 \) |
| 4 (tooth tip – right) | \( p_x/4 – (d_{a1} – d_1)\tan\alpha \) | \( -d_{a1}/2 \) |
where \( p_x = \pi m \) is the circular pitch (axial pitch for single-thread worm). For multi-start worms, the same profile is used but the helical sweep is repeated with a rotation offset of \( 360^\circ / z_1 \).
The modeling steps for the worm are:
- Create a cylindrical base body with diameter equal to the worm addendum circle \( d_{a1} \) and length equal to the threaded portion length \( L \).
- Construct a 3D helix curve with base circle diameter = \( d_1 \), pitch = \( z_1 p_x \) (lead), and height = \( L \).
- Sketch the trapezoidal tooth profile (as per Table 3) on a plane perpendicular to the helix axis.
- Perform a swept cut using the profile and the helix as the path to generate one thread groove.
- For multi-thread worms, apply a circular pattern around the worm axis with \( z_1 \) instances.
- Add shaft extensions (cylinders) at both ends of the threaded portion.
3.2 Worm Wheel Parameterized Modeling
The worm wheel modeling is more challenging because its teeth are curved both circumferentially and axially (hourglass shape). The tooth profile is an involute of a circle in the transverse plane, but the actual 3D geometry requires a swept cut along a helical path that matches the worm’s lead. The involute tooth profile in Cartesian coordinates is given by:
$$ x = R_b [\cos(\theta + \phi) + \theta \sin(\theta + \phi)] $$
$$ y = R_b [\sin(\theta + \phi) – \theta \cos(\theta + \phi)] $$
where:
- \( R_b = \frac{d_2}{2} \cos \alpha \) = base circle radius
- \( \theta \) = roll angle (parameter)
- \( \phi \) = half of the base tooth space angle = \( \frac{S_b}{2 R_b} \), where \( S_b \) = base circular tooth space thickness
The modeling steps for the worm wheel are:
- Create a cylindrical blank with outer diameter equal to the wheel addendum circle \( d_{a2} + 2m \) (to allow for throat relief).
- Use a revolved cut to remove material outside the throat circle (the smallest diameter of the wheel face, usually \( d_2 + m \)) to form the hourglass shape.
- Define the involute profile by generating a series of points at discrete \( \theta \) values (e.g., 0 to 30° in 0.5° steps) and fitting a spline through these points. Mirror the spline to create the opposite flank of the tooth space.
- Complete the tooth space profile by connecting the two involute curves with a root fillet and a tip arc.
- Create a helix curve with the same lead and base circle diameter as the worm (diameter = worm pitch circle \( d_1 \)).
- Perform a swept cut using the tooth space profile along the helix to remove the first tooth space.
- Circularly pattern the swept cut around the wheel axis with \( z_2 \) instances to obtain the full set of teeth.
- Add chamfers, center bore, keyway, and other finishing features.
4. Implementation and Example
Using Visual Basic 6.0, I created a user-friendly interface that integrates the design calculation, verification, and 3D modeling functions. The main interface (Fig. 4 in the original text) contains input fields for the operating parameters (power, speed, ratio, life, load factor) and output fields for the computed geometric dimensions. After entering the required data, the user clicks the “Design & Check” button to run the iterative algorithm. If the calculated dimensions pass all strength checks, the “Generate 3D Model” button becomes active. The user may also manually override any dimension and re-verify.
An example is given: design a ZA-type worm gear transmission driven by a Y-series three-phase induction motor. Input: worm shaft power \( P = 9 \text{ kW} \), worm speed \( n_1 = 1440 \text{ rpm} \), transmission ratio \( i = 57 \) (reducer), steady uniform load, unidirectional rotation, expected life 12,000 hours, 8 hours per day. The design results after calculation and verification are:
| Parameter | Symbol | Value |
|---|---|---|
| Center distance | \( a \) | 160 mm |
| Module | \( m \) | 5 mm |
| Worm pitch diameter | \( d_1 \) | 56 mm |
| Number of worm threads | \( z_1 \) | 1 |
| Worm wheel teeth | \( z_2 \) | 57 |
| Lead angle | \( \gamma \) | 5.11° |
| Worm addendum diameter | \( d_{a1} \) | 66 mm |
| Worm dedendum diameter | \( d_{f1} \) | 44 mm |
| Worm wheel pitch diameter | \( d_2 \) | 285 mm |
| Worm wheel outer diameter | \( d_{a2} \) | 295 mm |
| Worm wheel face width | \( b_2 \) | 42 mm |
| Worm threaded length | \( L \) | 68 mm |
Upon verification (contact stress \( \sigma_H = 210 \text{ MPa} \) < allowable \( 250 \text{ MPa} \); bending stress \( \sigma_F = 55 \text{ MPa} \) < allowable \( 75 \text{ MPa} \); shaft deflection \( \delta = 0.006 \text{ mm} \) < 0.01 m = 0.05 mm), the design is accepted. The VB program then calls SolidWorks API to generate the 3D models as shown in the corresponding figure (Fig. 6).
5. Conclusion
I have successfully developed a parametric design system for worm gears that automates the entire workflow from input parameter specification to final 3D solid model generation. By integrating Visual Basic with SolidWorks API, the system performs complex calculations, standard selections, and strength verifications without manual intervention. The use of parametric modeling ensures that any change in input parameters instantly updates the geometry, making iterative design easy and accurate. This system significantly reduces the design cycle time compared to traditional manual methods, eliminates human errors in calculation, and provides a solid foundation for subsequent finite element analysis, kinematic simulation, and dimensional inspection of worm gears. Future enhancements could include the addition of thermal analysis, optimization algorithms for material selection, and direct export to CAM software for manufacturing.